Task Orbit is a complete Human Resource Management System designed to simplify and automate organizational processes. It includes powerful modules such as Employee Management, Department Management, Shift Management, and Holiday Management for workforce and scheduling needs. The system supports essential HR functions like Payroll, Leave, Attendance, and Loan Management. For productivity and collaboration, it offers Project, Task, Client, and Team Management. Recruitment and performance are streamlined with Interview, Appraisal, and Designation Management. Additionally, Ticket, Reports, and Version Management ensure smooth operations and continuous improvement — making TaskOrbit HRMS a comprehensive end-to-end HR solution for modern businesses.
Task Orbit also integrates advanced AI-powered automation to further enhance efficiency and decision-making. The AI module can automatically generate detailed Project SRS documents, create professional employee CVs, build accurate employee job descriptions, and provide intelligent ticket responses or conversions. It also assists in generating important company notices and communication drafts. With these AI capabilities, Task Orbit remains future-ready and significantly reduces manual workload across HR and operational teams.
Project Information
- Project Name: Task Orbit
- Framework: Laravel (PHP)
- Database: MySQL
- Frontend: Blade, Bootstrap, jQuery, Javascript, Vite
- Version: 1.0.0
- Description: A comprehensive HRMS solution for managing employee data, attendance, payroll, leave requests, and HR-related tasks. The system also includes integrated AI features for generating project SRS documents, creating employee CVs, drafting employee job descriptions, producing automated ticket replies, and generating important company notices — enhancing productivity and reducing manual workload.
For demo purpose
Link to Demo
- Demo URL:
https://taskorbit-demo.pixelwibes.in
Login Credentials
- SuperAdmin: Email:
admin@example.com| Password:abcd1234 - HR: Email:
hr@example.com| Password:abcd1234 - Employee: Email:
employee@example.com| Password:abcd1234 - Client: Email:
client@example.com| Password:abcd1234
User Roles and Permissions
- SuperAdmin: Full system access
- Client: Access to project, invoice, and client modules
- Employee: Access to attendance, leave requests, and assigned tasks
- HR: Access to Employee, Attendance, Payroll, Leave, Department & Designation and HR related modules
Features & Modules
- Core HR: Employee, Attendance, Payroll, Leave, Department & Designation
- Project & Task: Project, Task, and Team Management
- Financial: Expense, Invoice, and Loan Management
- Administrative: User roles, authentication, and system settings
- Additional: Interview, Appraisal, Ticket System, Notice Board, Holiday Management
- AI-Powered Automation: Project SRS generation, employee CV creation, job description generation, automated ticket reply/conversion, and AI-generated notices.
File Uploads & Media
All uploaded files (profile pictures, documents) are stored in
public/storage. The media library allows managing and accessing uploaded
content.
Image & Assets Disclaimer
All images used in the preview, demo, and screenshots are for demonstration purposes only. They are not included in the downloadable package. Placeholder images will be used instead.
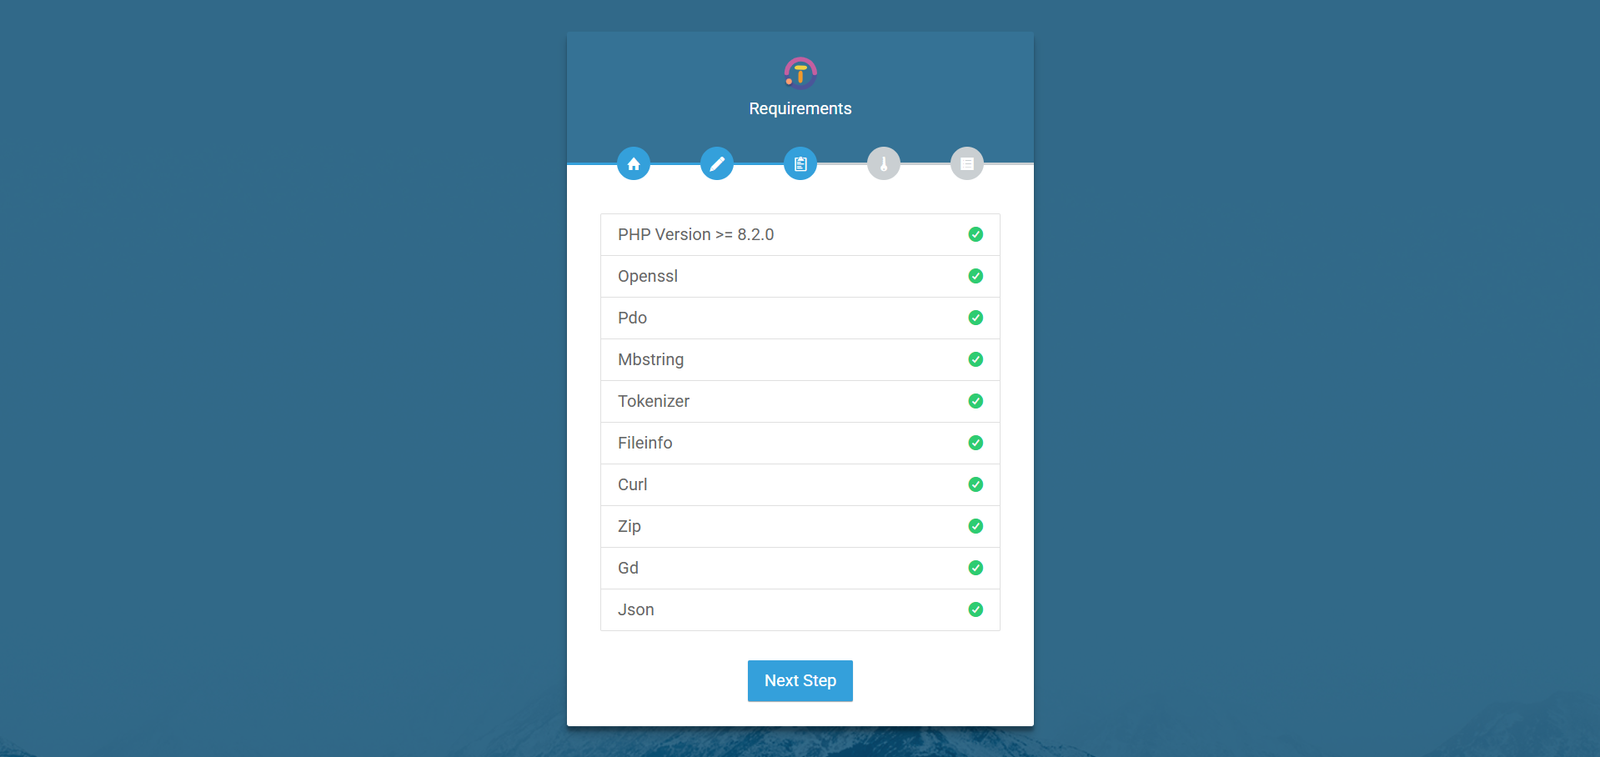
Before installing our Task Orbit application, ensure that your server meets the following requirements:
Server Requirements
- Hosting: Shared hosting or VPS hosting (with SSH access) with cPanel or similar control panel.
- Laravel Framework : Laravel 12
- PHP: 8.2 to 8.4
- Database: MySQL 8.0+
- Node.js: Required to run frontend build commands (e.g., compiling assets with Vite, Webpack, or similar).
PDOPHP extensionOpenSSLPHP extensionmbstringPHP extensionfileinfoPHP extensionZipPHP extensionGDPHP extensionJSONPHP extensionTokenizerPHP extensioncURLPHP extension- Ensure the
mod_rewriteApache module is enabled
Laravel Dependencies
The application relies on several Composer packages for its functionality. Key
dependencies from composer.json include:
Composer Version: 2.8.12
-
Core
php:^8.2laravel/framework:^12.0laravel/sanctum:^3.2laravel/tinker:^2.8
-
Libraries & Packages
barryvdh/laravel-dompdf:^2.1guzzlehttp/guzzle:^7.2predis/predis:^2.2spatie/laravel-medialibrary:11.0.0
-
Development & Testing
fakerphp/faker:^1.9.1laravel/pint:^1.25laravel/sail:^1.18nunomaduro/collision:^7.0nunomaduro/larastan:2.9nunomaduro/phpinsights:^2.13phpunit/phpunit:^10.1spatie/laravel-ignition:^2.0
ViteJs Dependencies
Node.js is required to run frontend build commands (e.g., Compiling assets with Vite, Scss File).
Current Node.js Version: 20.12.2
If you want to make a build, run: npm run build
Key frontend dependencies from package.json:
-
Core
vite:^4.3.5laravel-vite-plugin:^0.7.8
-
CSS & Styling
sass:^1.62.1less:^4.2.0font-awesome:^4.7.0
-
JavaScript Frameworks & Utilities
bootstrap:^5.3.8jquery:^3.7.0@popperjs/core:^2.11.7axios:^1.4.0@rollup/plugin-inject:^5.0.3sortablejs:^1.15.2@srexi/purecounterjs:^1.5.0
-
UI Components & Plugins
@toast-ui/editor:^3.2.2@yaireo/tagify:^4.17.8bootstrap5-tags:^1.5.15select2:^4.1.0-rc.0sweetalert2:^11.4.8flatpickr:^4.6.13tui-calendar:^1.15.3datatables.net:^1.13.4
-
Charts & Visualization
apexcharts:^3.37.3
PHP Configuration
Open your php configuration file php.ini and change the following settings.
Database Create
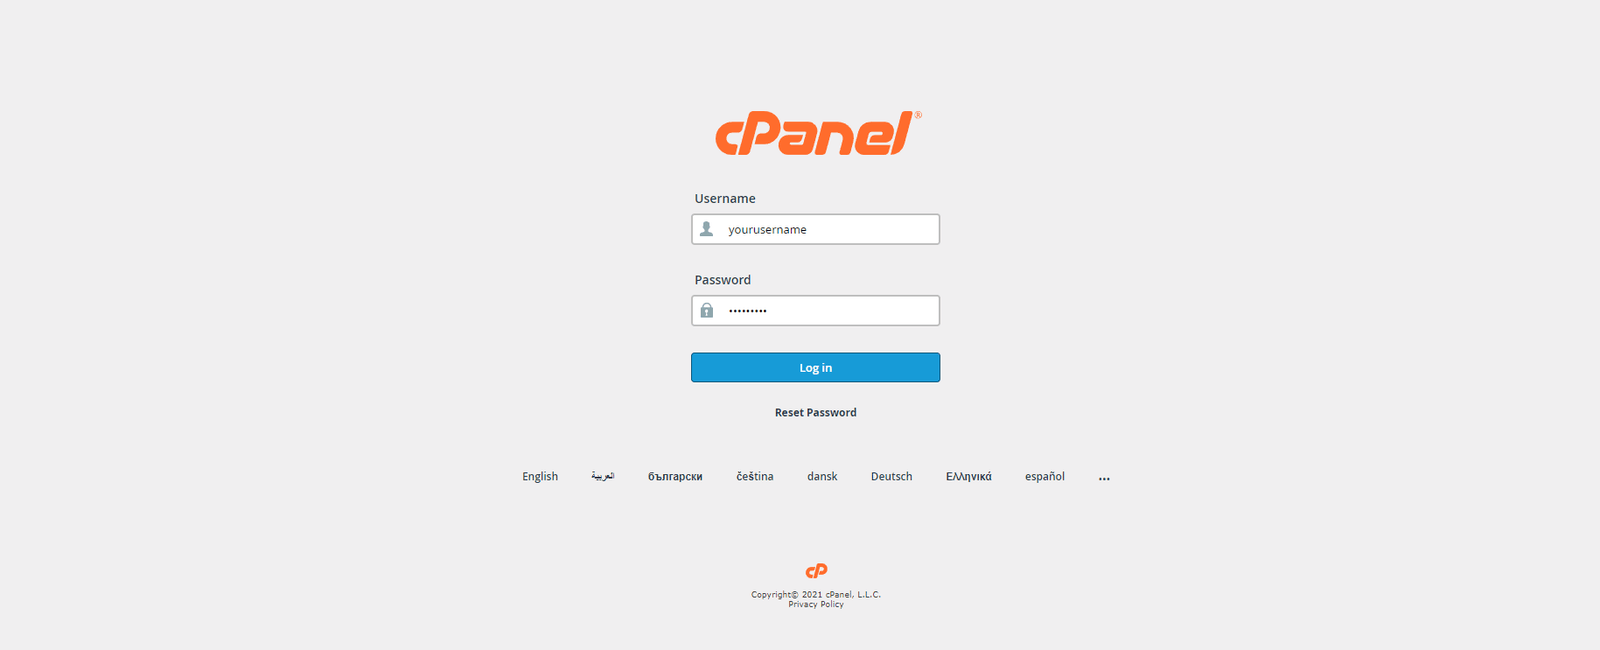
Step 1. Login into your cPanel.
Step 2. Go to database in your cPanel.
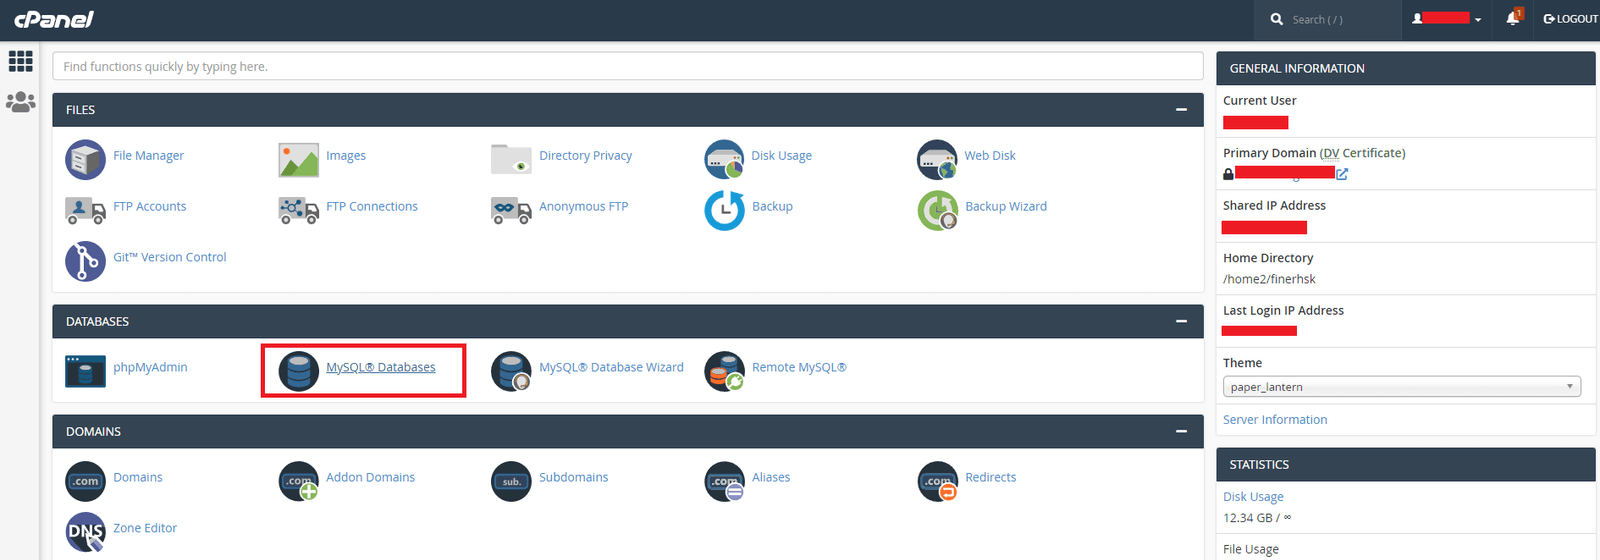
Step 3. Enter database name and Create a new database.
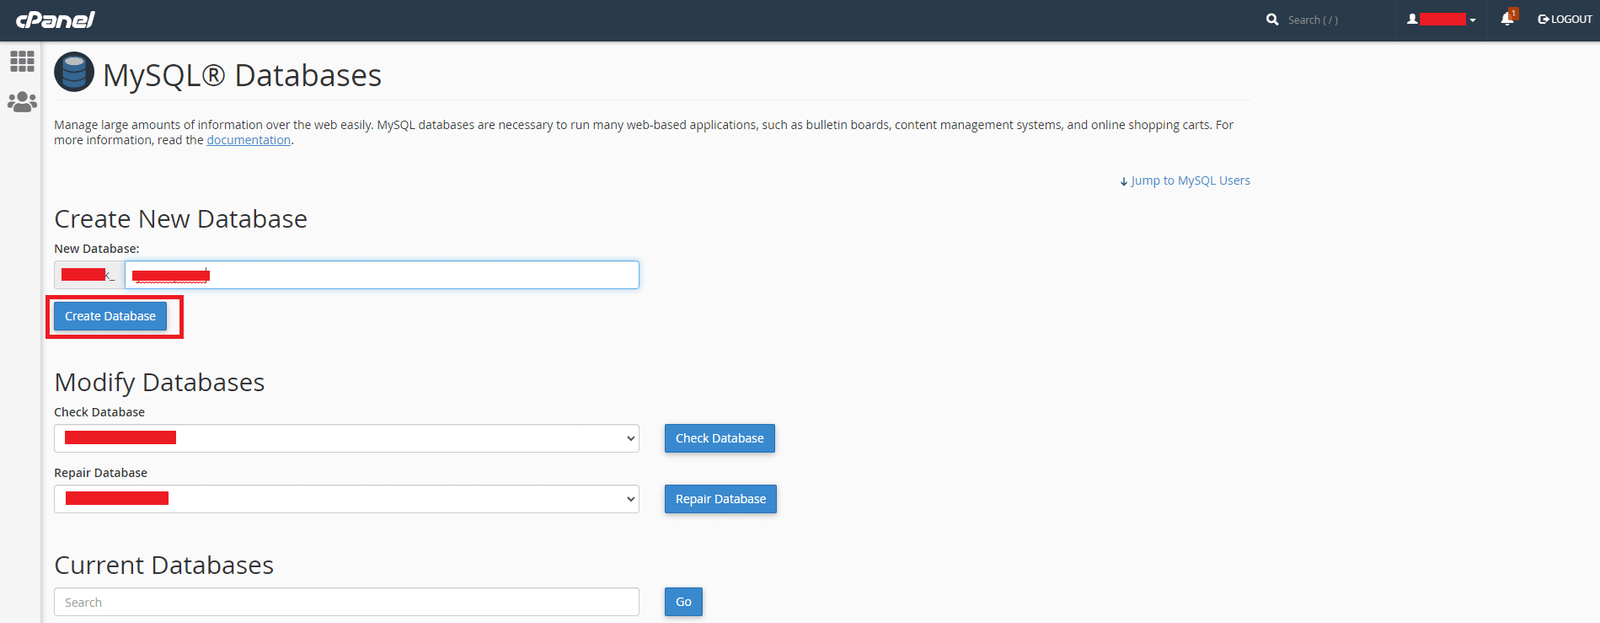
Step 4. Create Database user.
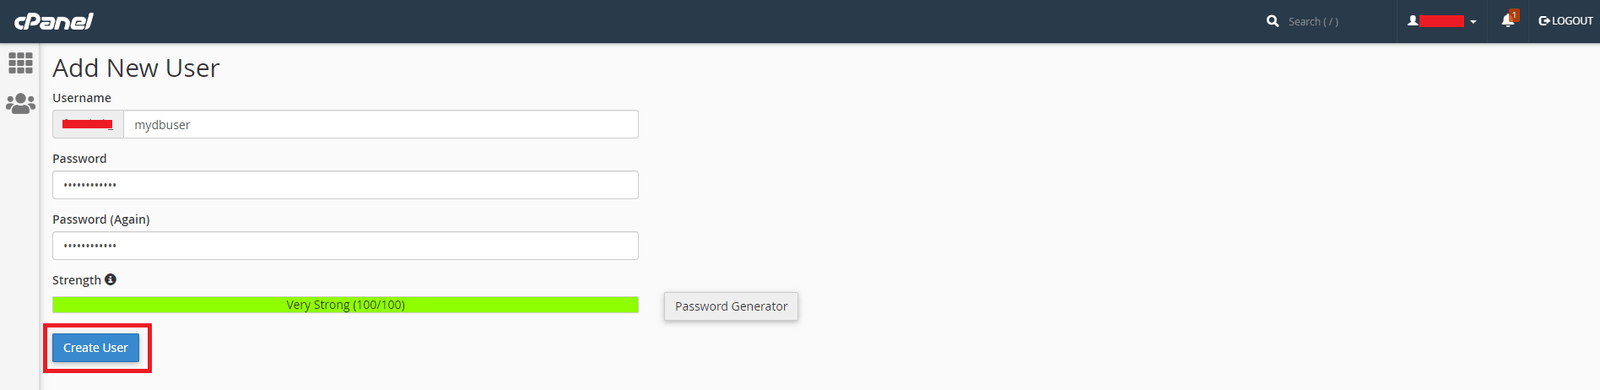
Step 5. Assign Database to the user.

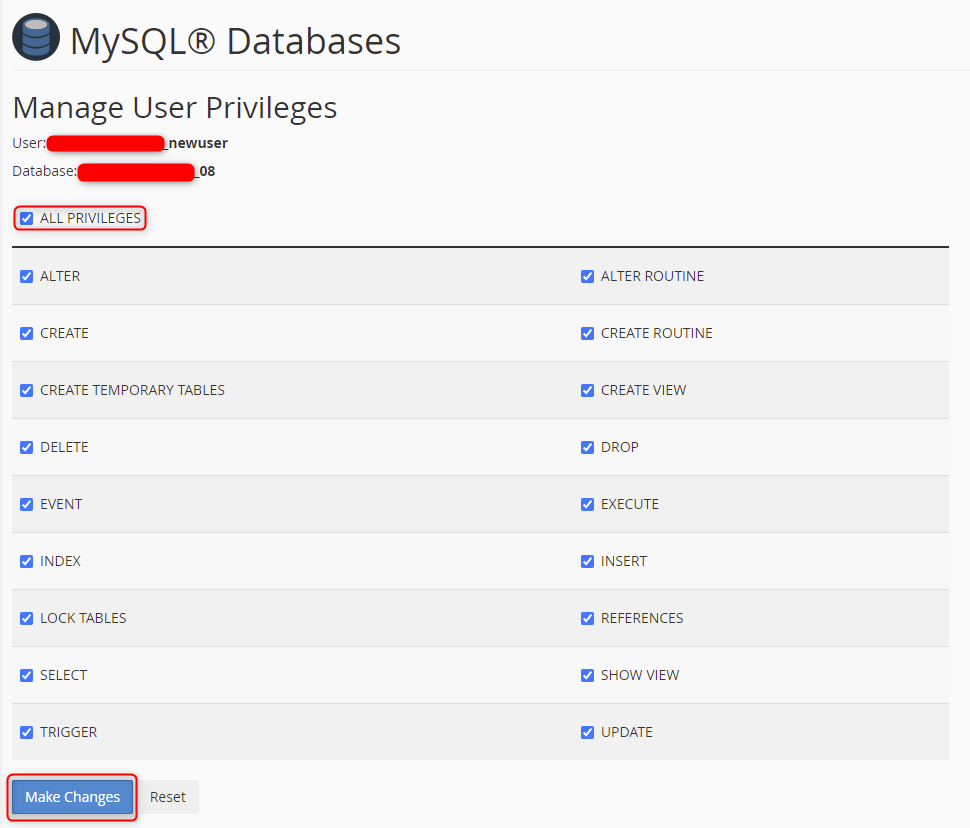
Step 6. Manage User Privileges. (Check All Privileges)
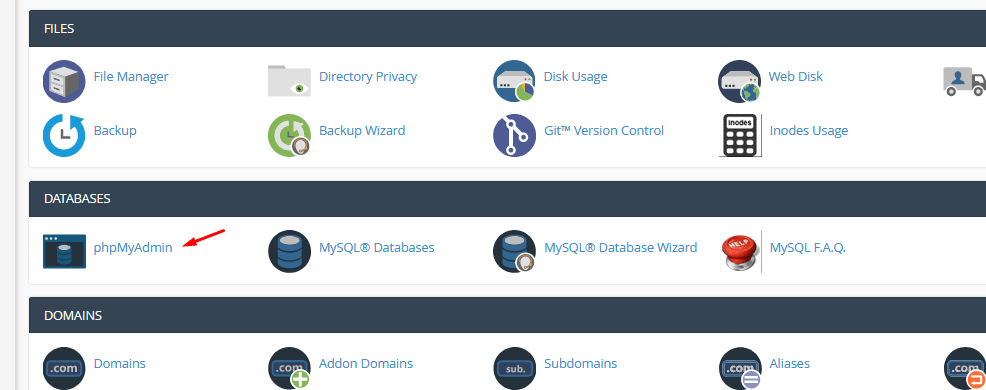
Step 7. For importing Database go to phpMyAdmin (It's Optional)
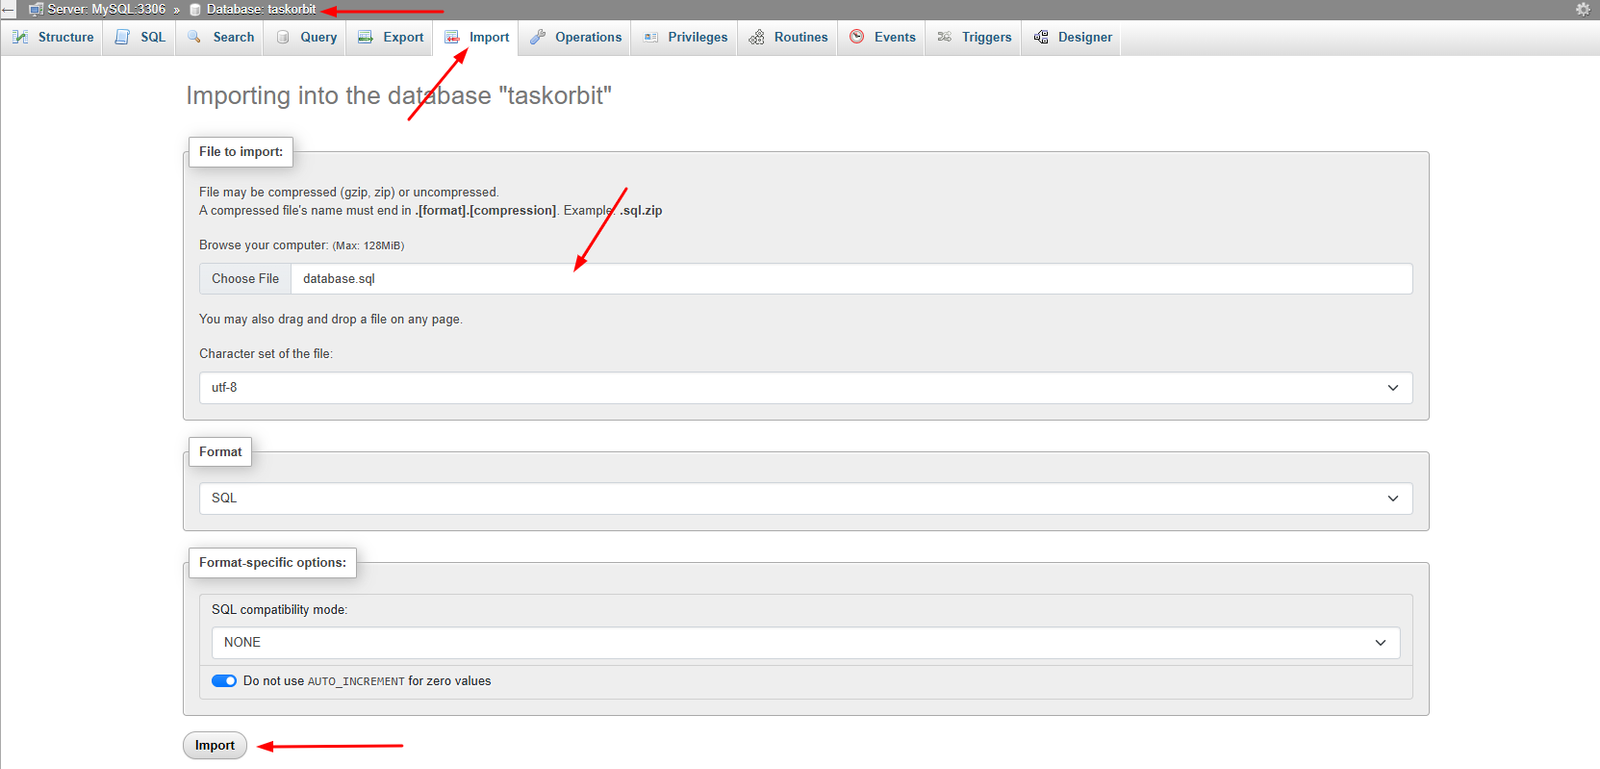
Step 8. In your database go to Import tab for importing database.sql file from database Folder (It's Optional)
File Upload
Step 1. Open File manager now.

Step 2. Go to public_html or public_html/yourDomain.in in your hosting File Manager — whichever folder your domain is pointing to.
- If you upload it in public_html folder, then visit http://your-sitename in browser.
- If you upload it in a folder in public_html folder, then visit http://your-sitename/folder_name in browser.
- If you upload it in your created subdomain folder, then visit http://your-subdomain-name in browser.
- If you upload it in a folder in your created subdomain folder, then visit http://your-subdomain-name/folder_name in browser.

Step 3. Upload the downloaded zip in public_html or public_html/yourDomain.in folder.
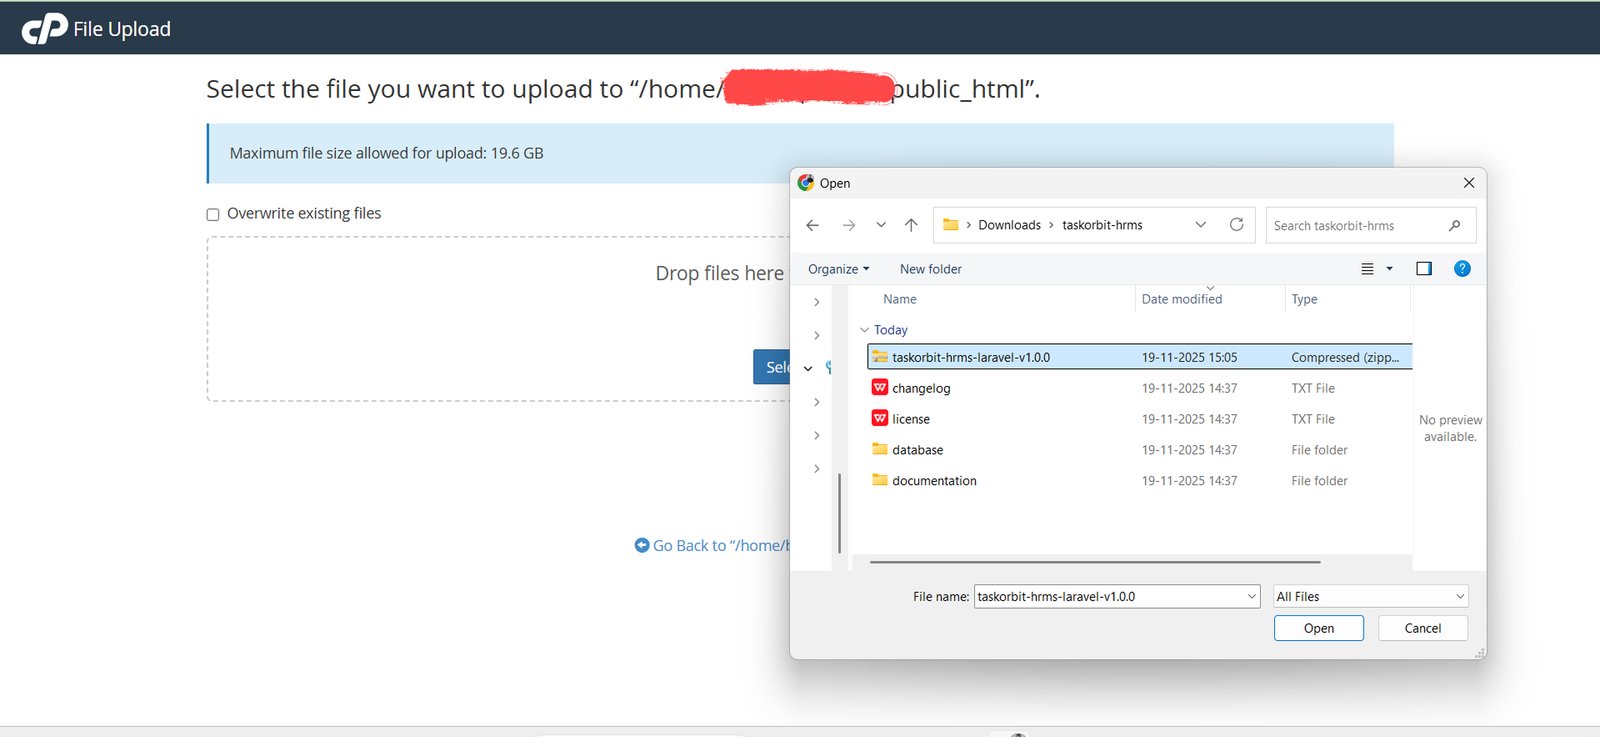
Step 4. unzip or extract the Code v1.0 - task orbit.zip file that you have just uploaded.
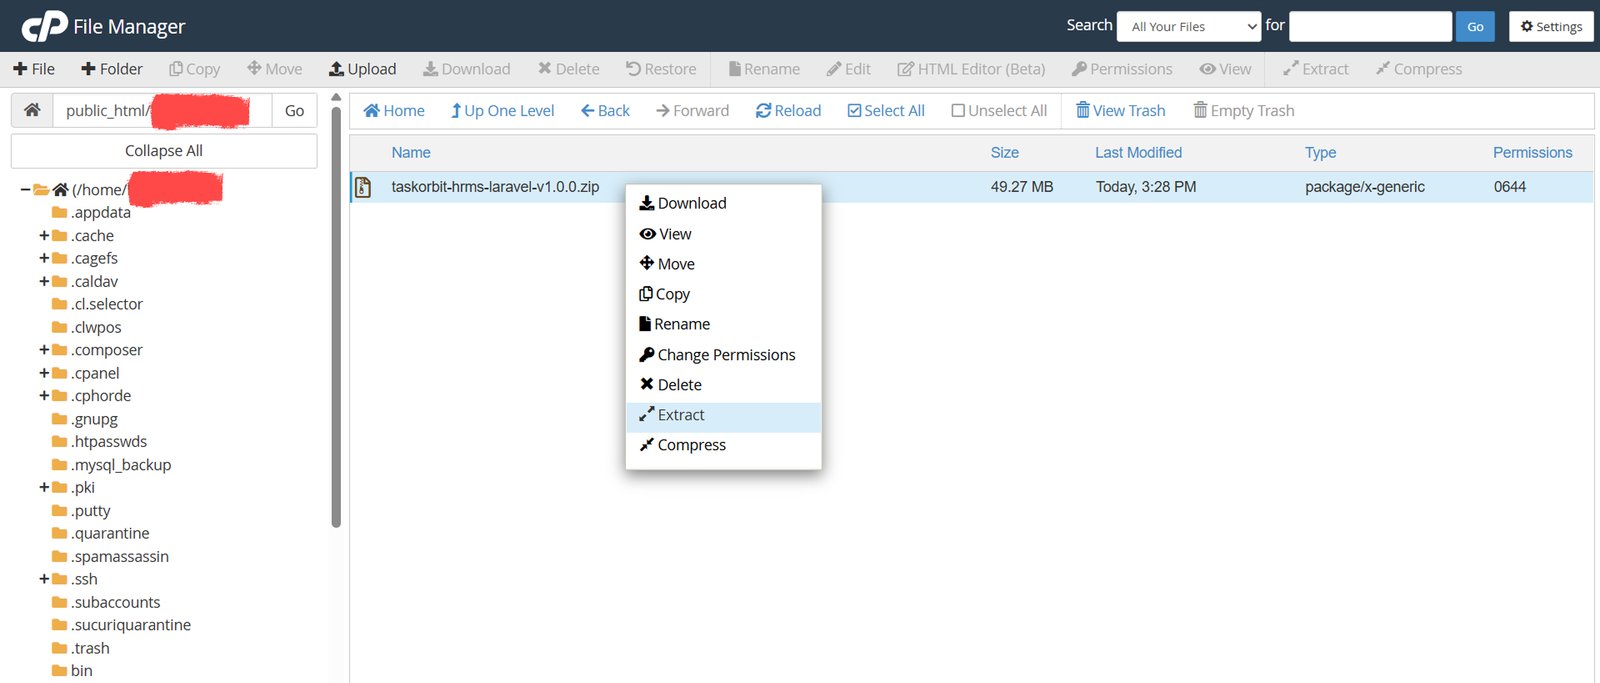
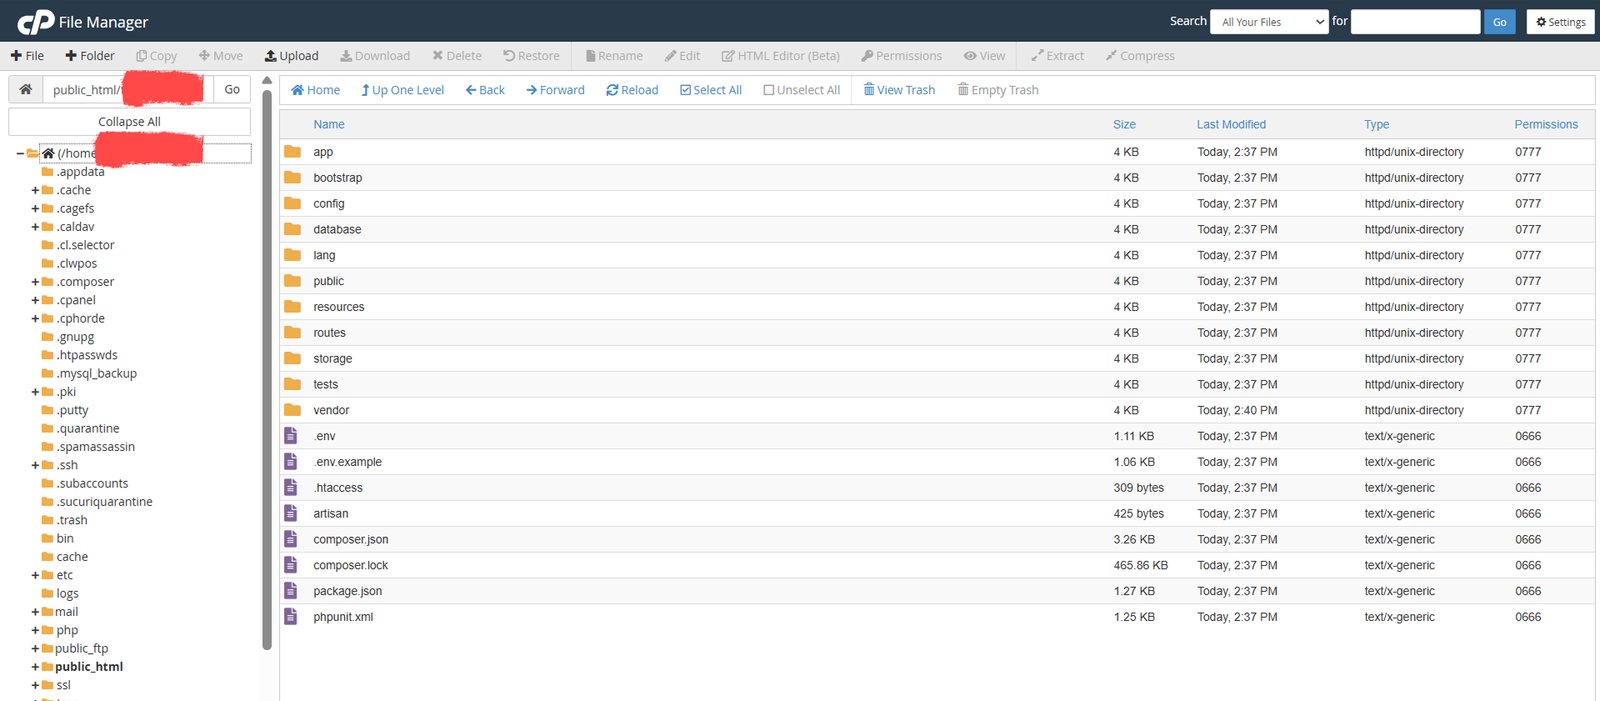
Step 5. verify that all these files are in public_html or public_html/yourDomain.in folder.
Install Application
Step 1: Welcome
Step Before Installation
-
Copy the
.env.examplefile to.env
To run the installer visit www.yourdomain.com (example: https://taskorbit.pixelwibes.in), you’ll automatically be redirected to the installation page
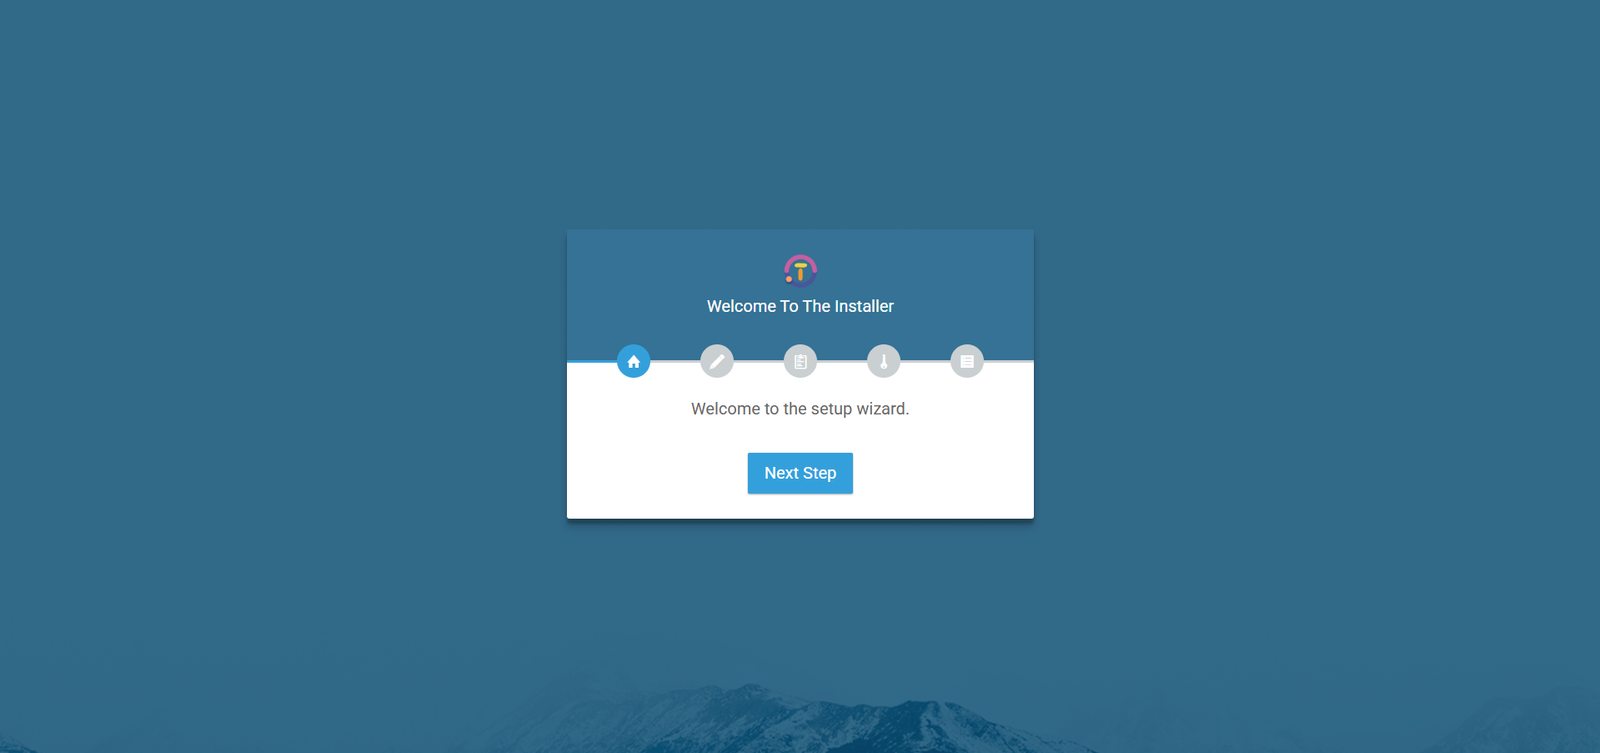
Welcome
Step 2: Database Configuration
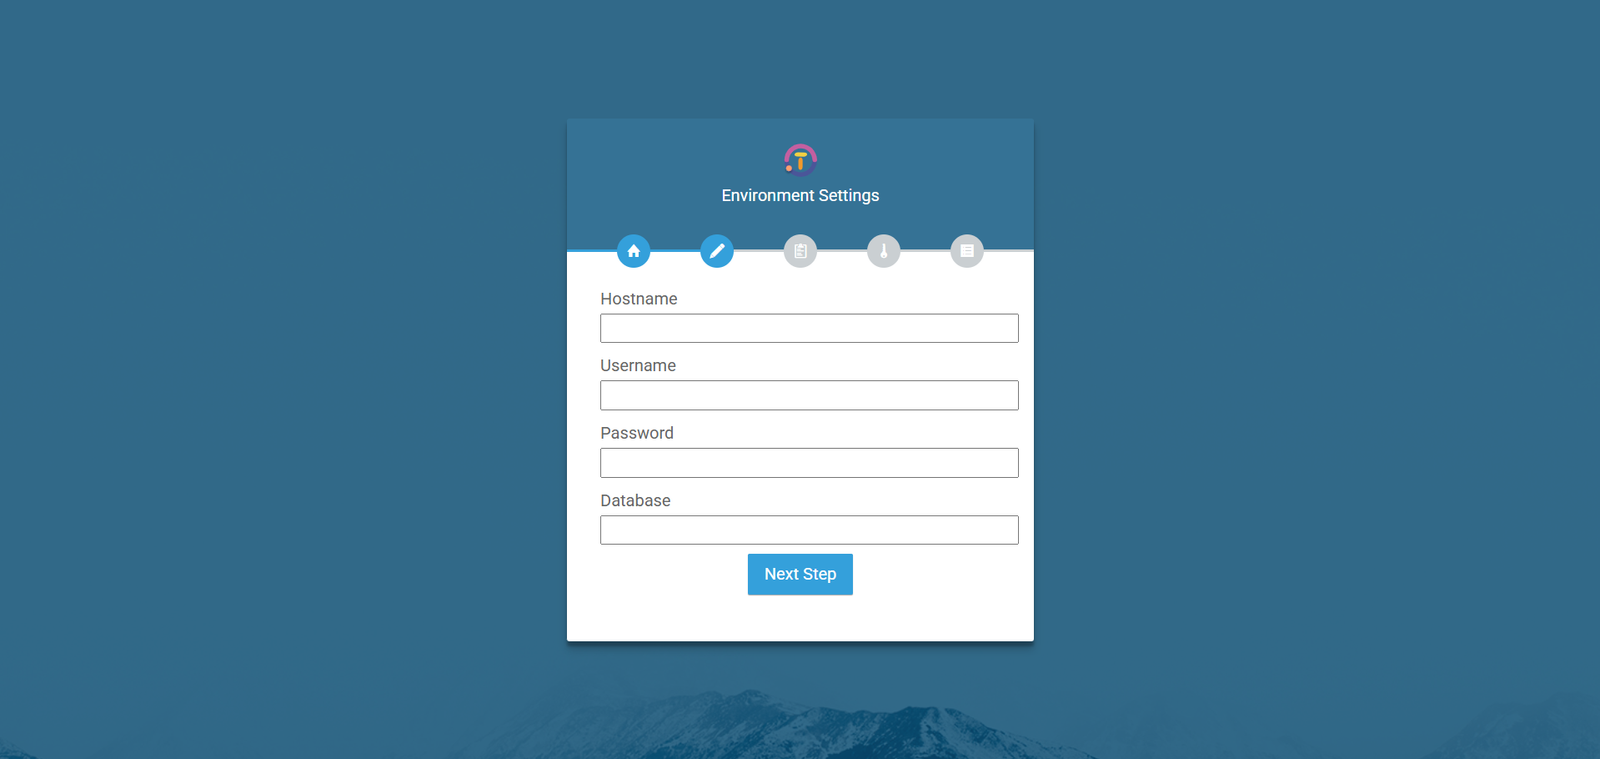
- Database Hostname : Put the database hostname in here.
- Database Username : Enter the database's user name.
- Database Password : Kindly input the strong password.
- Database Name : Enter the database's name.
Step 3: Server Requirements
• For cPanel: Go to PHP Selector → Find the extension name → Tick/Enable it → Click Save.
• For Local Server (XAMPP/WAMP): Open
php.ini
file → Search for the extension line (e.g. ;extension=openssl)
→ Remove the semicolon (;) → Save and restart Apache.
-
PHP Version : Version must be 8.2 to 8.4.
Step: Log in to your hosting panel → Find "PHP Selector" or "PHP Version" → Select 8.2 to 8.4 → Save. - OpenSSL Extension : Needed for secure data.
- PDO Extension : Needed for database connection.
- Mbstring Extension : Needed to handle text properly.
- Tokenizer Extension : Needed by Laravel.
- Fileinfo Extension : Needed for file uploads.
- Curl Extension : Needed for API requests.
- Zip Extension : Needed for archives.
- GD Extension : Needed for images.
- Json : Needed for archives.
Step 4: Folder Permission Check
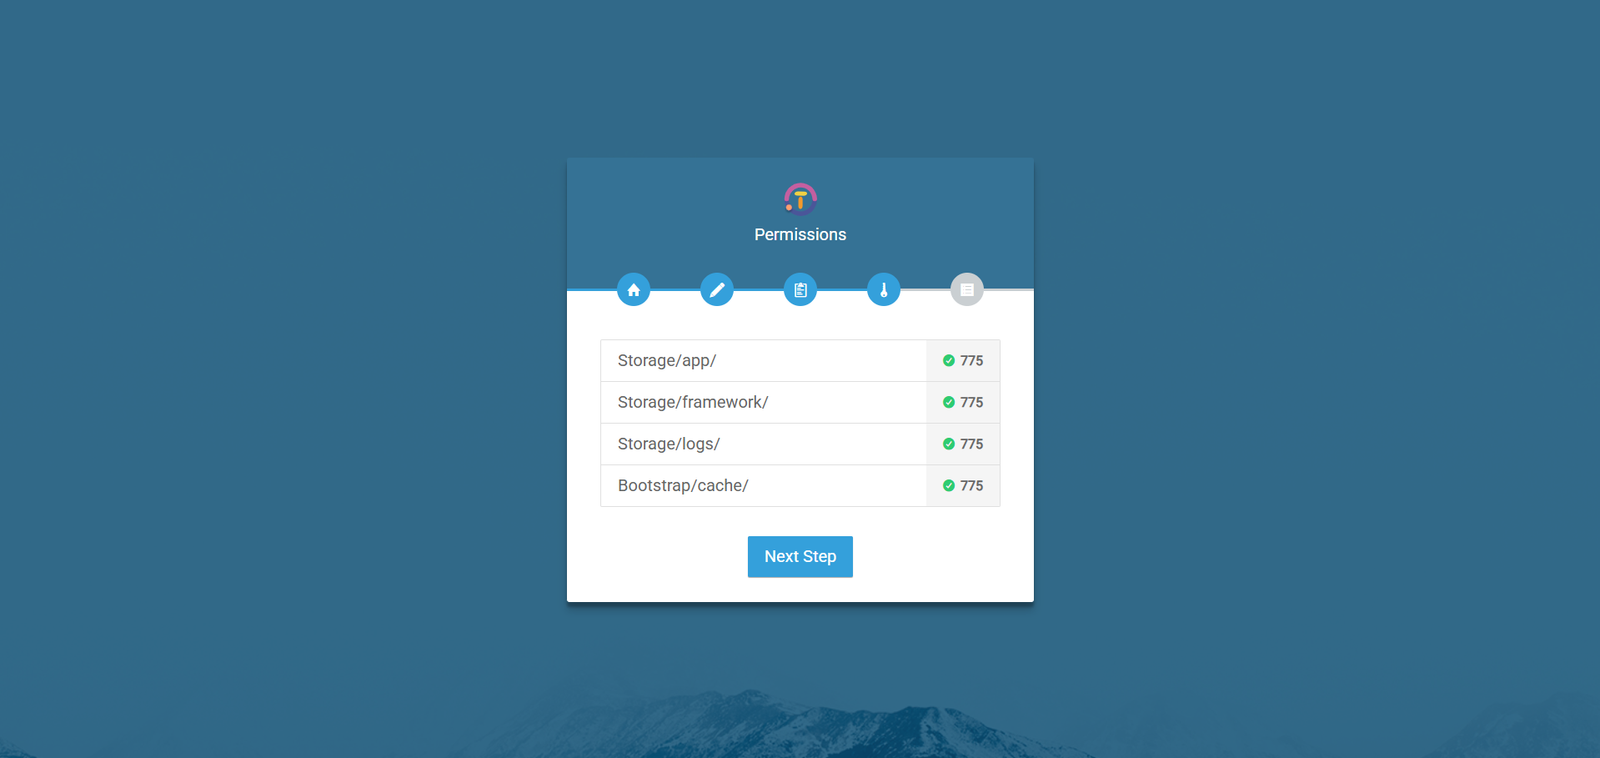
-
/storage/app
: Must be writable for storing uploaded files and application
data.
Note (Linux / macOS): Runchmod -R 775 storage/app
Note (Windows): Right-click thestorage/appfolder → Properties → Security tab → Edit → giveModifypermission to your web server user (e.g.,IIS_IUSRSor your username).
Run this command from your Laravel project root path. -
/storage/framework
: Must be writable for cache, sessions, and compiled views.
Note (Linux / macOS): Runchmod -R 775 storage/framework
Note (Windows): Right-click thestorage/frameworkfolder → Properties → Security → Edit → allowModifyfor your web server user.
Run this command from your Laravel project root path. -
/storage/logs
: Must be writable for application logs.
Note (Linux / macOS): Runchmod -R 775 storage/logs
Note (Windows): Right-click thestorage/logsfolder → Properties → Security → Edit → allowModifypermission.
Run this command from your Laravel project root path. -
/bootstrap/cache
: Must be writable for framework cache and compiled files.
Note (Linux / macOS): Runchmod -R 775 bootstrap/cache
Note (Windows): Right-click thebootstrap/cachefolder → Properties → Security → Edit → allowModifypermission.
Run this command from your Laravel project root path.
Success
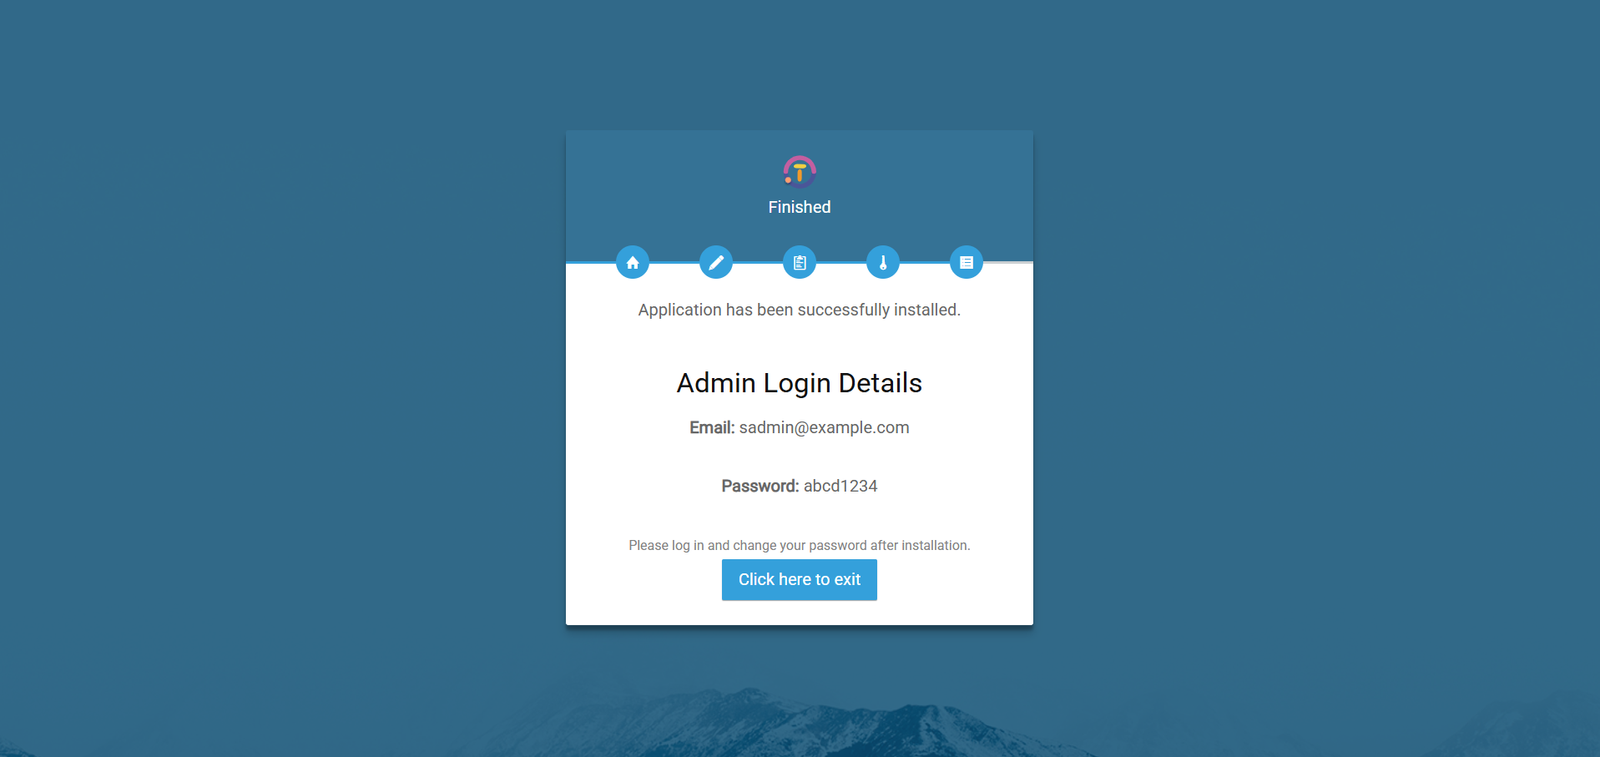
Before continuing, please review the full Requirements page to ensure your environment meets all system needs.
Backend Setup (Laravel)
-
Install PHP dependencies:
composer install -
Copy the
.env.examplefile to.env -
Generate the application key:
php artisan key:generate -
Start the Laravel server:
php artisan serve -
Open your browser and navigate to
http://127.0.0.1:8000.
Frontend Setup (Vite)
-
Install JavaScript dependencies:
npm install -
Start the Vite development server:
npm start -
Build assets:
npm run build
Server Installation Notes
If you are using VPS / SSH
- Copy
.env.exampleto.env - Run
php artisan key:generate - Update database and mail settings
If you are using Shared Hosting
- A ready
.envfile is already included in the shared_hosting folder. - Only update database and mail settings
- Do not modify APP_KEY (your project may stop working)
Login
-
Login With Admin:
- Please enter your email address. It was used during the installation process
- Please enter your password. It was used during the installation process
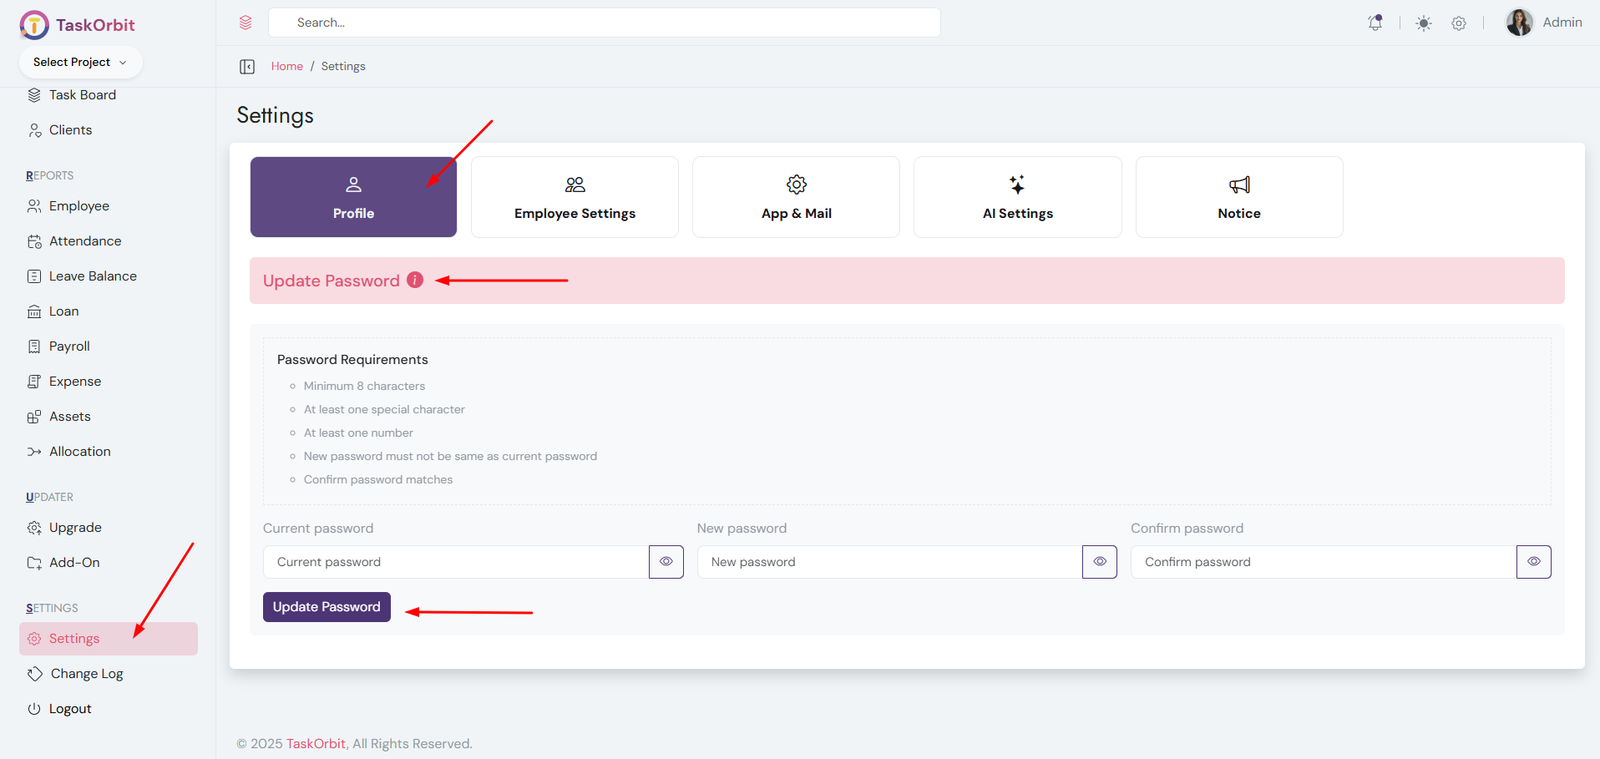
General Setting
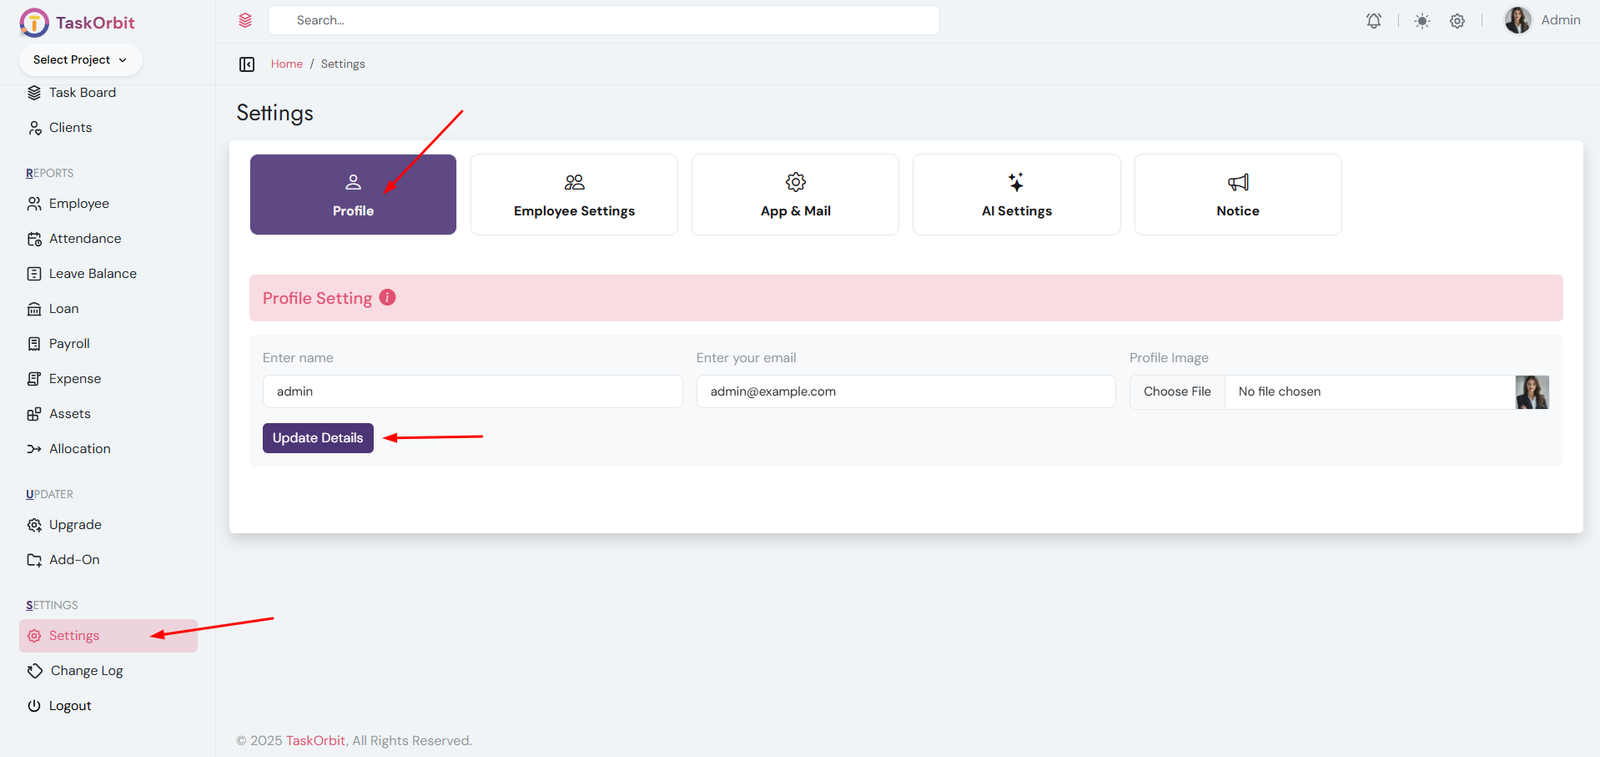
- Profile Info: Manage name, profile picture and email.
- Change Password: Update your account password securely.
Shift Management (Required to assign a shift when creating a new employee)
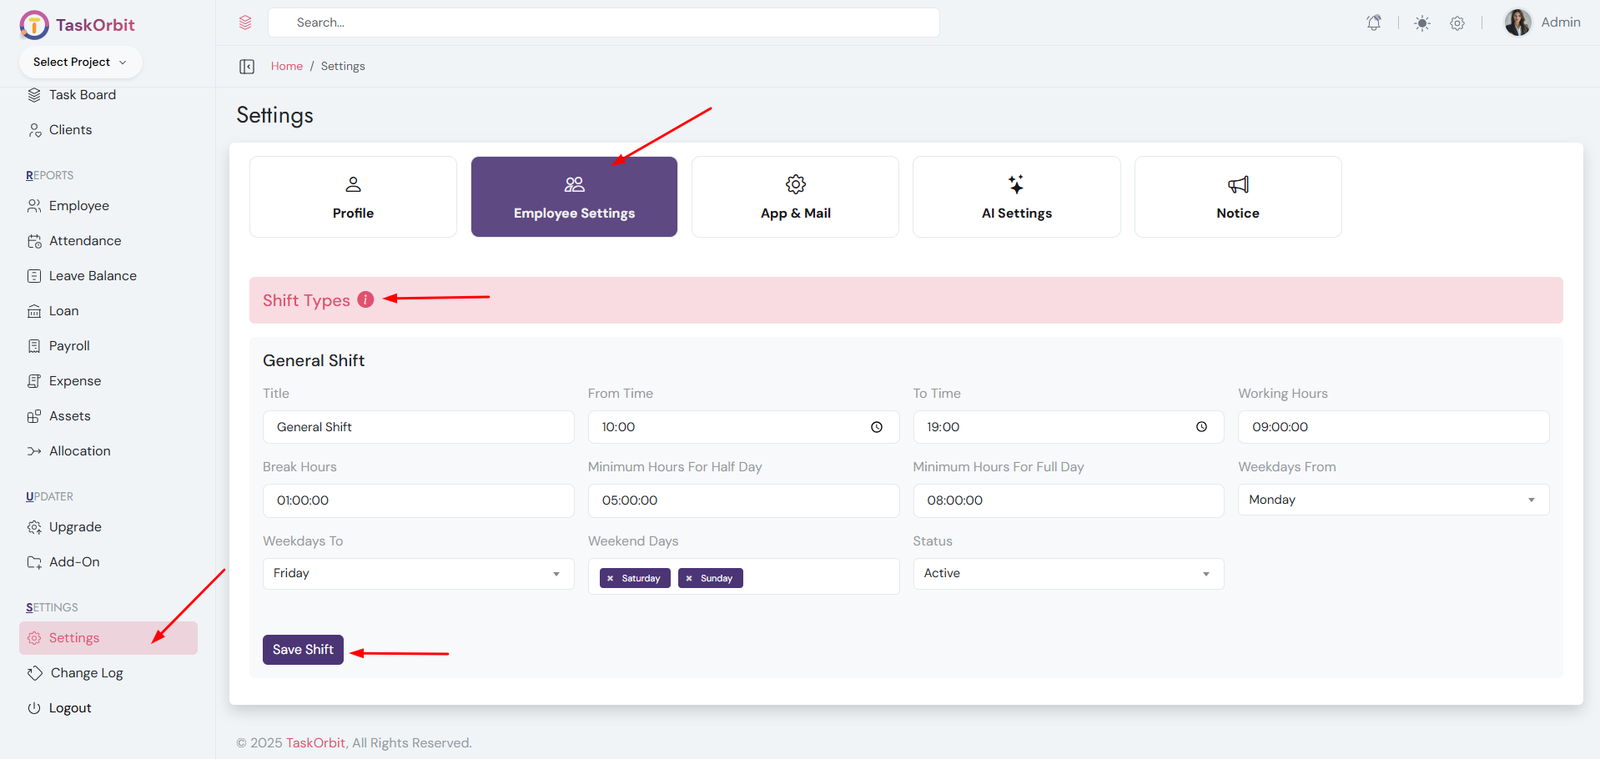
- Define working hours
- Set break times
- Minimum hours for half/full day
- Configure weekdays and weekends
- Used in salary calculation
- Manage existing shifts or add new ones
- Used for attendance clock-in/clock-out functionality
- Required to assign a shift when creating a new employee
Leave management(Required to assign a leave when creating a leave request)
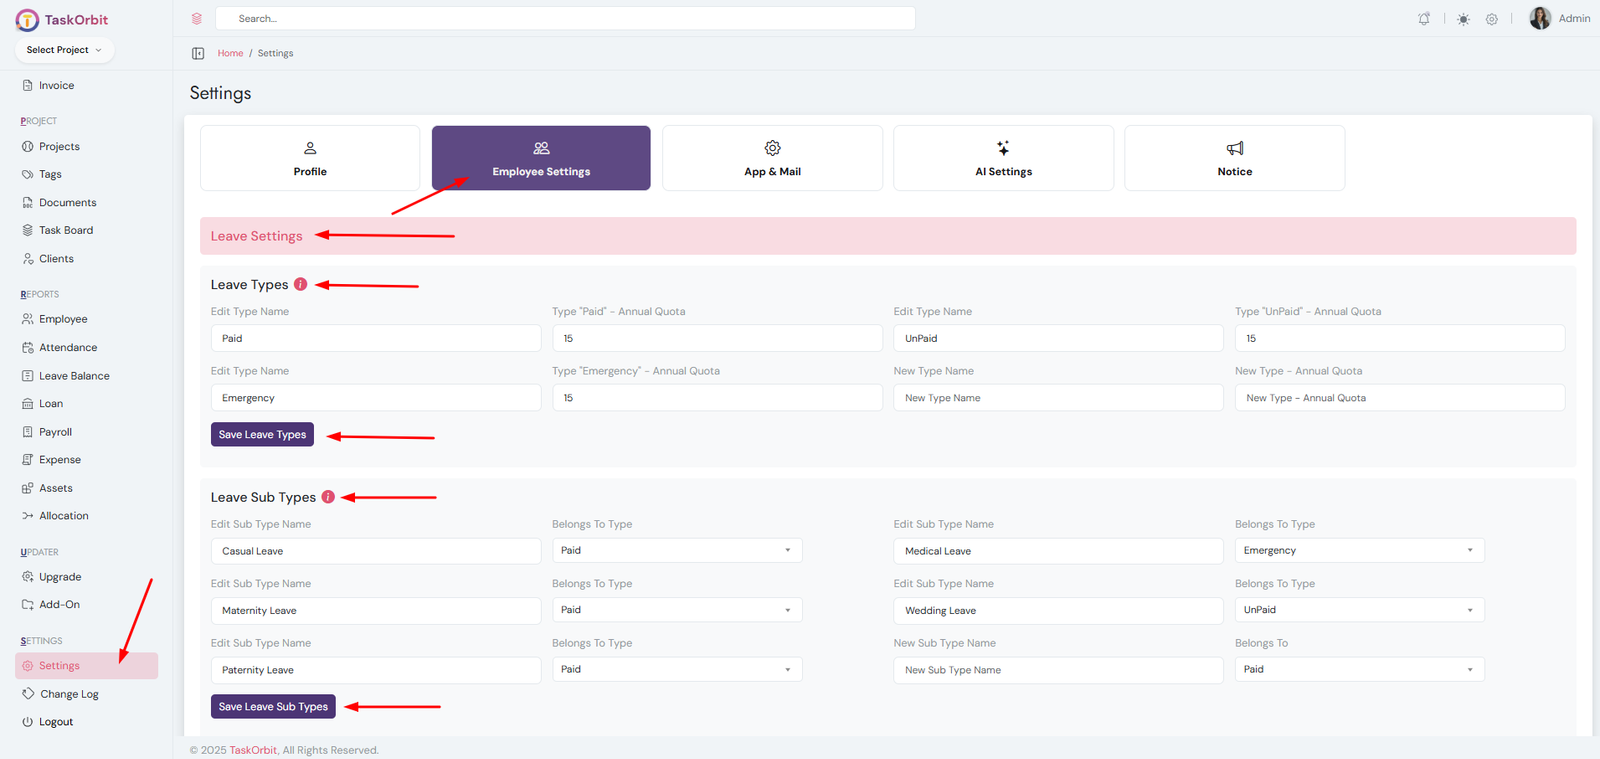
-
Leave Types Management:
- Define leave types for employees (Paid, Unpaid, Emergency, etc.).
- Set annual leave quotas for each type.
- Edit existing leave type names and quotas.
- Add new leave types with a name and annual quota.
- Required for managing employee leaves effectively.
-
Leave Sub Types Management:
- Define subcategories of leave types to categorize leaves more specifically.
- Assign subtypes to existing leave types.
- Edit existing subtypes and change which leave type they belong to.
- Add new subtypes with a name and link them to a leave type.
- Helps track and manage employee leaves in more detail.
Appraisal Management
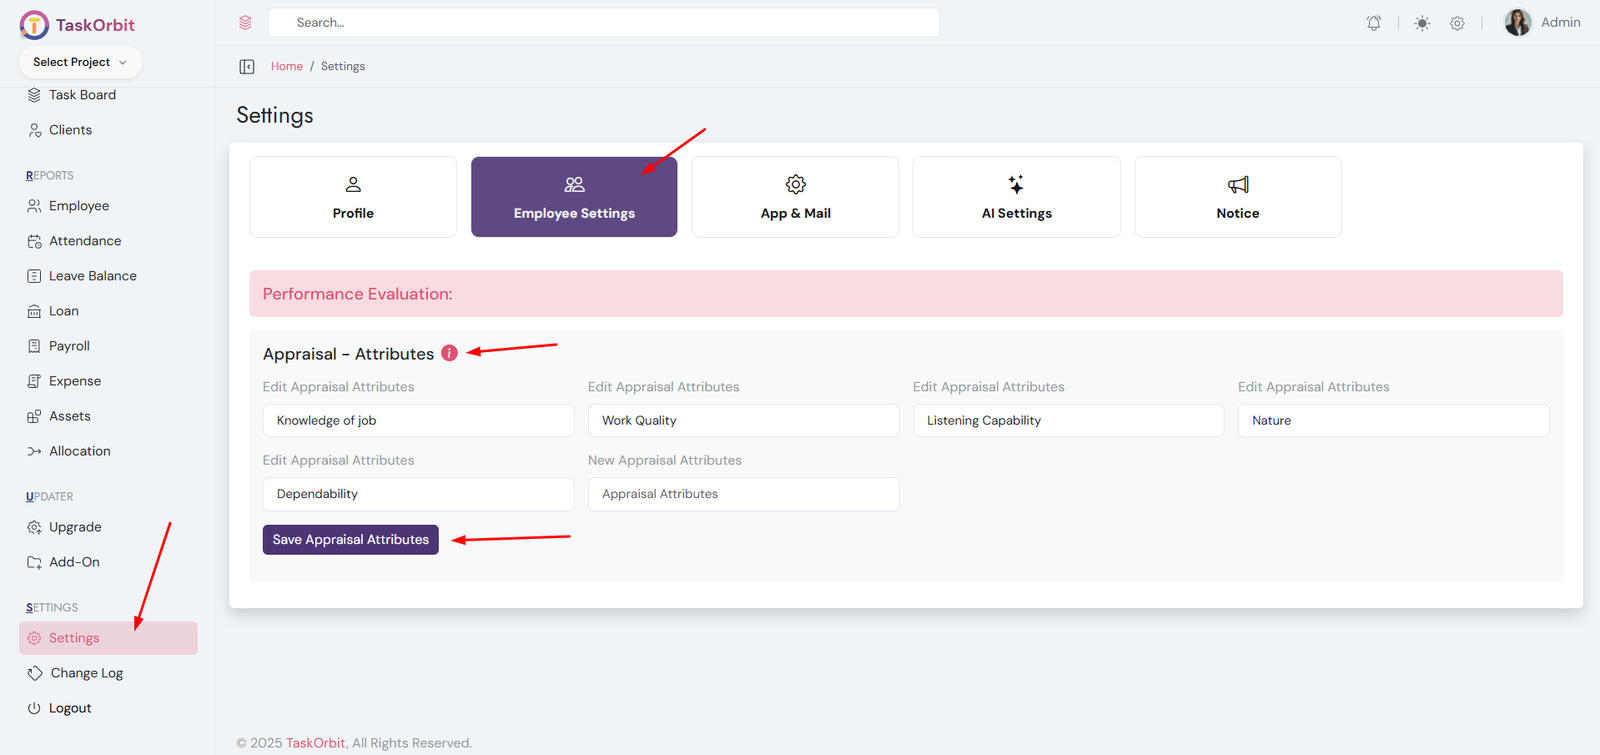
- Define performance attributes used for employee appraisals.
- Helps evaluate employee performance systematically.
- Attributes are used to score and generate appraisal reports.
- Edit existing appraisal attributes or add new ones.
- Required for structured and consistent performance appraisals.
Interview Management

- Define performance attributes used during candidate interviews.
- Helps evaluate candidates systematically and fairly.
- Attributes are used to score and compare interview performance.
- Edit existing interview attributes or add new ones.
- Ensures standardized assessment for hiring decisions.
Web App Settings
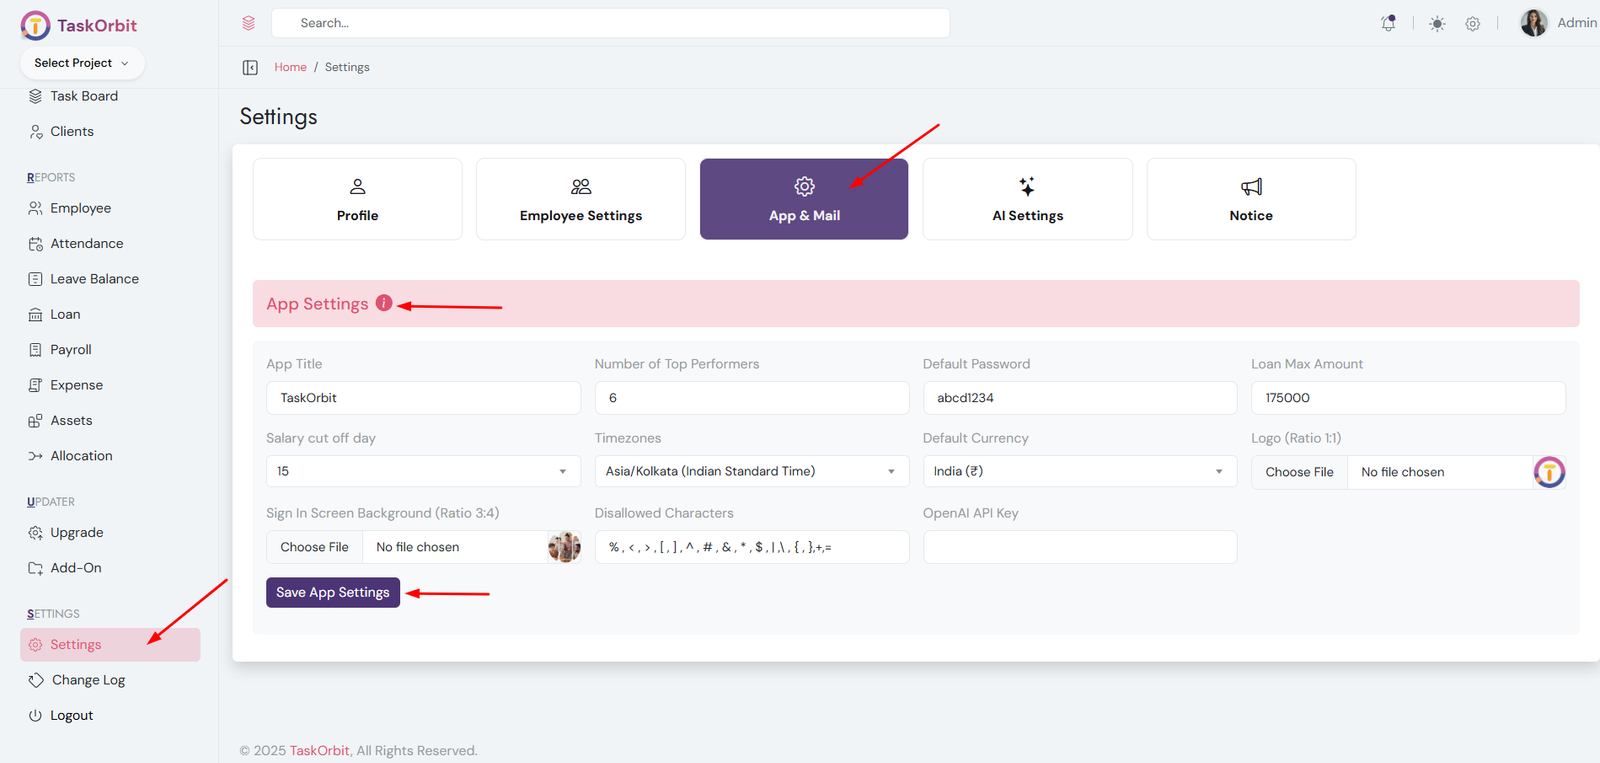
Web App Settings
-
Web App Title: TASKORBIT
- This is the name of the application displayed to users.
-
Number of Top Performers: 6
- Defines how many employees are highlighted as top performers in reports or dashboards.
-
Default Password: abcd1234
- The initial password assigned to new users when their account is created.
-
Loan Max Amount: 175,000
- The maximum amount an employee can request as a loan through the system.
-
Salary Cut Off Day: 7
- The day of the month used to calculate payroll; salaries are processed based on this cut-off.
-
Timezones: Asia/Kolkata (Indian Standard Time)
- Sets the default timezone for all timestamps, reports, and scheduled tasks in the app.
-
Default Currency: India (₹)
- Specifies the currency used for payroll, loans, and financial reports.
-
Logo (Ratio 1:1): (200*200,512*512 etc)
- The main logo of the app, displayed on dashboards and headers. Must be square (1:1 ratio).
-
Sign In Screen Background (Ratio 3:4): (300*400, 600*800 etc)
- Background image displayed on the login page. Recommended 3:4 ratio for best display.
-
Disallowed Characters: % , < , > , [ , ] , ? , ^ , # , & ,
* , $ , | , \ , { , }, +, =, /
- These characters cannot be used in usernames, passwords, or other text fields to prevent errors and security issues.
-
OpenAI API Key
- Used to enable AI features such as SRS generation, smart suggestions, automated content creation, and other AI-driven functionalities within the application.
Web App Settings
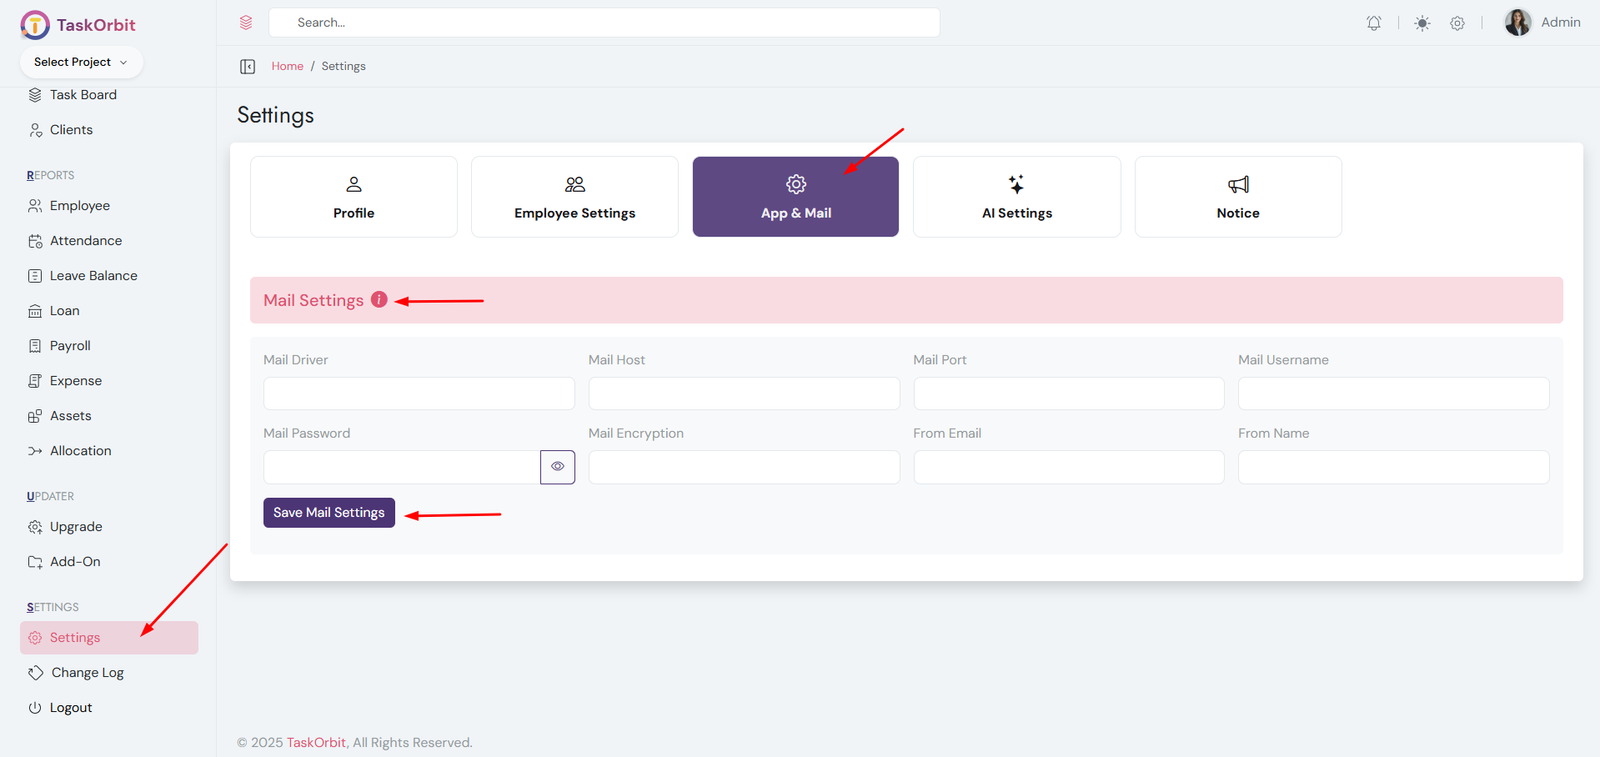
Mail Settings (Required for Password Reset and Other Email-Based Features)
-
Mail Driver: smtp
- Specifies the method used to send emails from the application. "SMTP" is the most common mail protocol.
-
Mail Host: smtp.example.com
- The server address used to send emails. This is provided by your email service provider.
-
Mail Port: 465
- The port number used for email communication. Port 465 is commonly used for SMTP with SSL encryption.
-
Mail Username: test@example.com
- The email account username used to authenticate with the mail server.
-
Mail Password: ••••••••••••
- The password for the email account. Used for authenticating with the mail server securely.
-
Mail Encryption: ssl
- Specifies the type of encryption for email communication. "SSL" ensures emails are sent securely.
-
From Email: test@example.com
- The email address that will appear as the sender for all outgoing emails.
-
From Name: TaskOrbit
- The name displayed as the sender in outgoing emails.
AI Settings
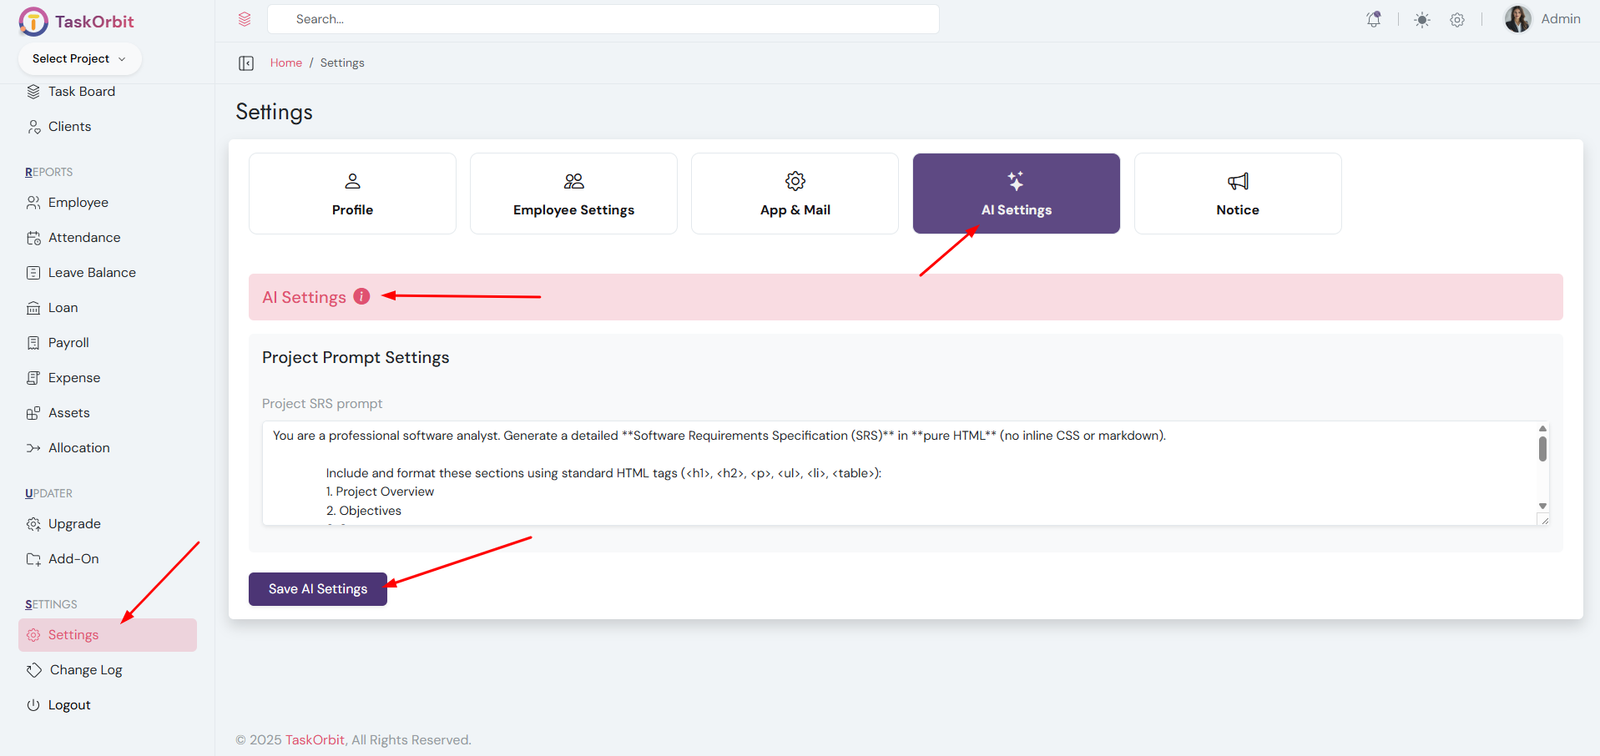
AI Promot Settings
- Configure AI prompts for each module
- Group-wise customization supported so user betterunderstand
-
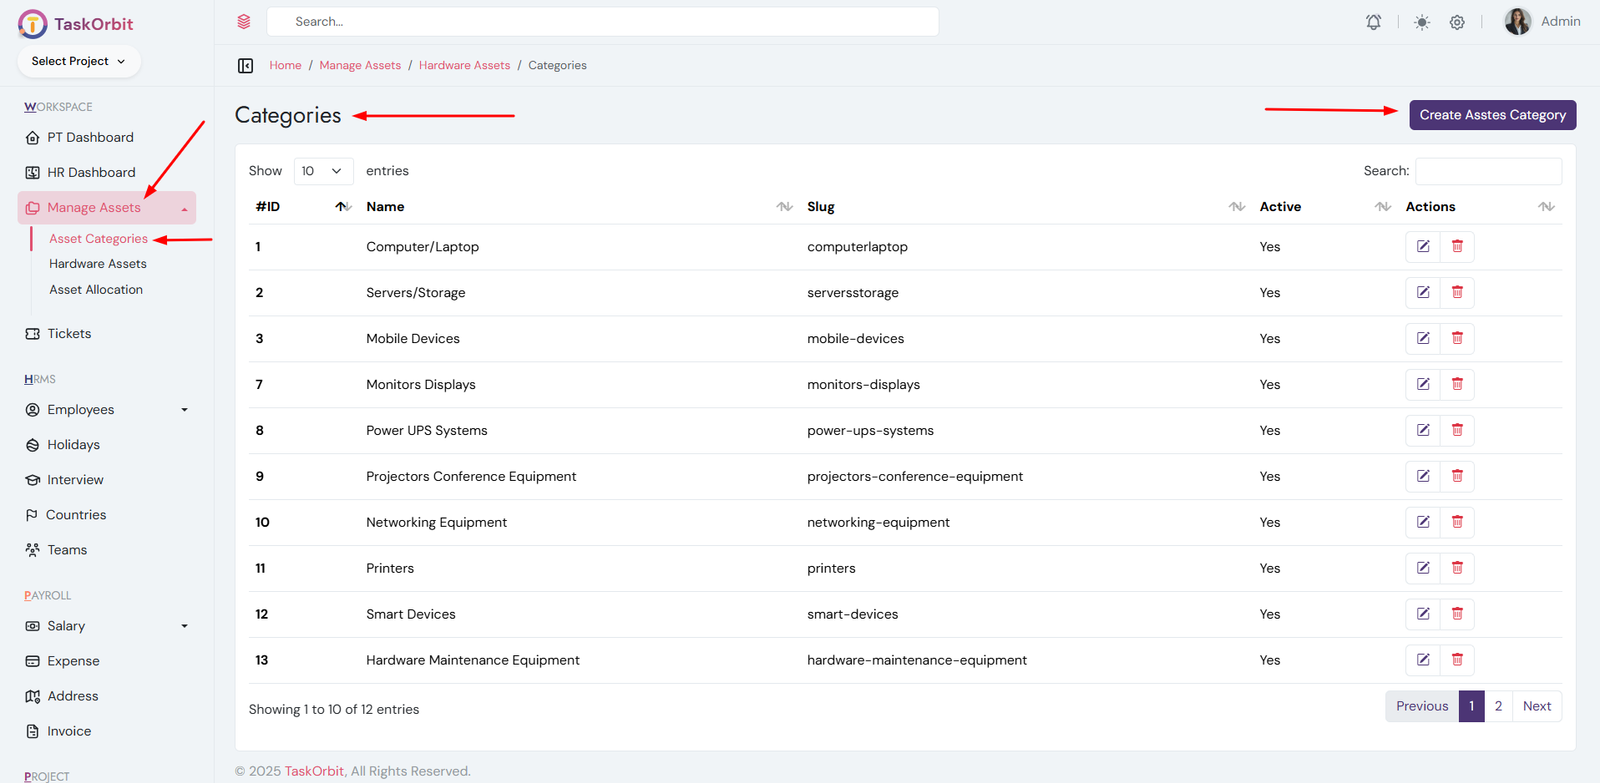
Asset Categories Management:
- You can manage asset categories list here. You can add, edit, update, delete and see the details too.
-
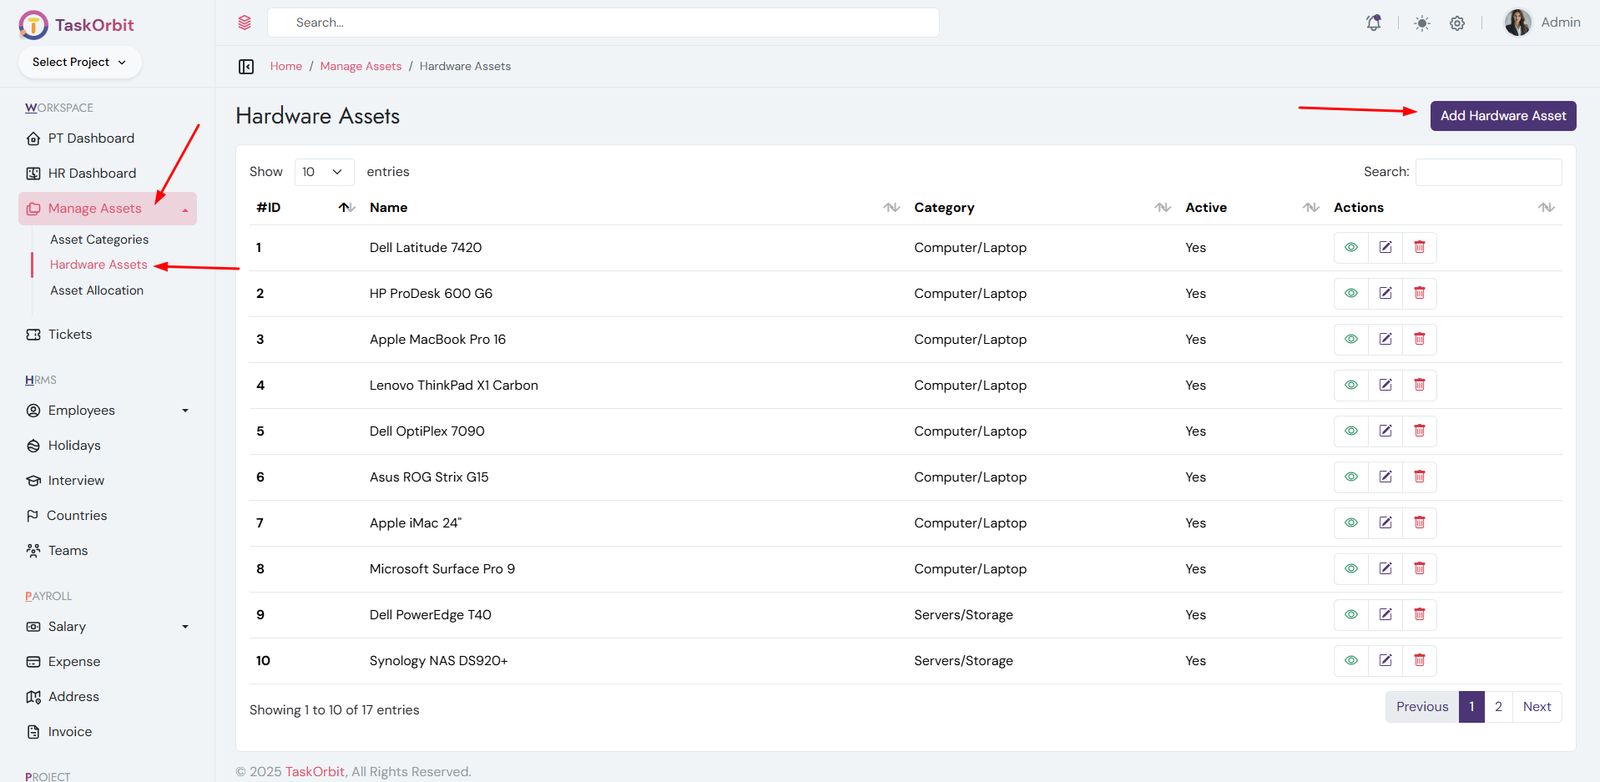
Hardware Assets Management:
- You can manage hardware assets list here. You can add, edit, update, delete and see the details too.
-
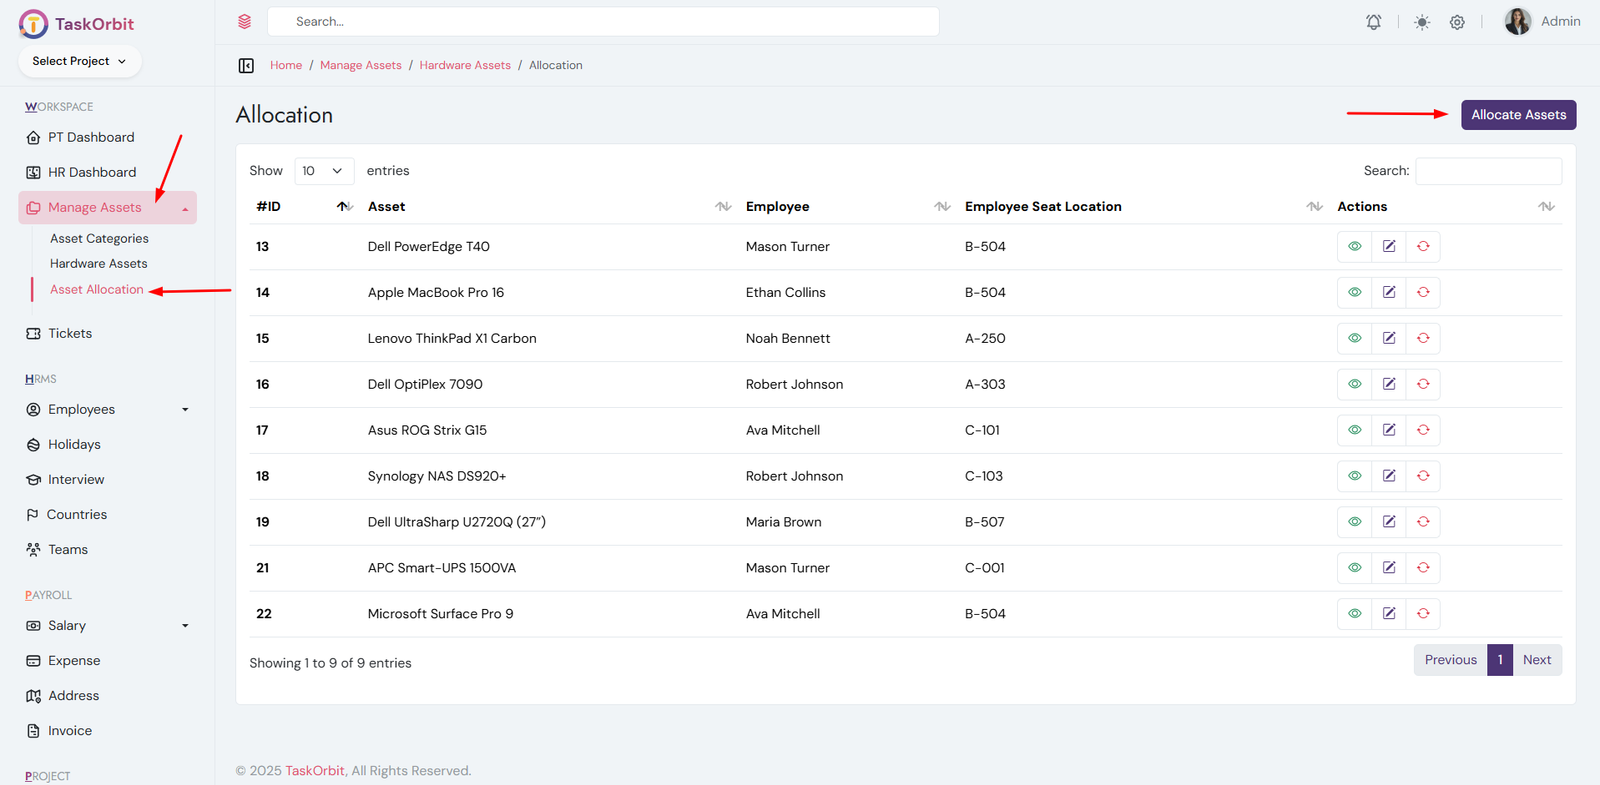
Hardware Asset Allocation Management:
- You can manage hardware asset allocation list here. You can add, edit, update, delete and see the details too.
- It is used to assign hardware assets to employees.
-
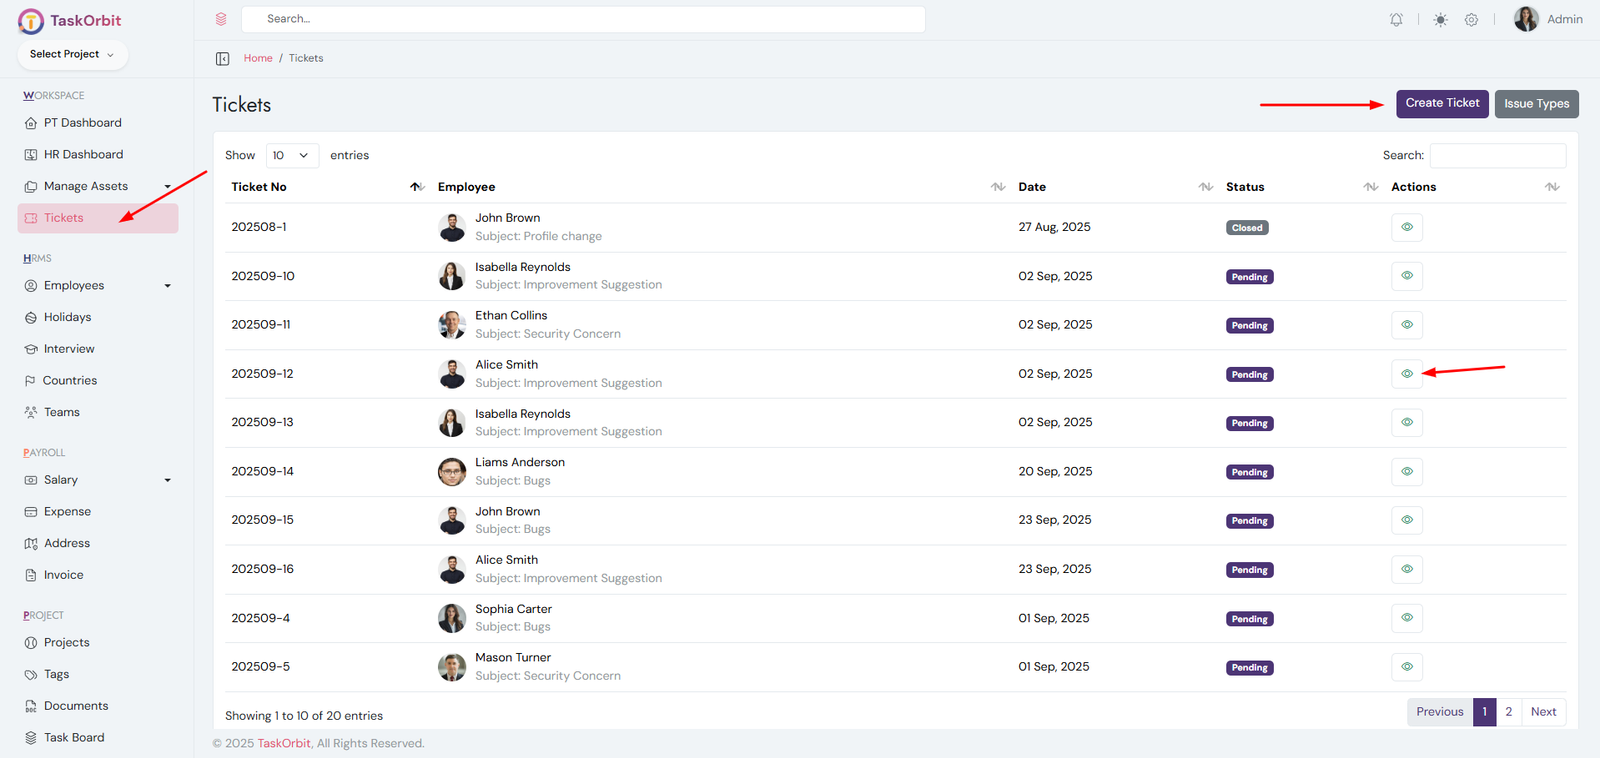
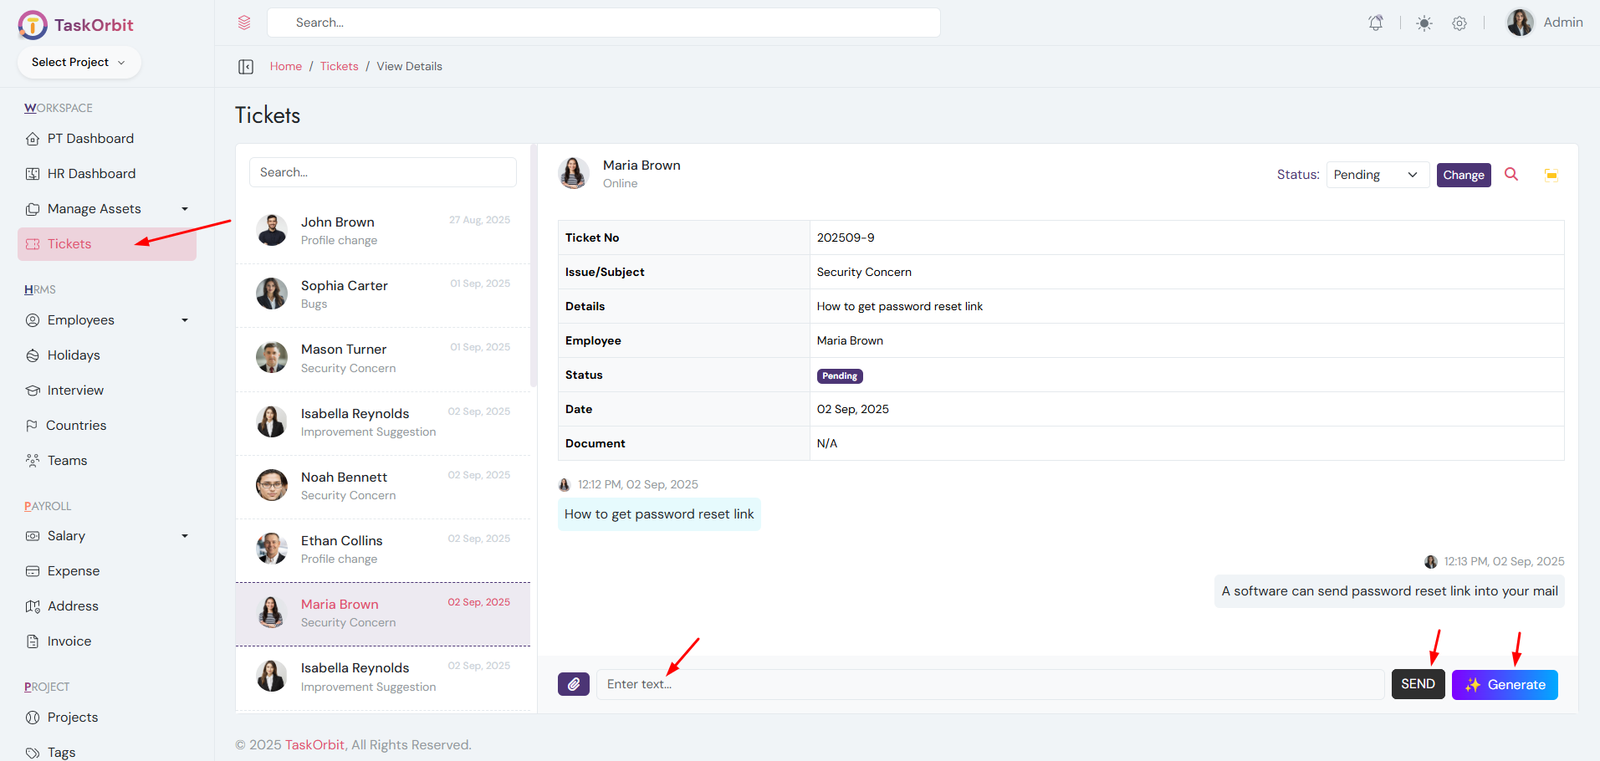
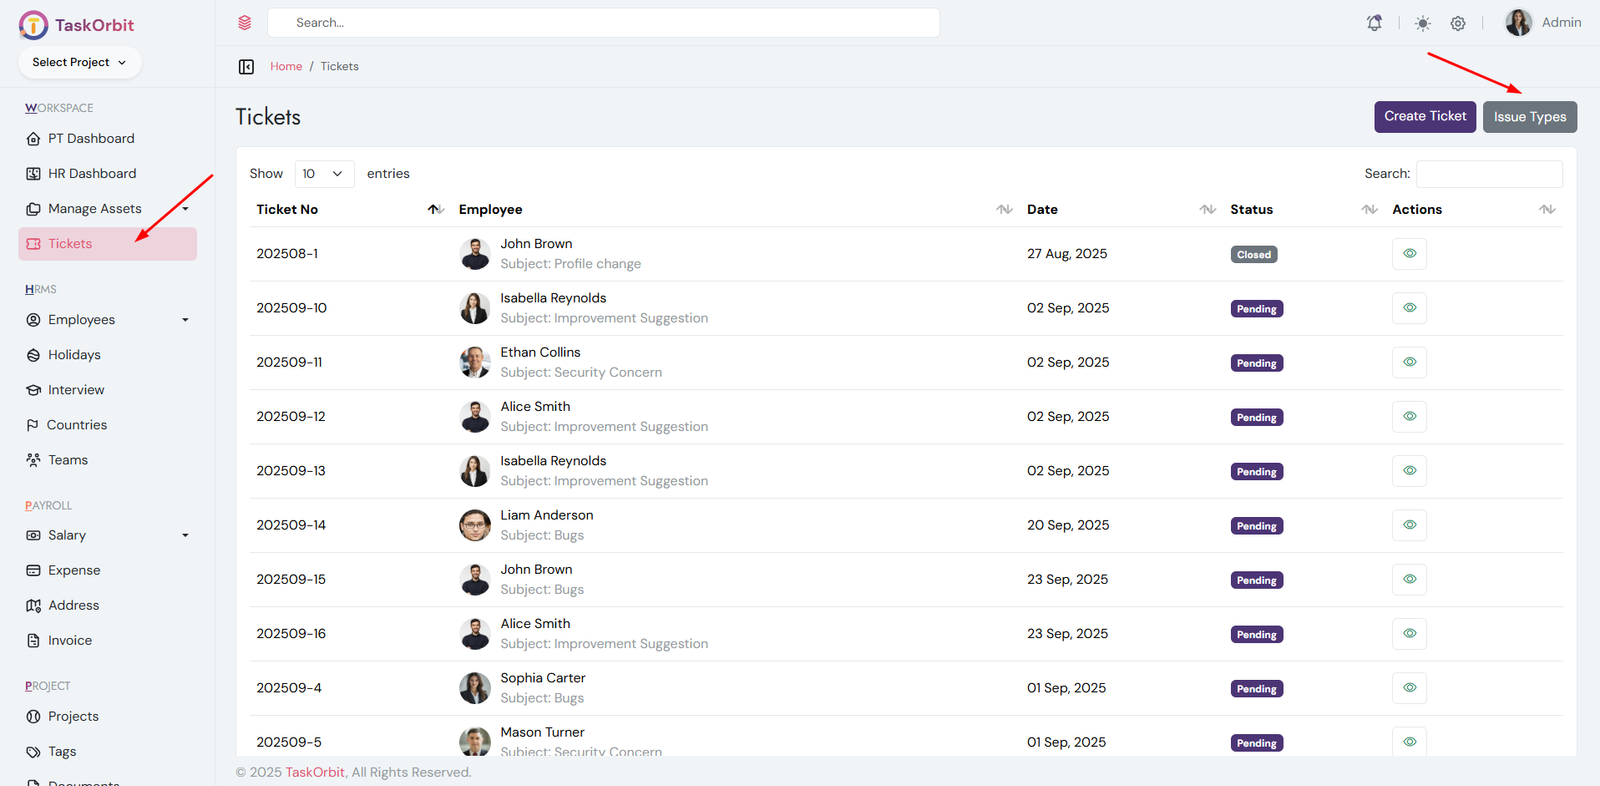
Ticket Management:
- You can manage ticket list here. You can add, edit, update, delete and see the details too.
- AI Assistance: Click the Generate button to receive an AI-generated reply, solution suggestion, or response draft for the selected ticket.
-
Employee clock-in and clock-out management:
- Employee can manage clock in and clock out here.
-
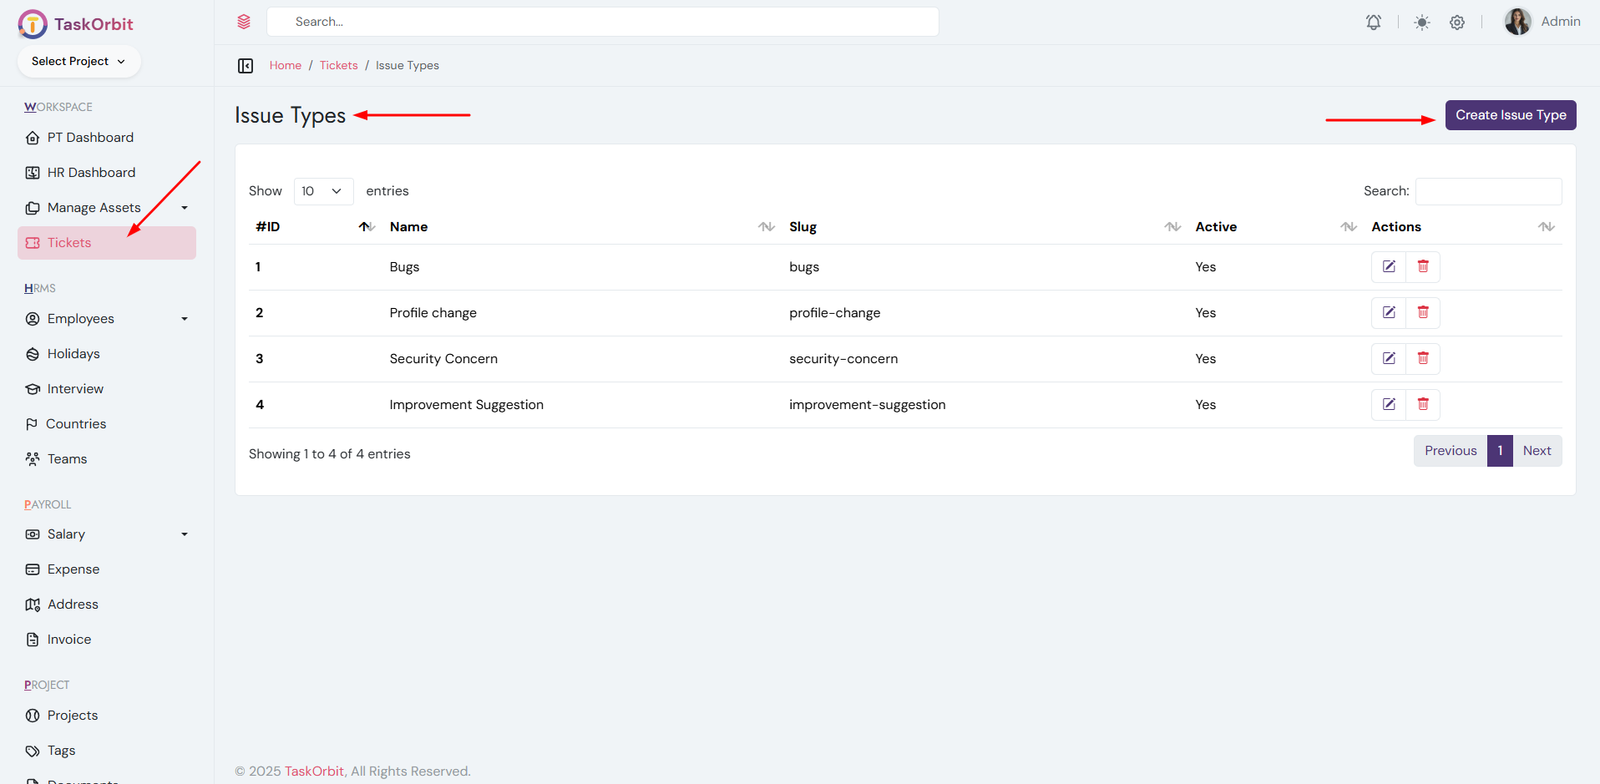
Ticket Issue Management:
- You can manage ticket issue list here. You can add, edit, update, delete and see the details too.
-
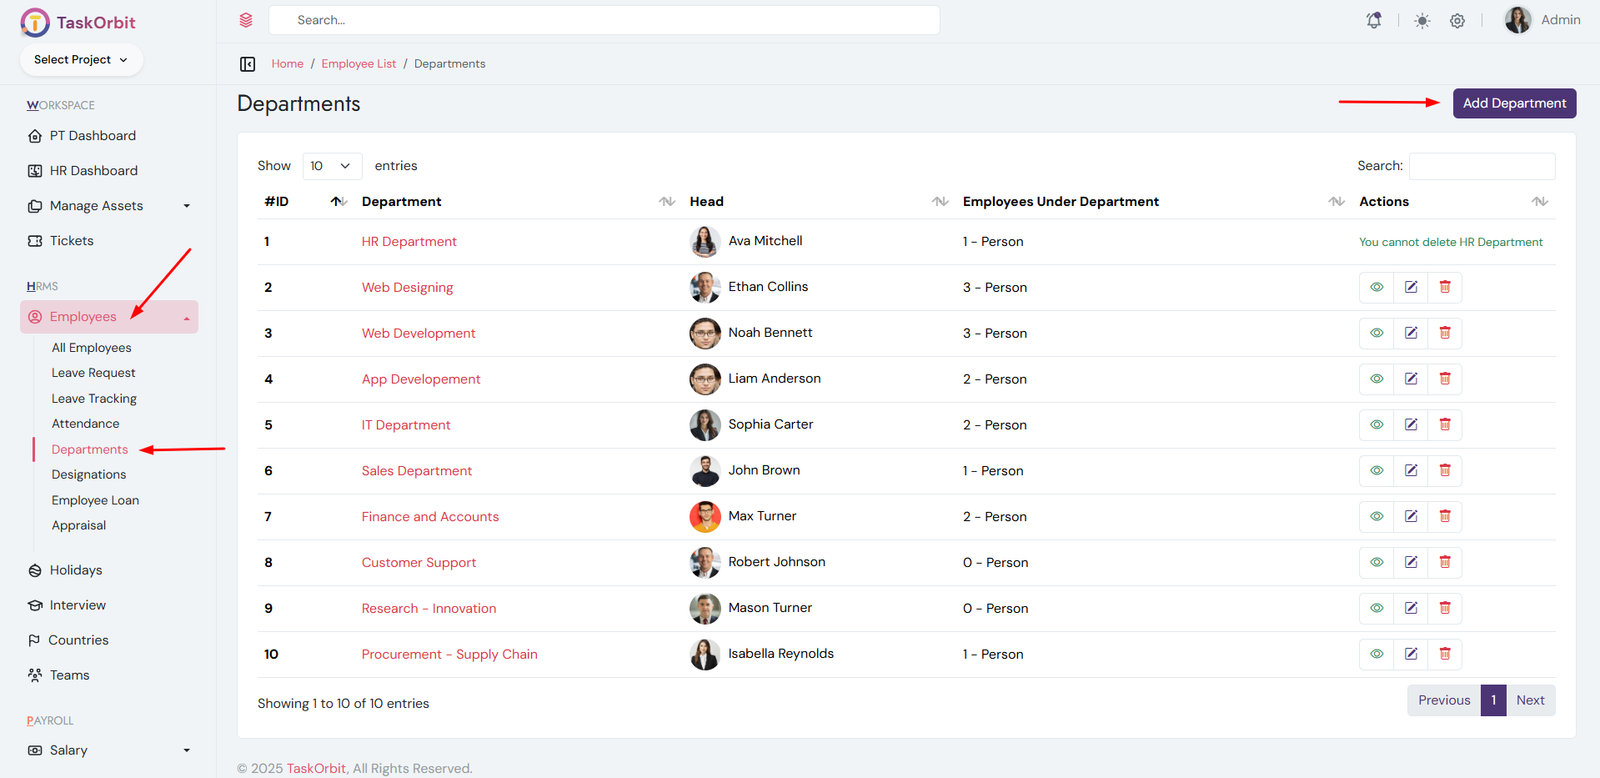
Department Management:
- You can manage department list here. You can add, edit, update, delete and see the details too.
-
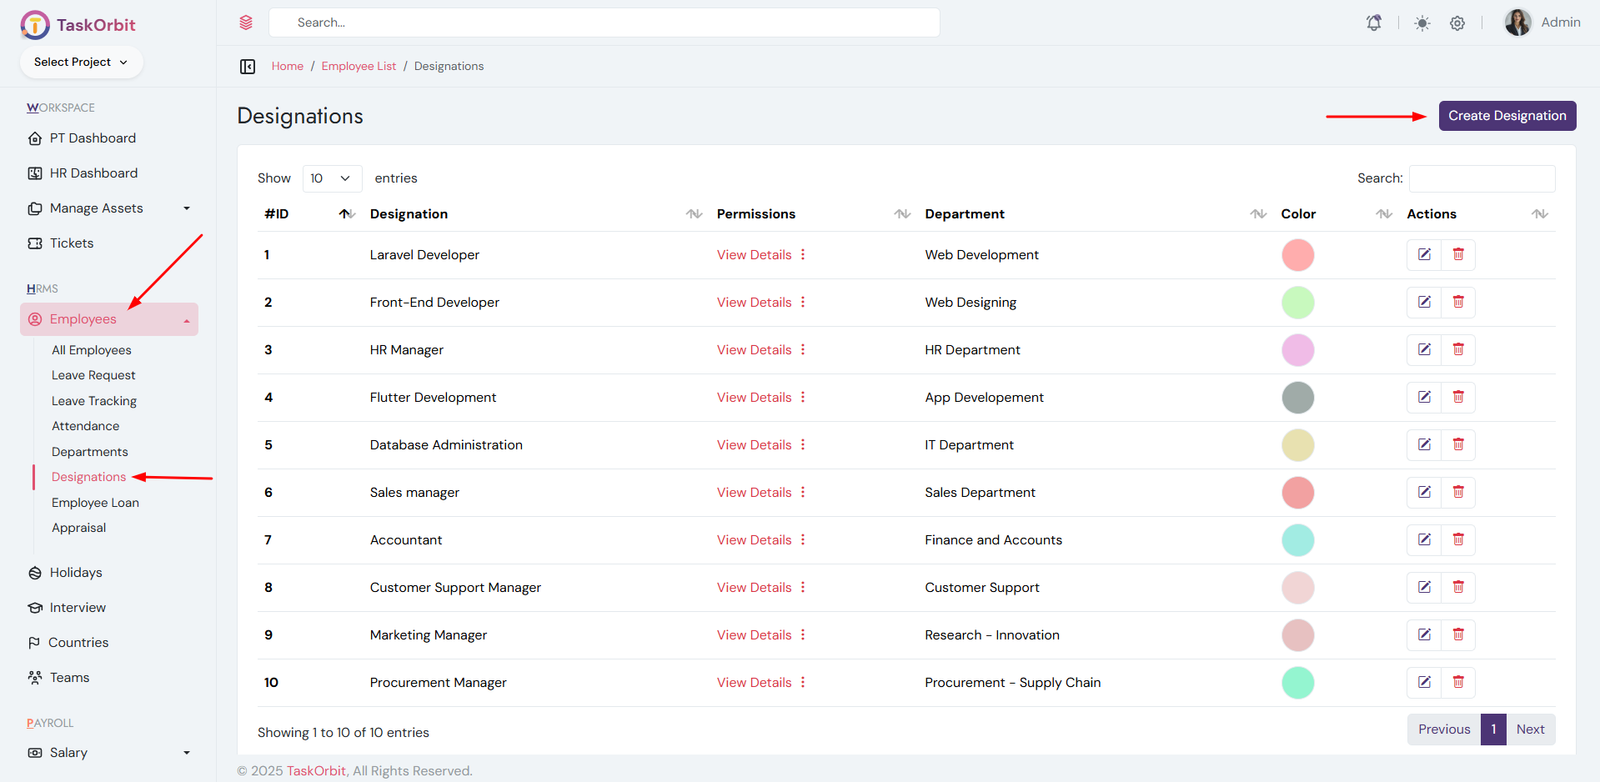
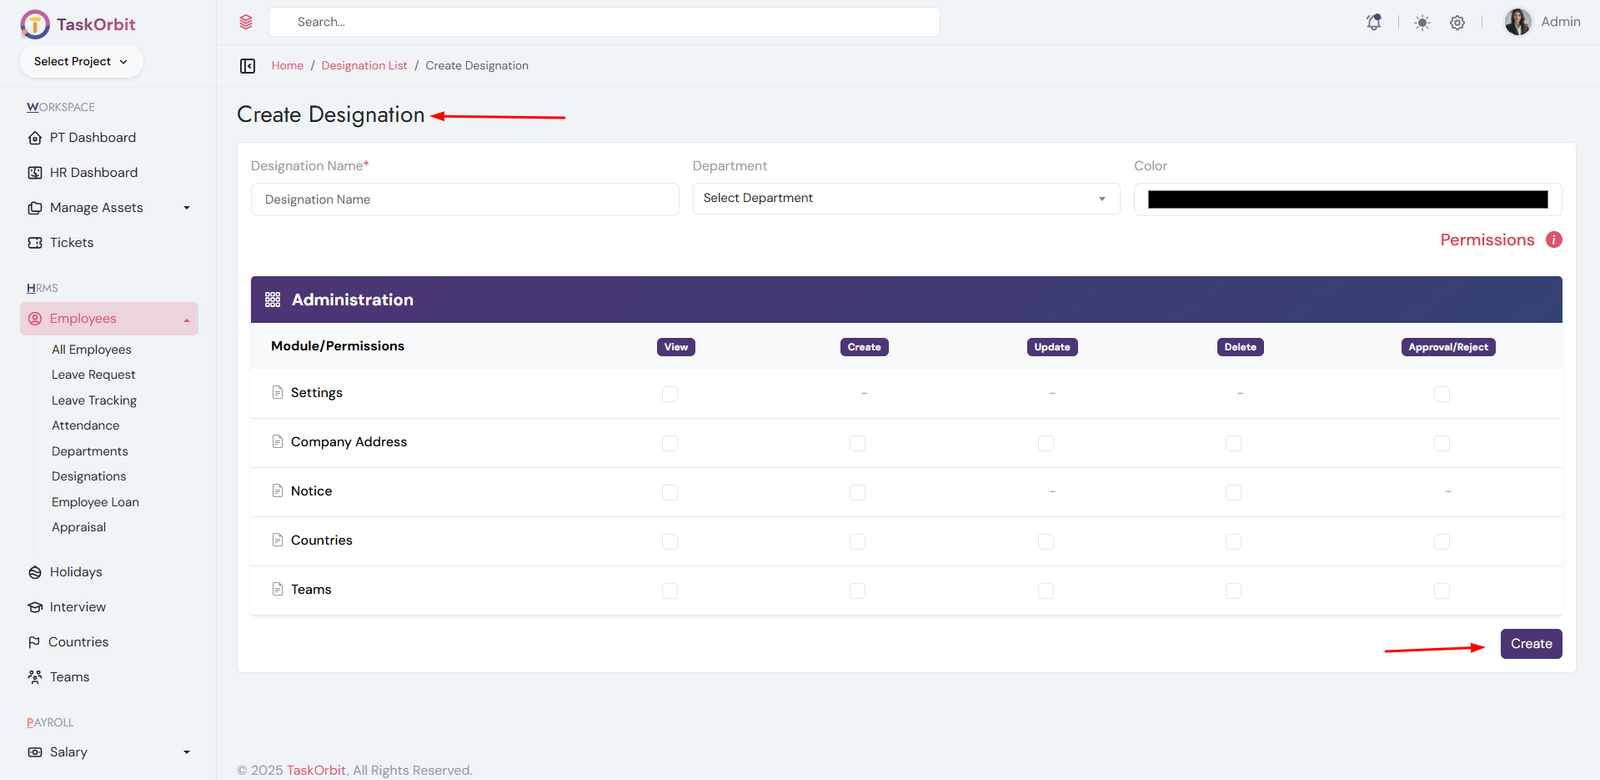
Designations Management:
- You can manage designations list here. You can add, edit, update, delete and see the details too.
-
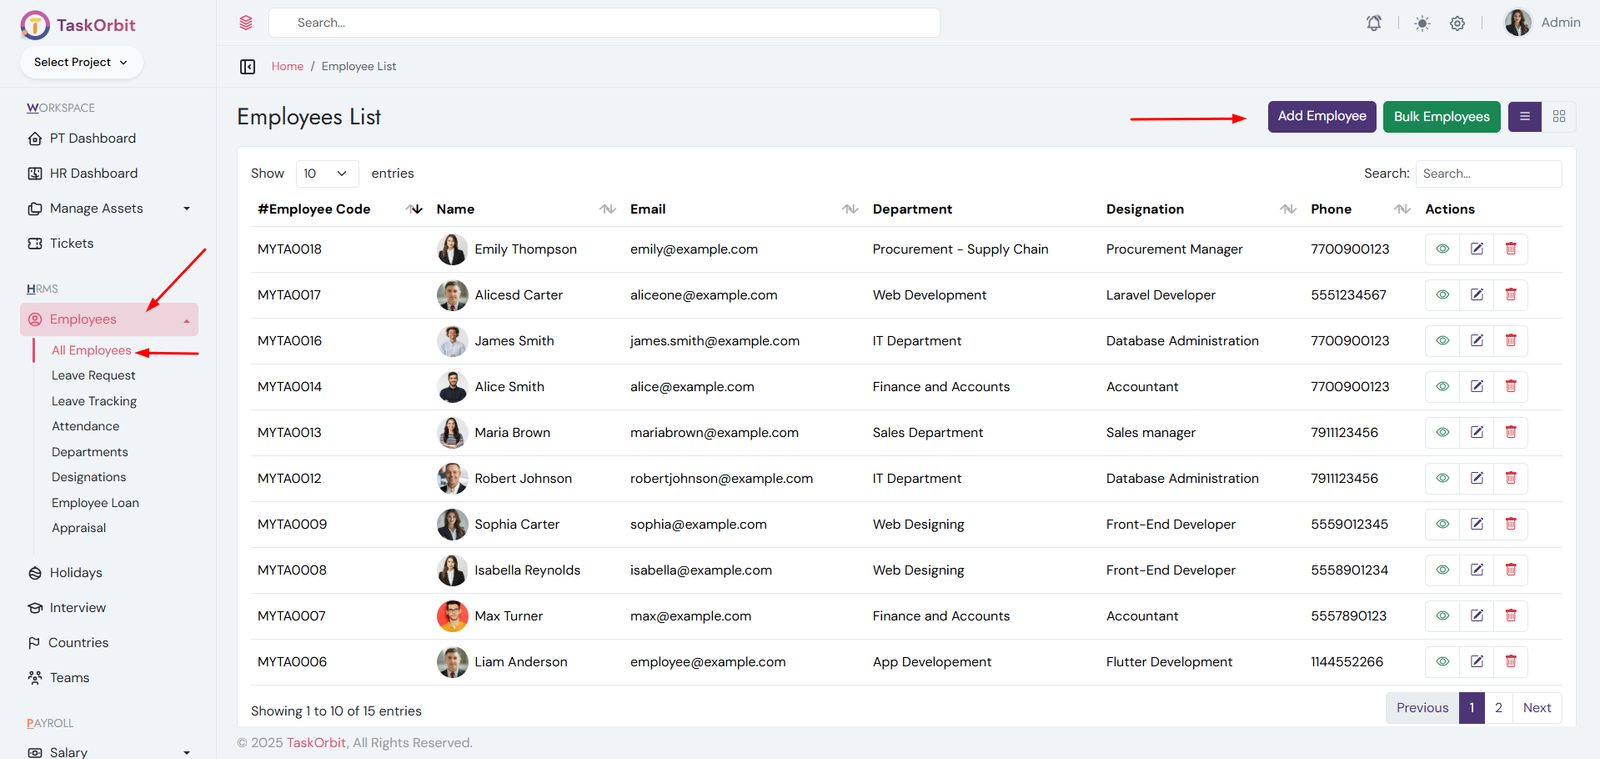
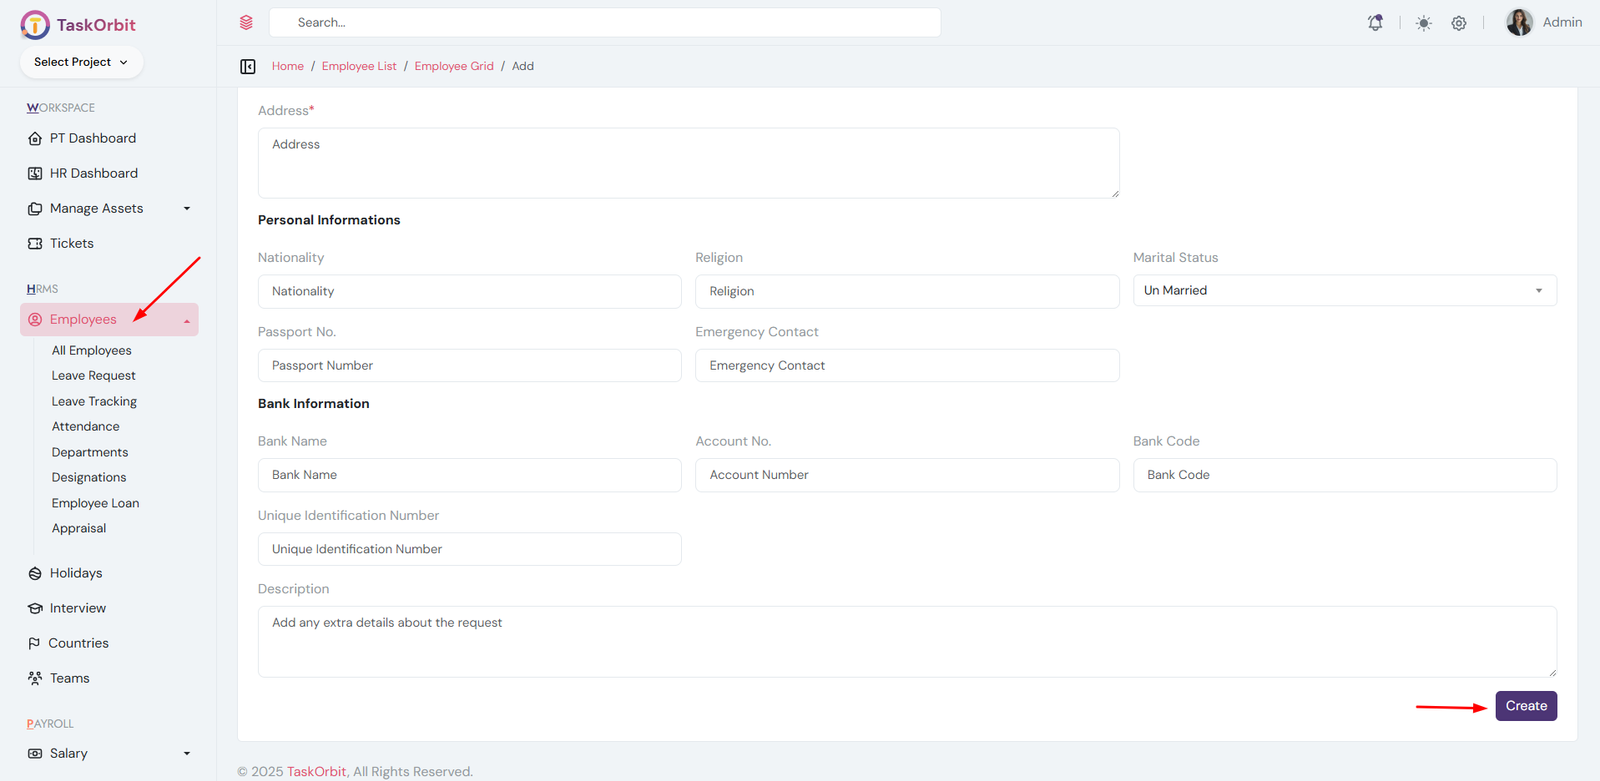
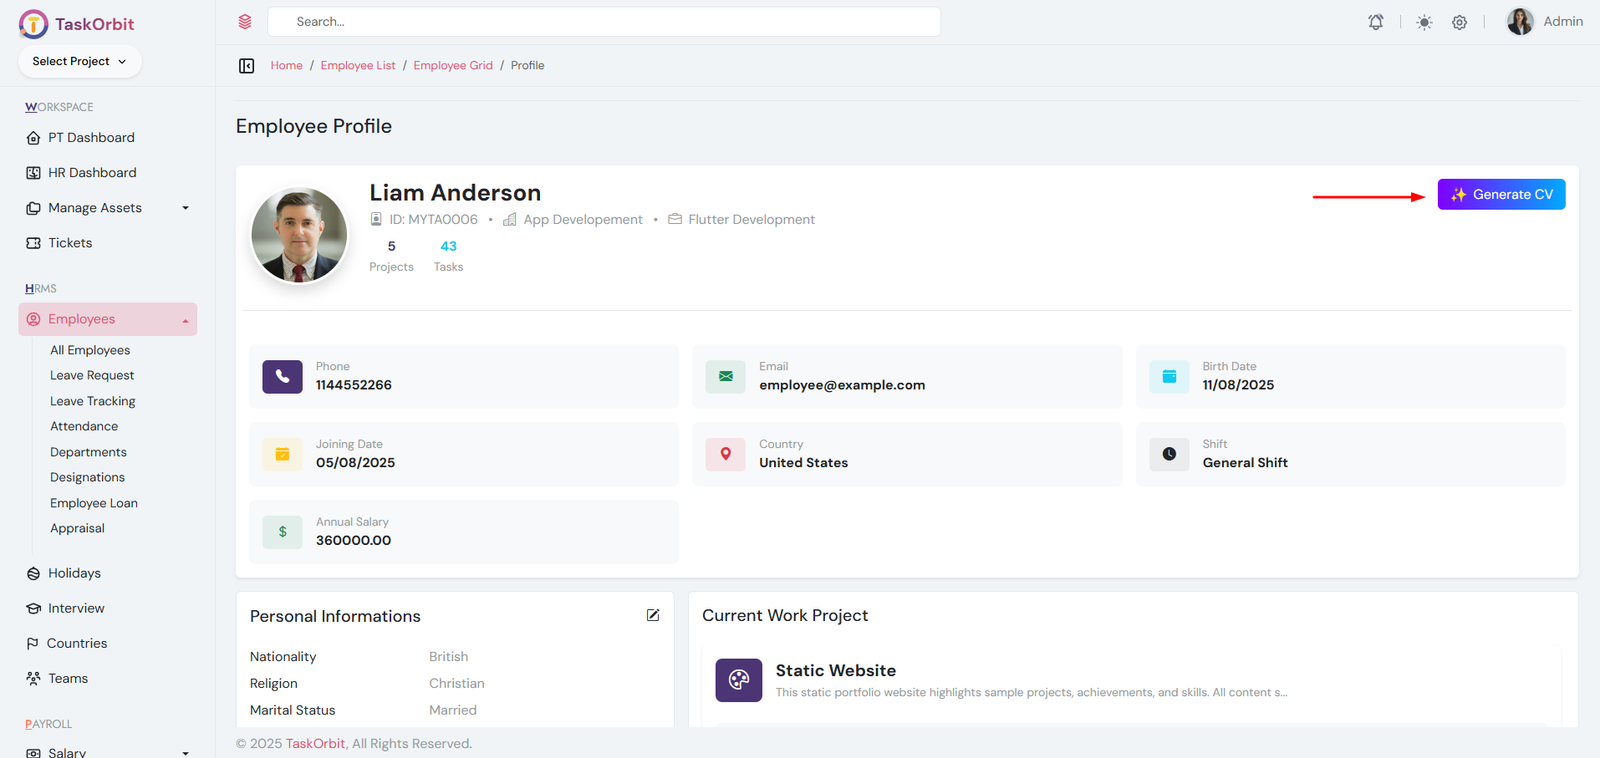
Employee Management:
- You can manage the employee list here. You can add, edit, update, delete, and view detailed employee information.
- AI CV Generation: Go to the employee list -> view employee and click the Generate CV button on the top-right to create an AI-generated CV.

-
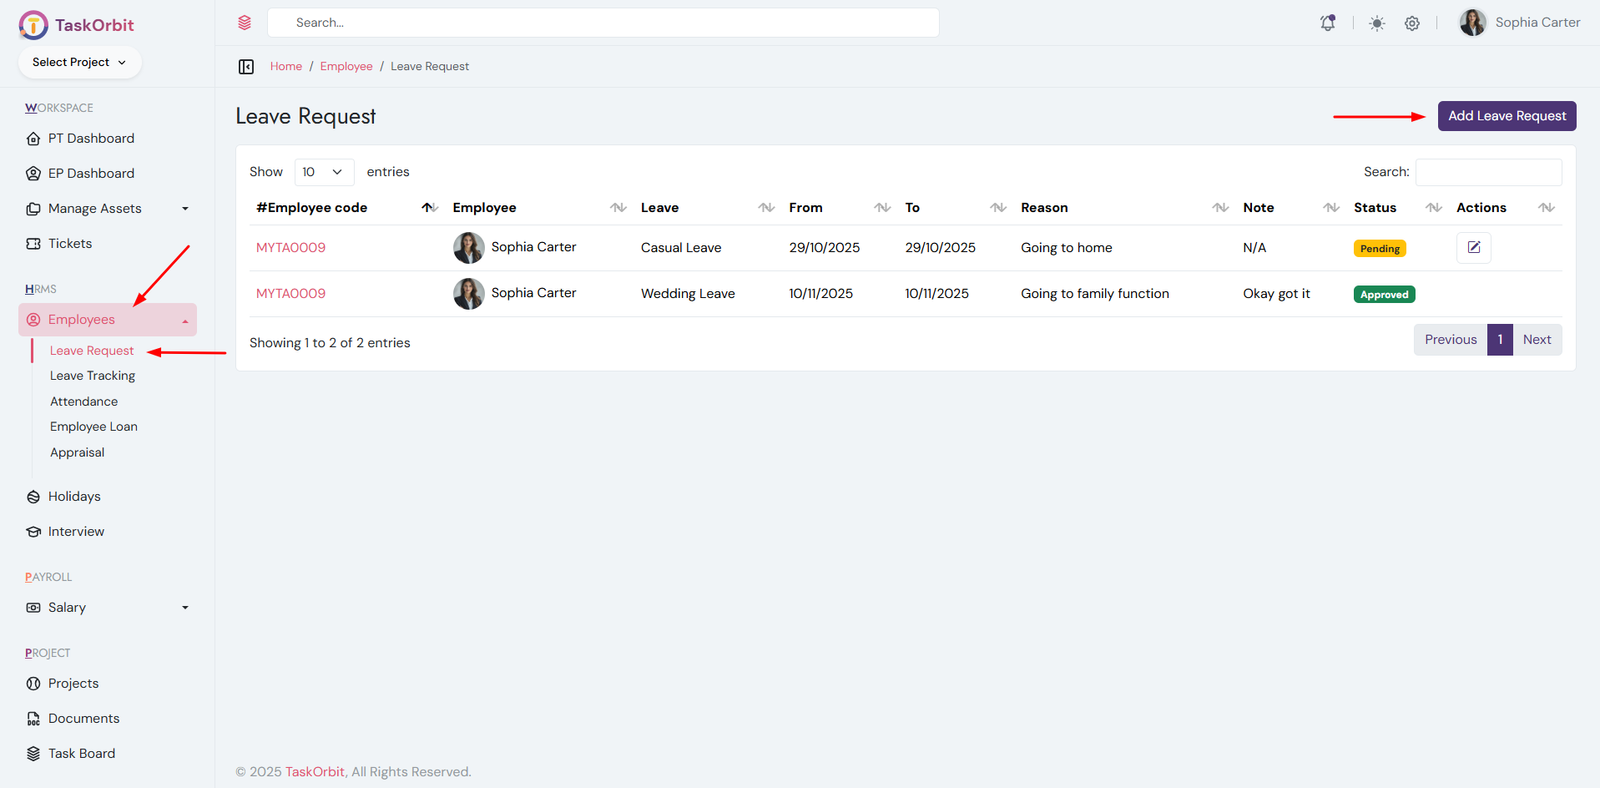
Leave Requests Management:
- You can manage Leave list here. You can add, edit, update, delete and see the details too. also admin can approve/reject leave request
-
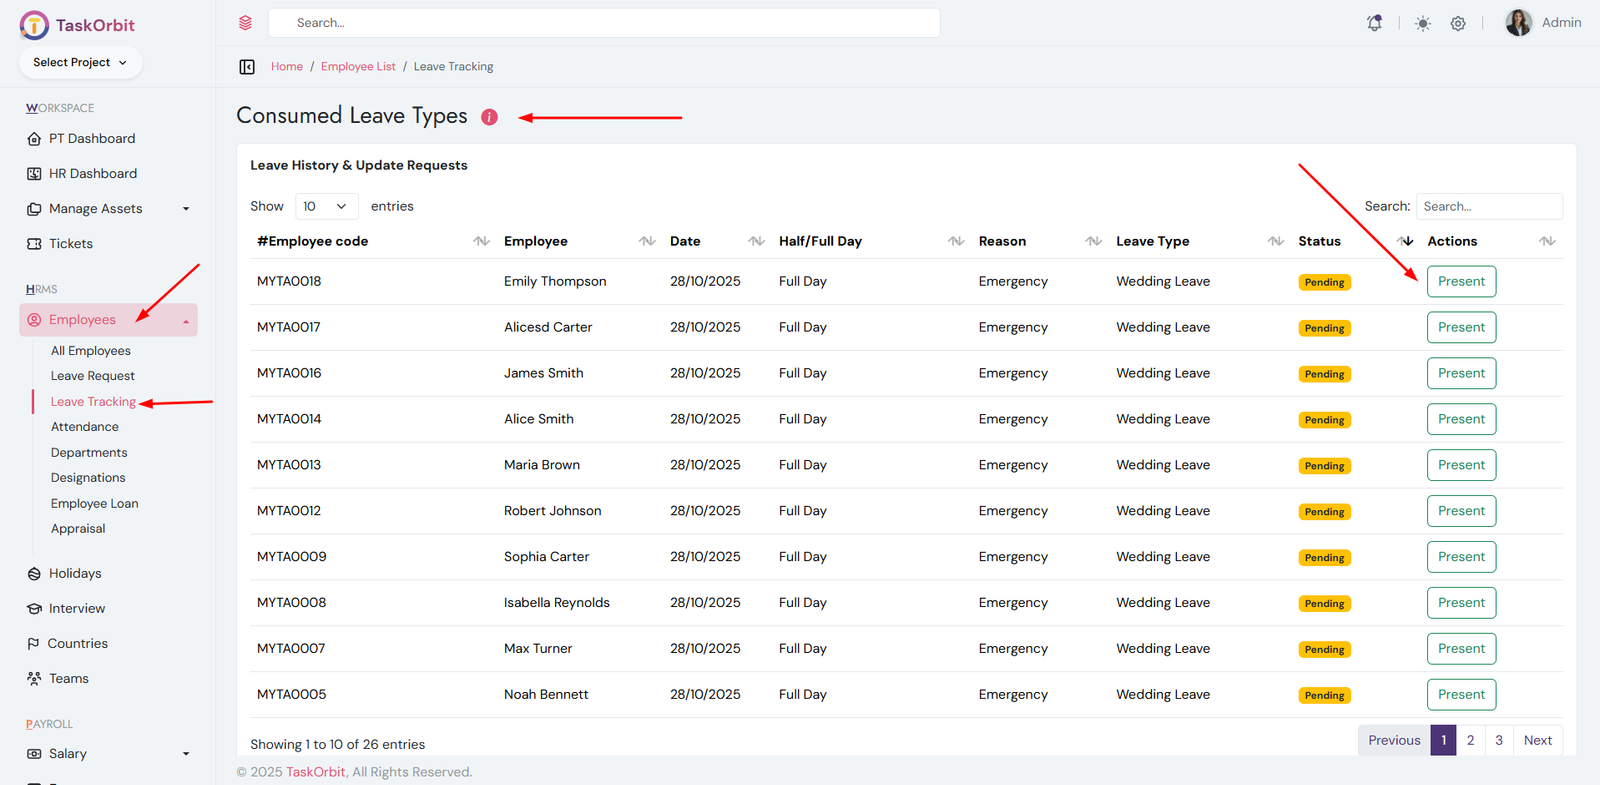
Consumed Leave Management:
- You can manage consumed leave list here. You approve leave request. default is rejected
- If user is marked as Present.
- You can update Clock In and Clock Out times.
-
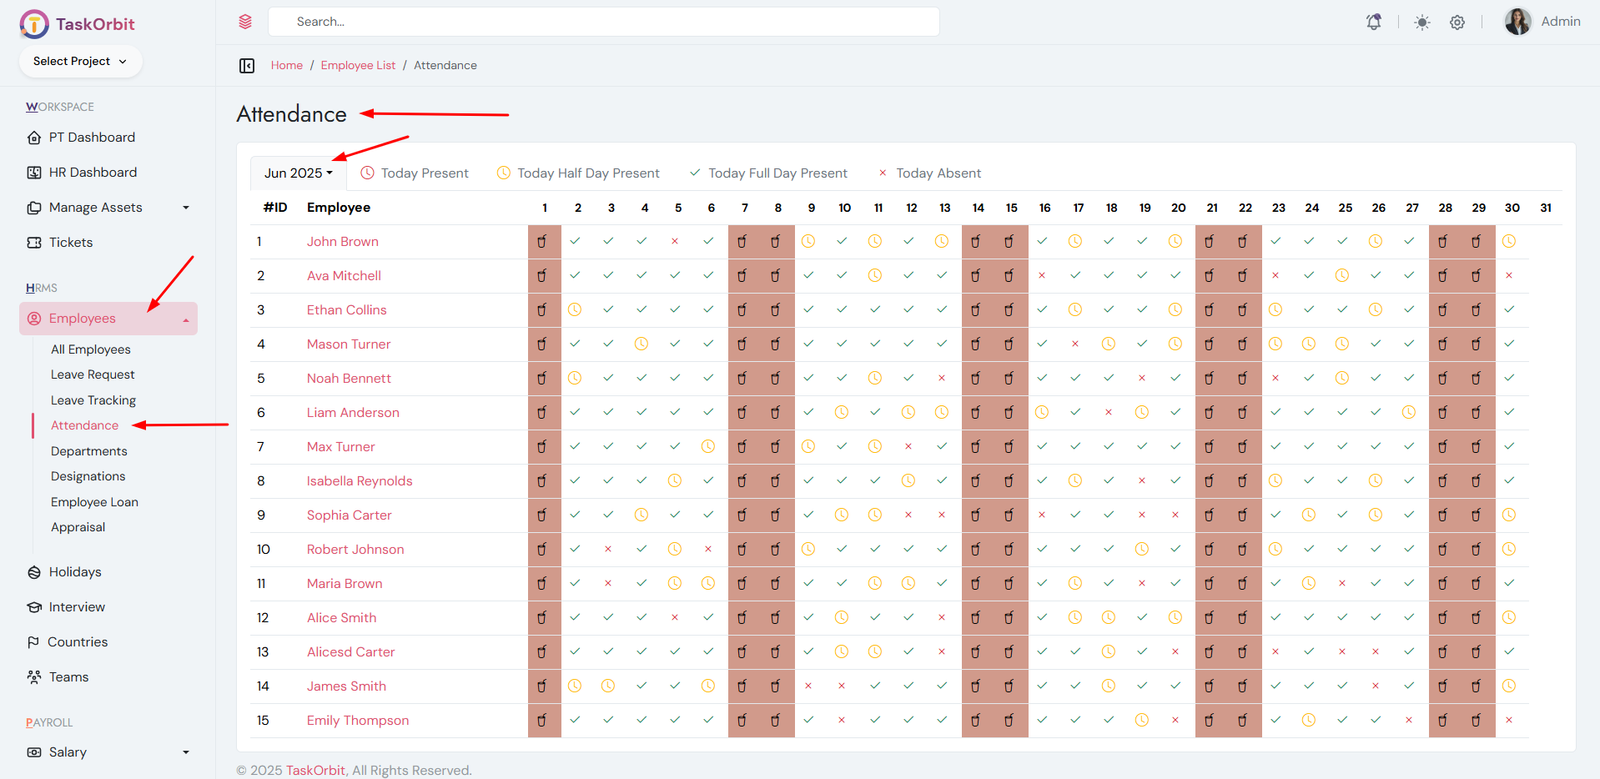
Attendance Management:
- You can manage attendance list here. You can add, edit, update and see the details too.
-
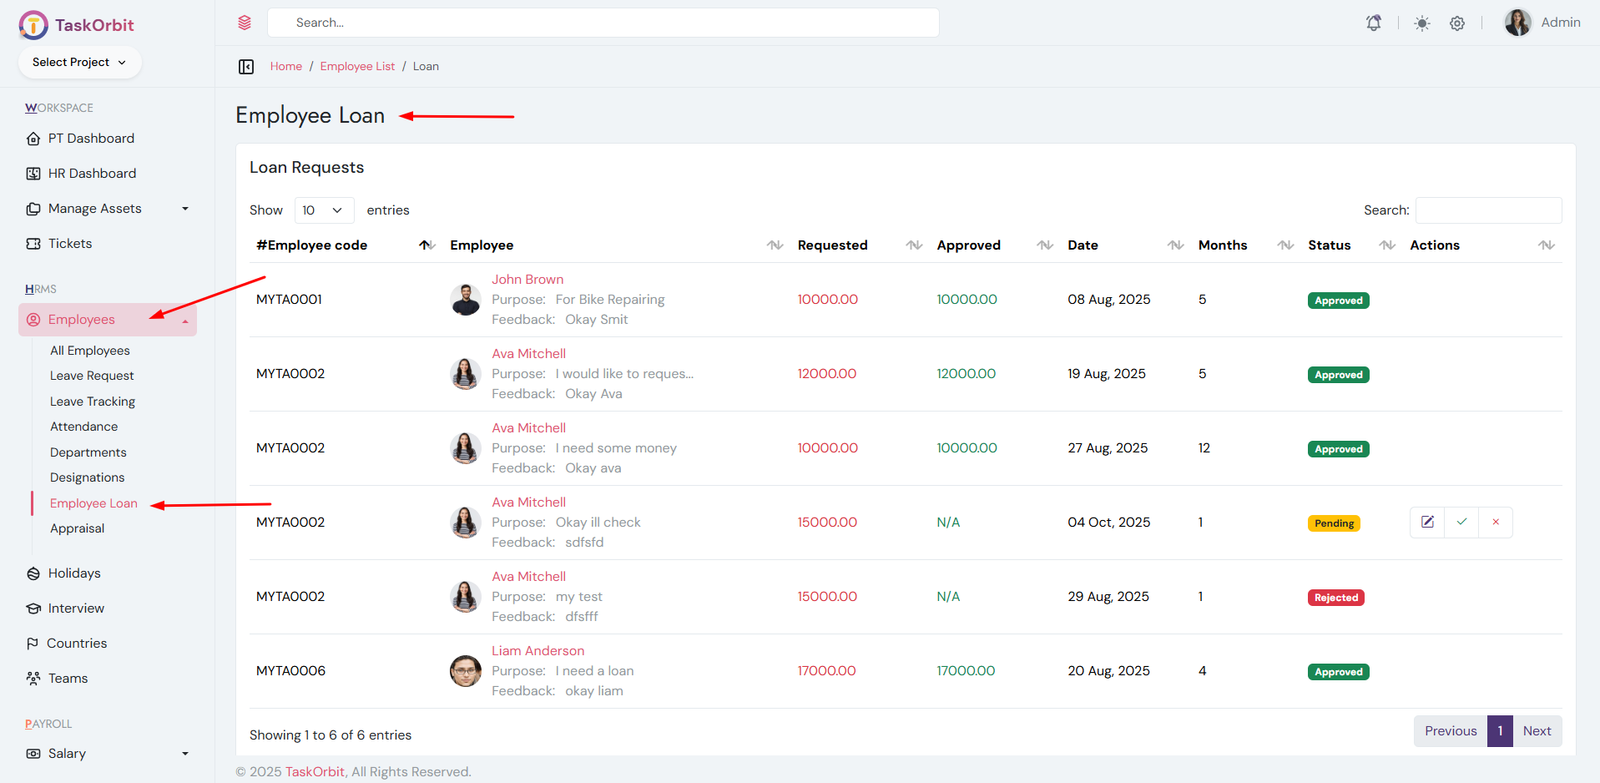
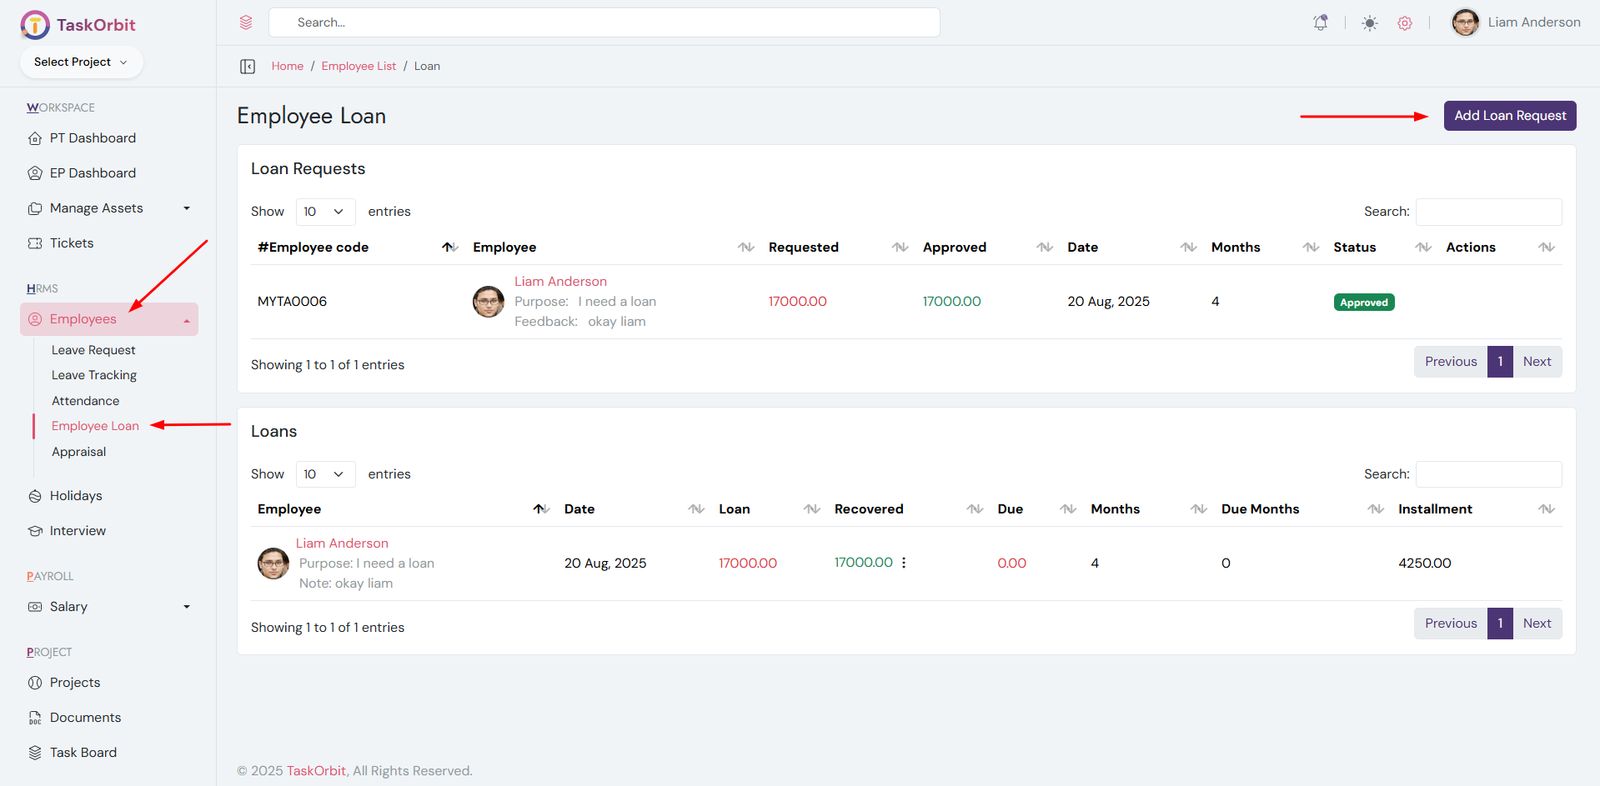
Employee Loan Management:
- You can manage employee loan list here. You can add, edit, update and see the details too. also admin can approve/reject loan request
-
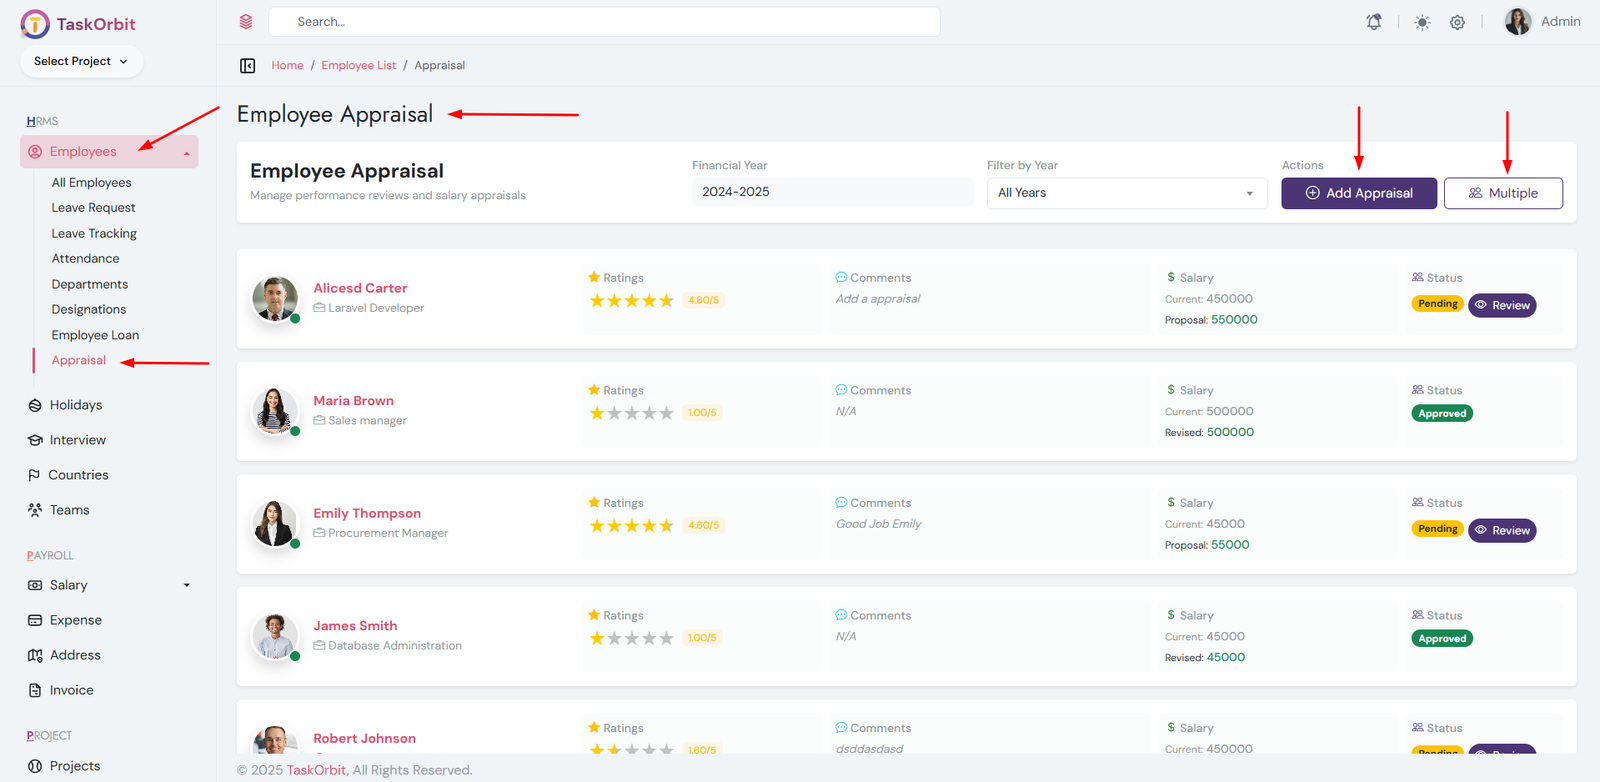
Employee Appraisal Management:
- You can manage employee appraisal list here. You can create single level and multiple level appraisals. Yalso you can review and see the details too. admin can approve/reject appraisal request
- Admin can approve/reject appraisal request
-
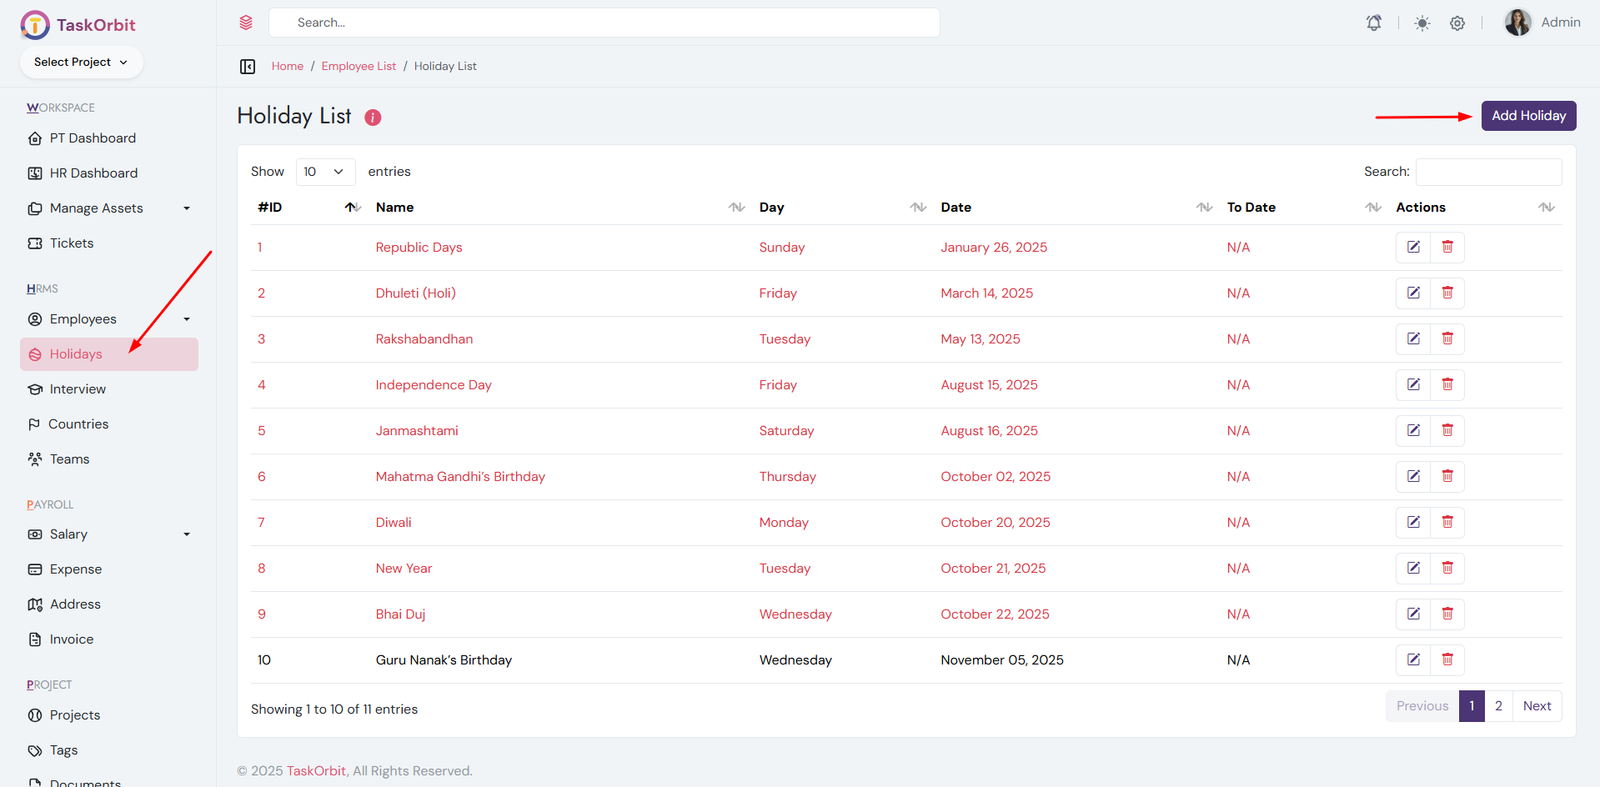
Holiday Management:
- You can manage holiday list here. You can add, edit, update and see the details too.
- As per the defined holiday list, payroll processing will automatically exclude all holidays for the selected month.
- Past holidays will be shown in red color
- Current month holidays will be shown in green color
- Future holidays will be shown in black color
-
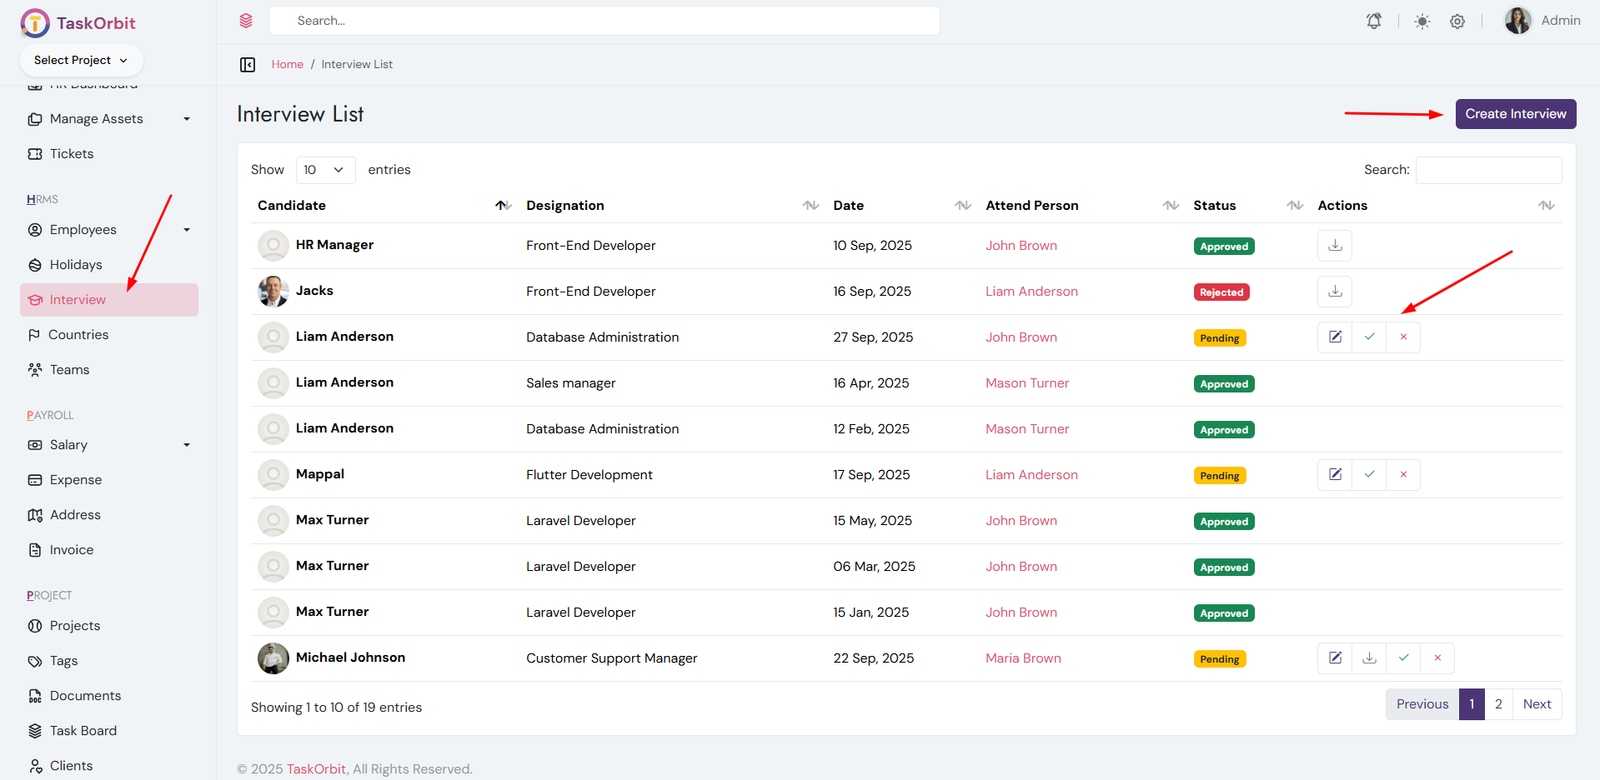
Interview Management:
- You can manage interview list here. You can add, edit, update and see the details too.
- Admin/HR can approve/reject interview request
-
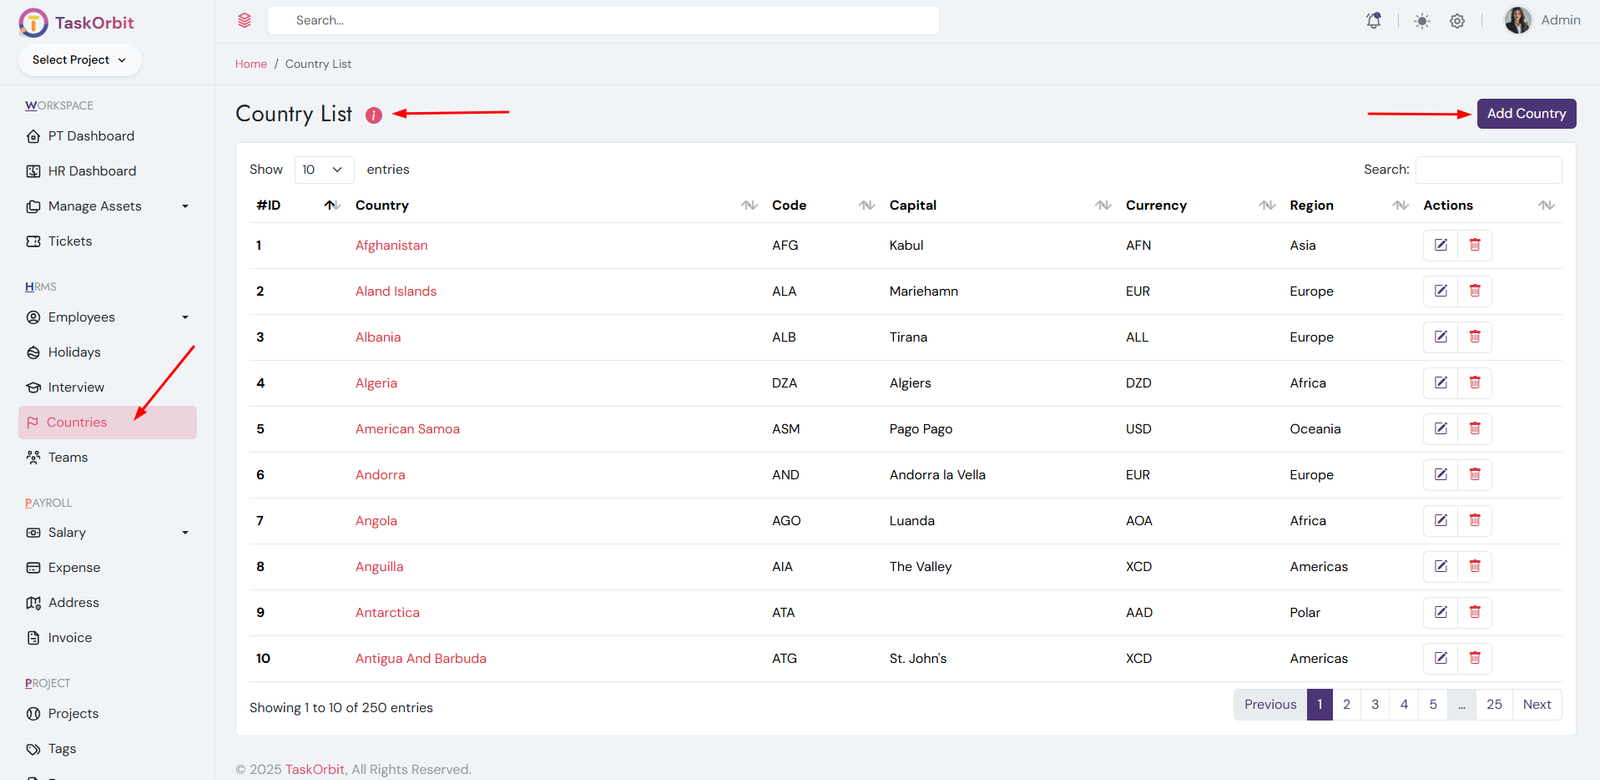
Country Management:
- You can manage country list here. You can add, edit, update and see the details too.
- The country is used to set the default timezone for the application.
- It also defines the default currency used in transactions and payroll.
- Changing the country may update date, time, and number formats dynamically.
- Ensure you choose the correct country for accurate global settings.
- If you delete a country, because it is actively used in the application settings.
- It may be set as the default currency, default timezone, or both.
- Please update the app settings before attempting to delete it.
-
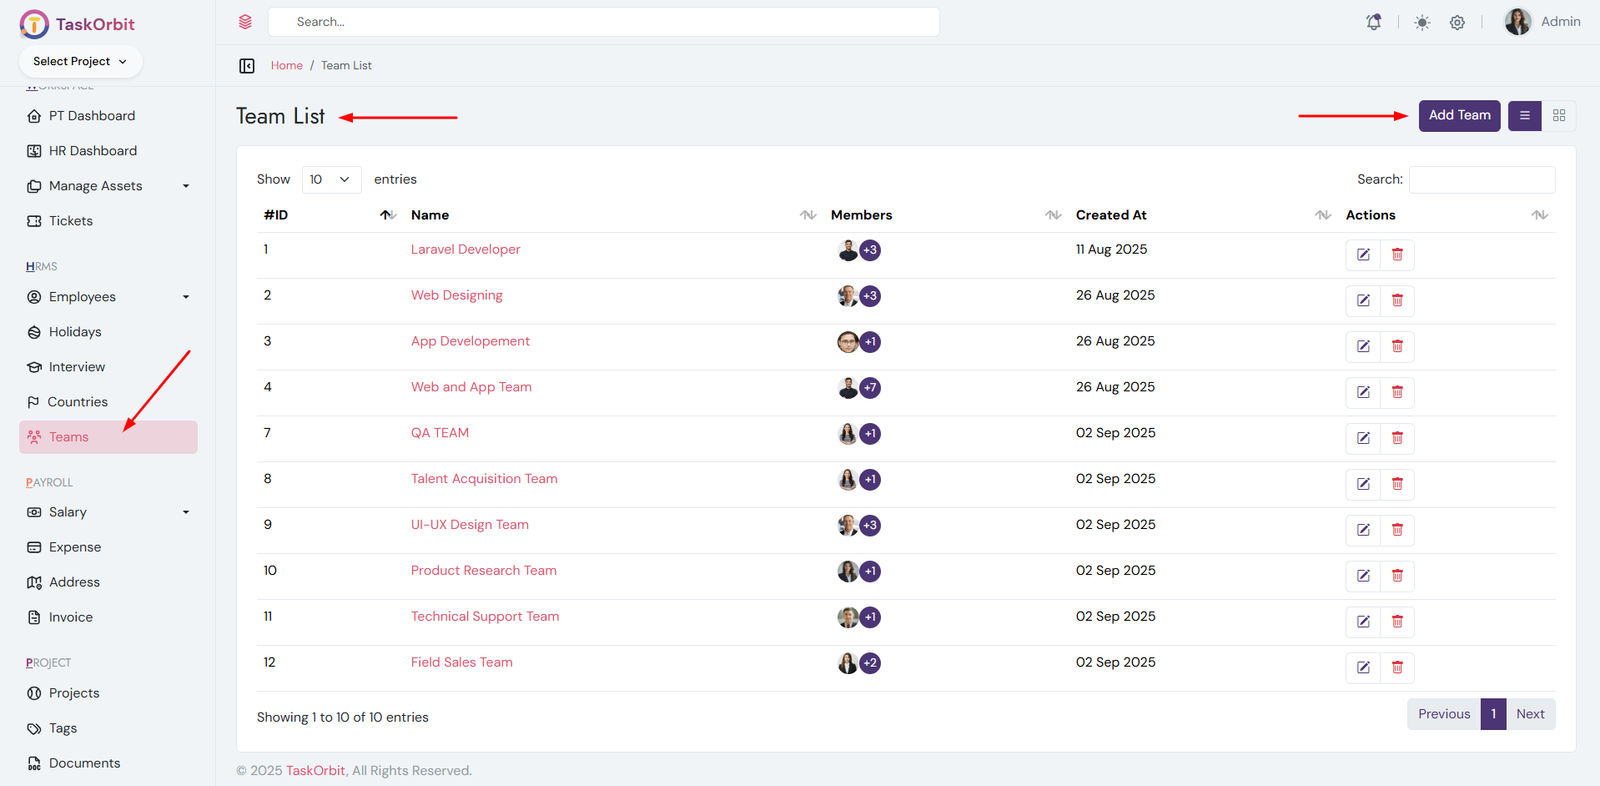
Team Management:
- You can manage team list here. You can add, edit, update and see the details too.
-
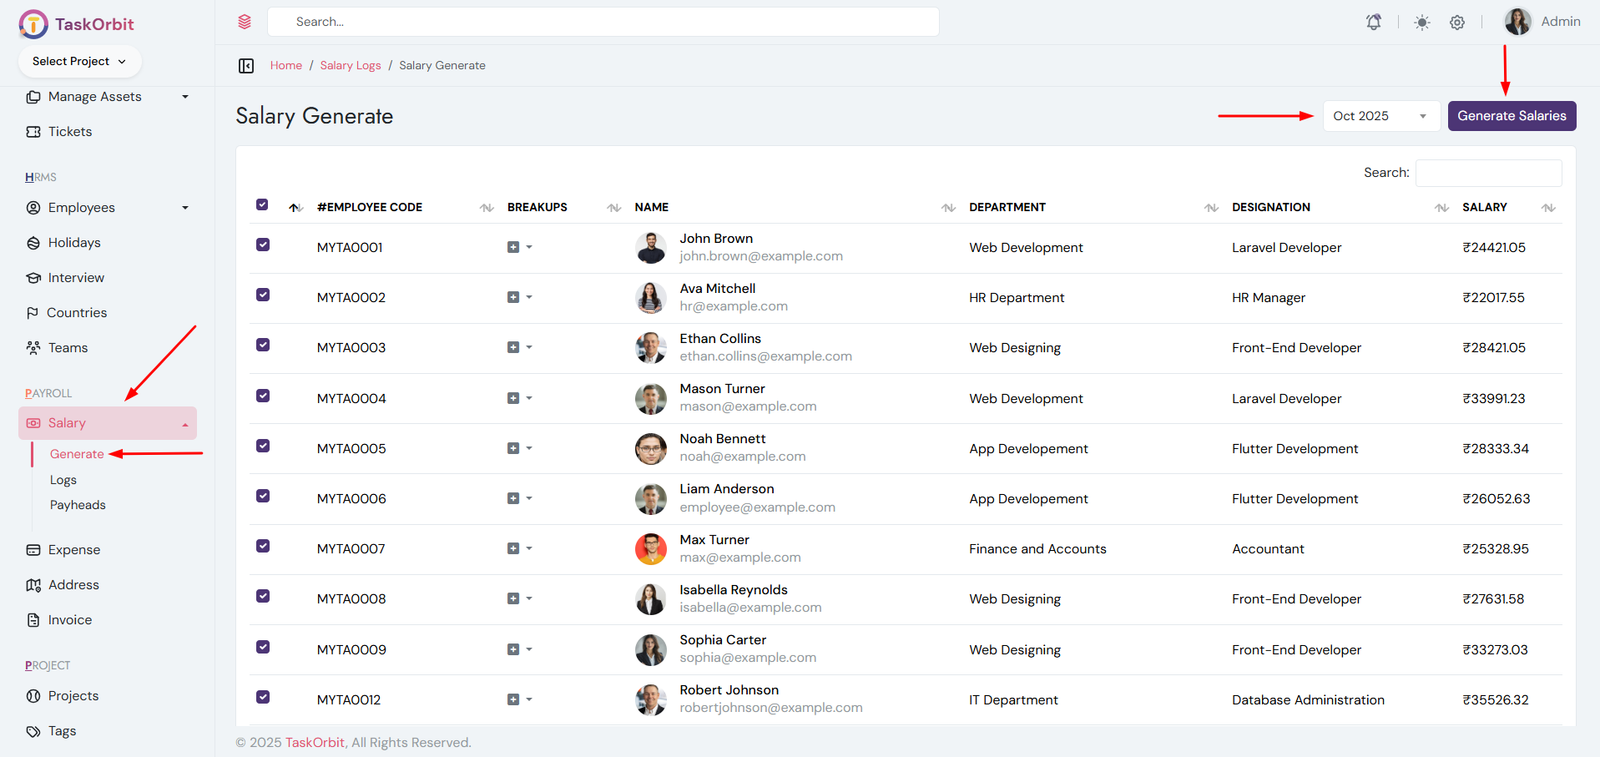
Salary Management:
- You can manage salary list here. You can add, edit, update and see the details too.
-
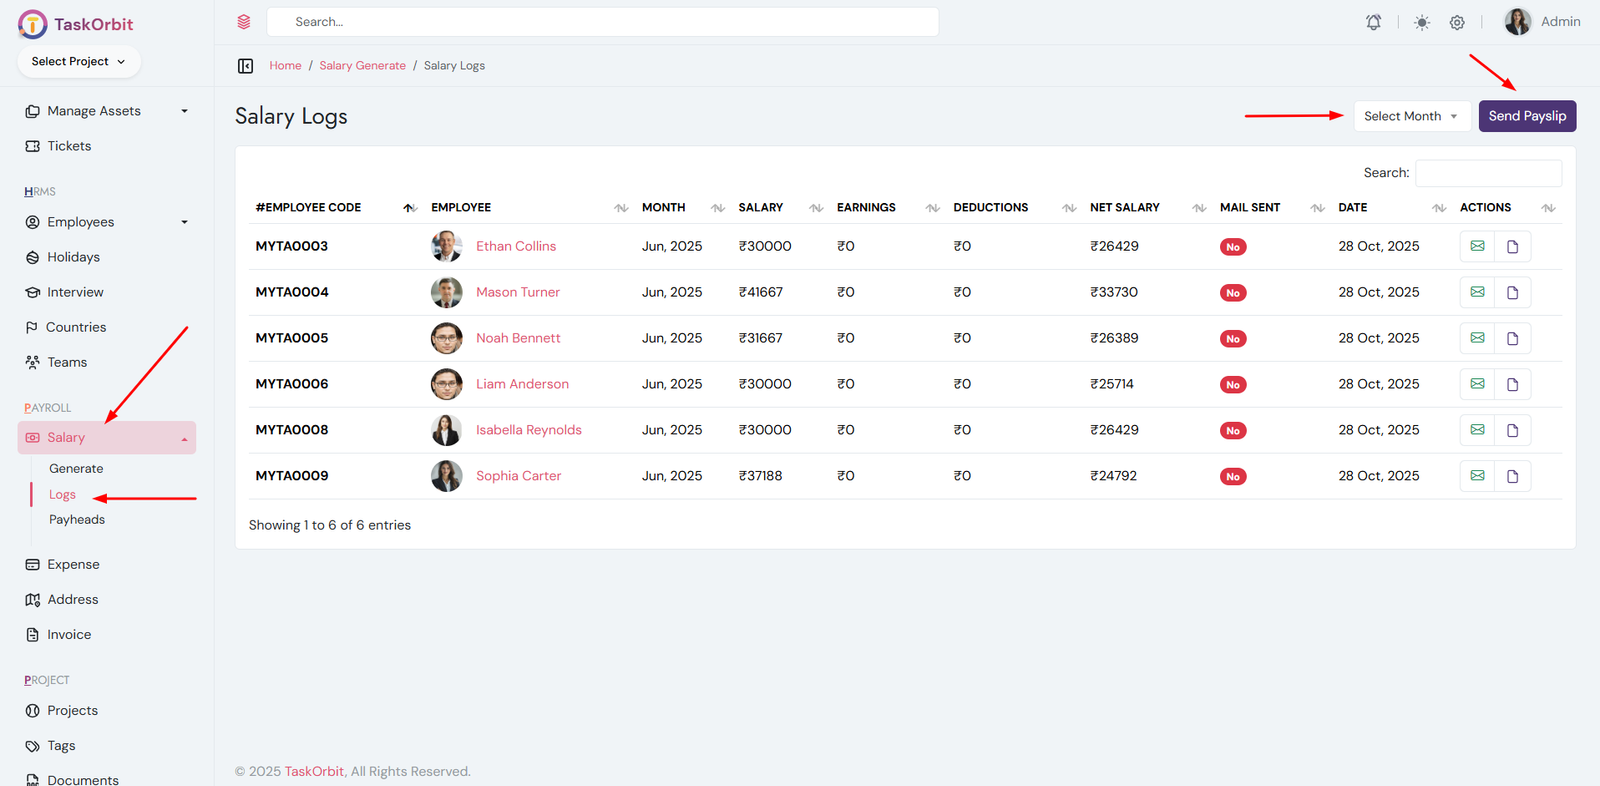
Salary Logs Management:
- You can manage salary logs list here. You can see the details too.
-
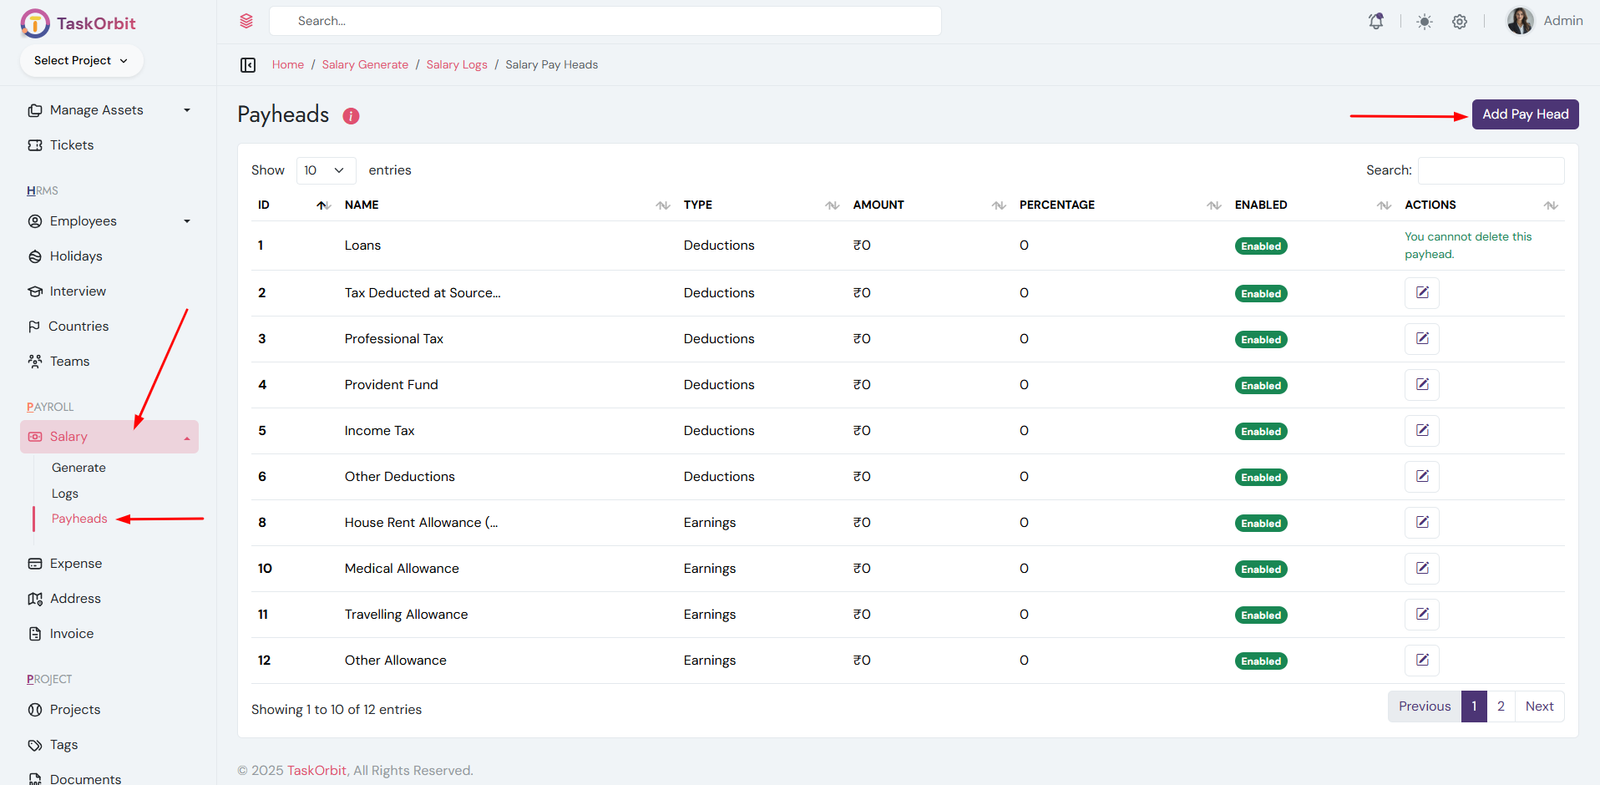
Salary Payheads Management:
- You can manage salary payheads list here. You can add, edit, update and see the details too.
- Payheads define how salaries are structured.
- They include Earnings (like Basic, HRA, Bonus).
- They include Deductions (like Loans, PF, Taxes).
- Some payheads cannot be deleted if in use.
- Disabled payheads are not applied in salary calculation.
-
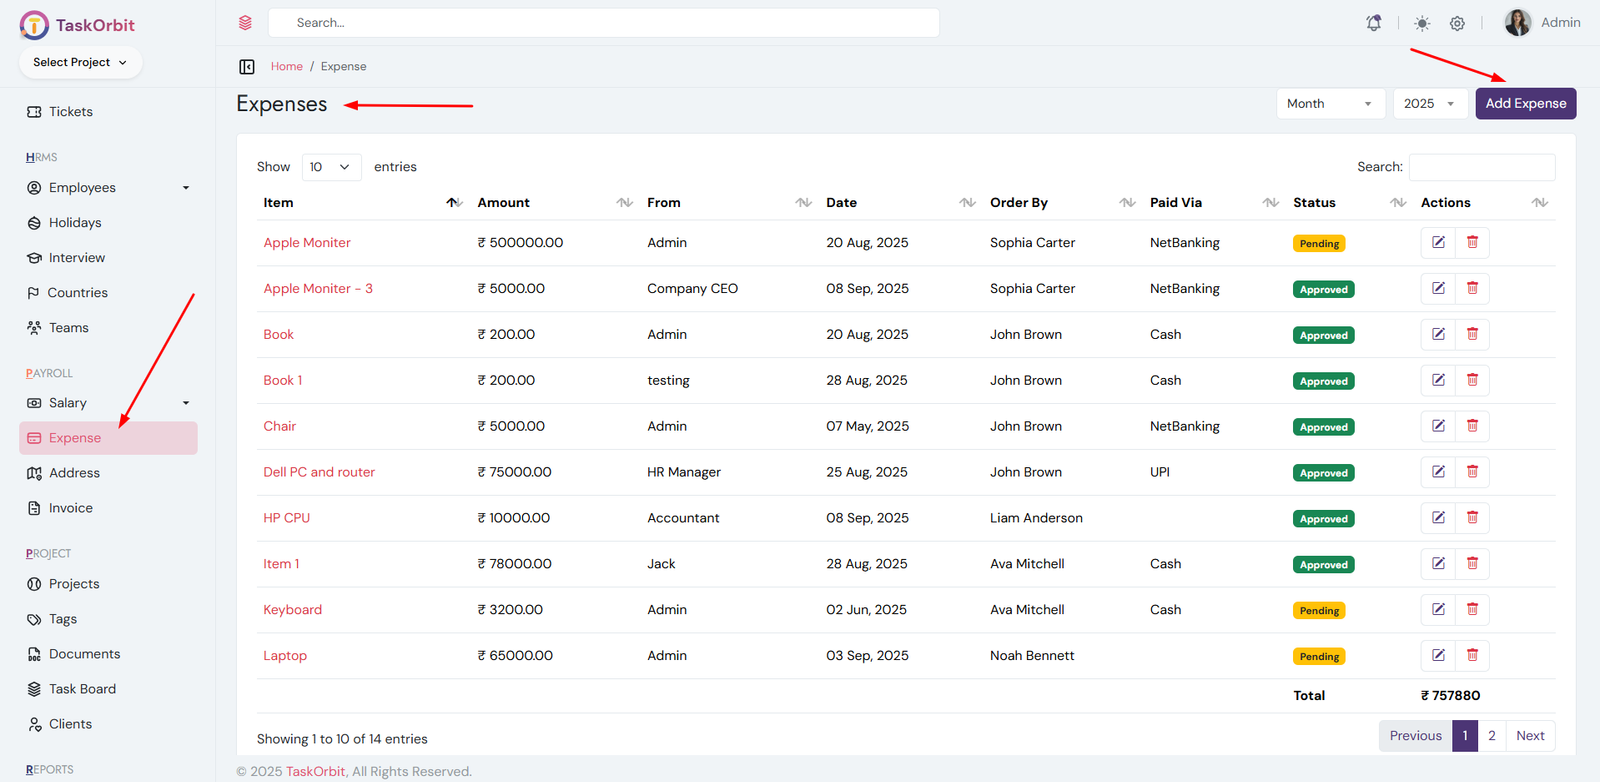
Expenses Management:
- You can manage expenses list here. You can add, edit, update and see the details too.
-
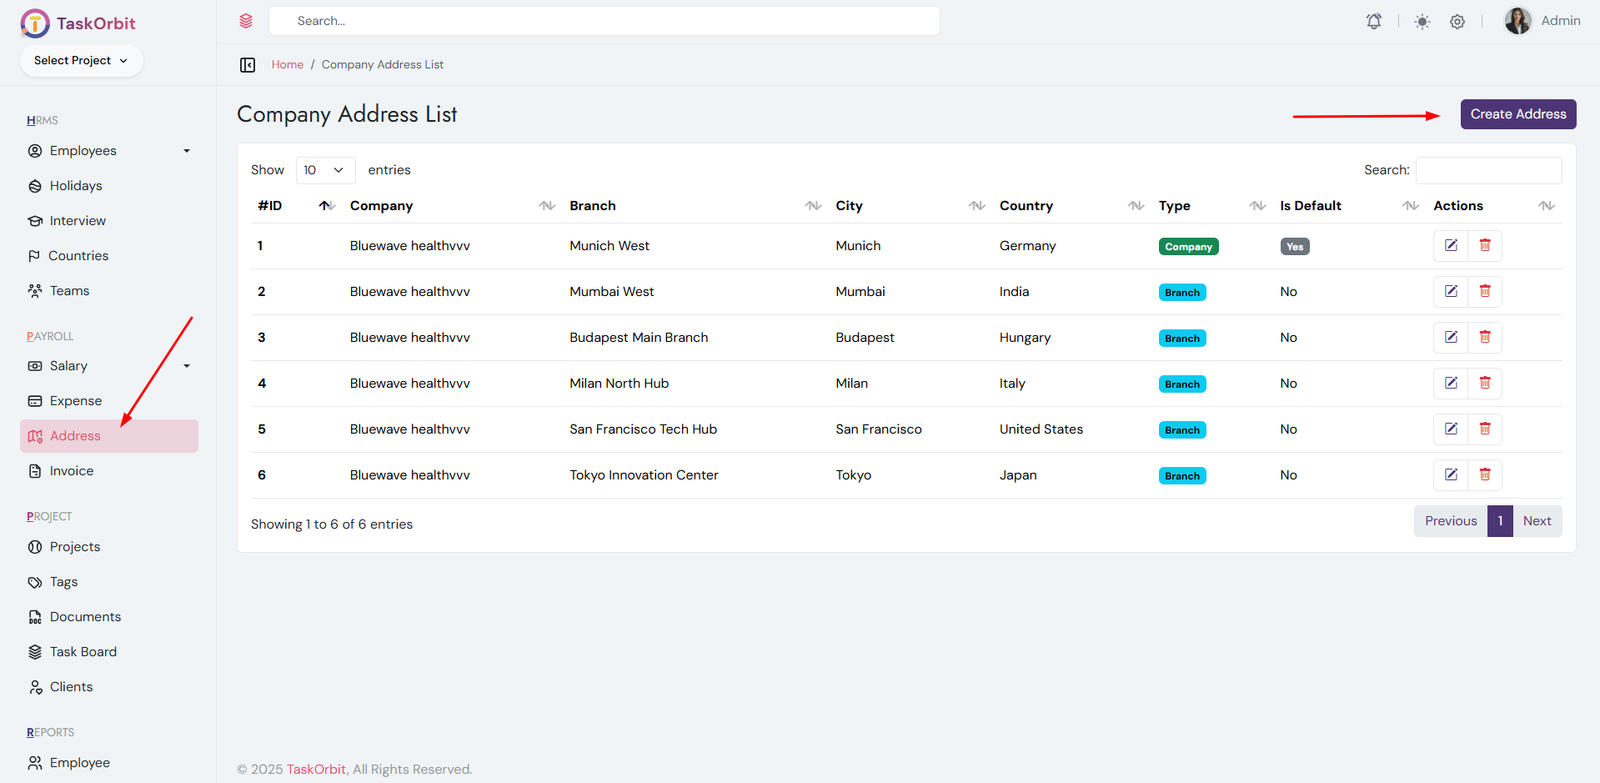
Company address Management:
- You can manage company address list here. You can add, edit, update and see the details too.
-
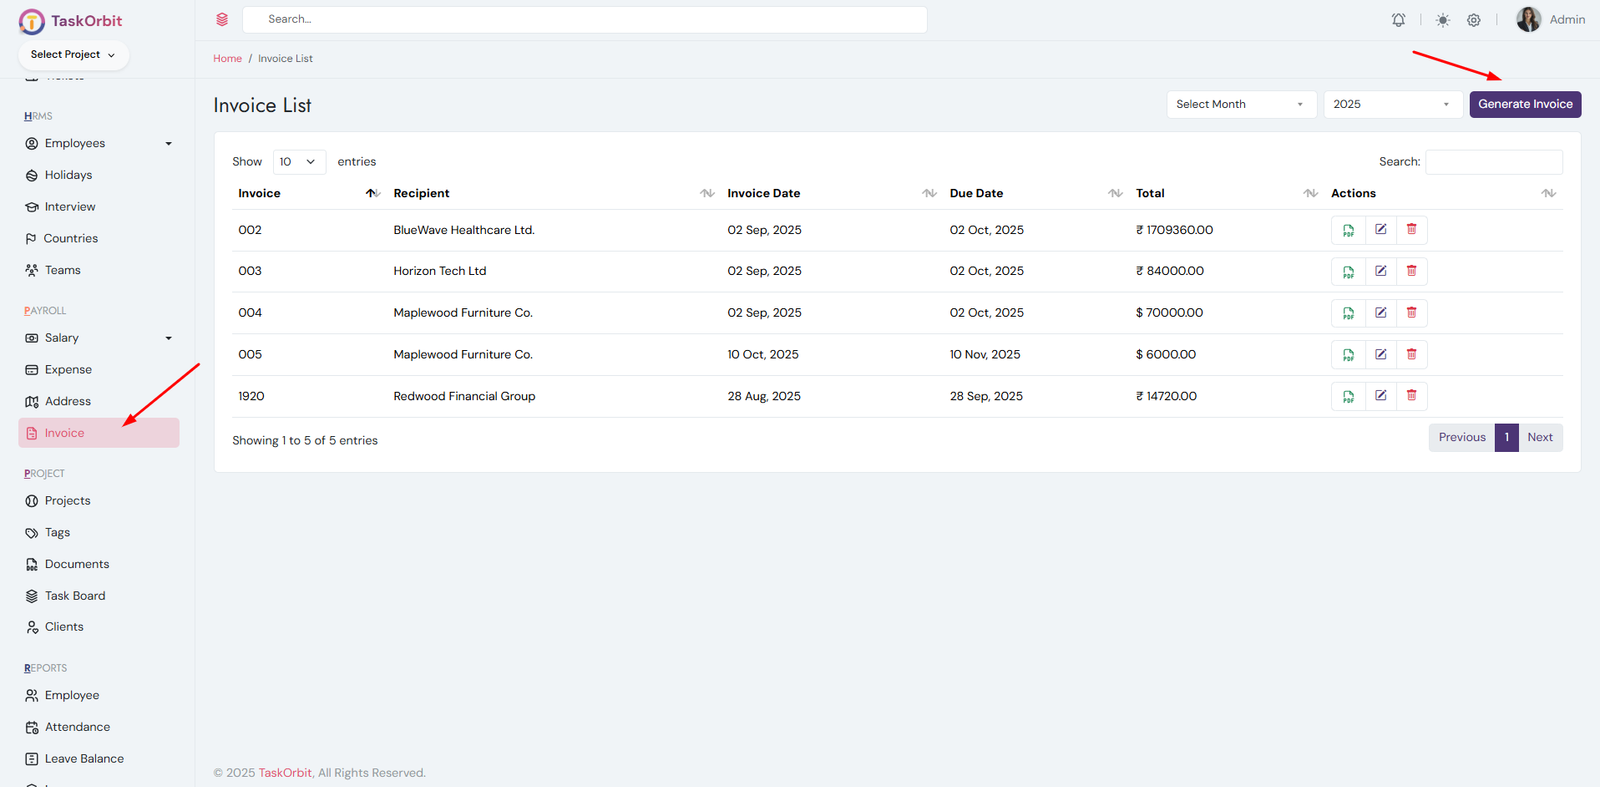
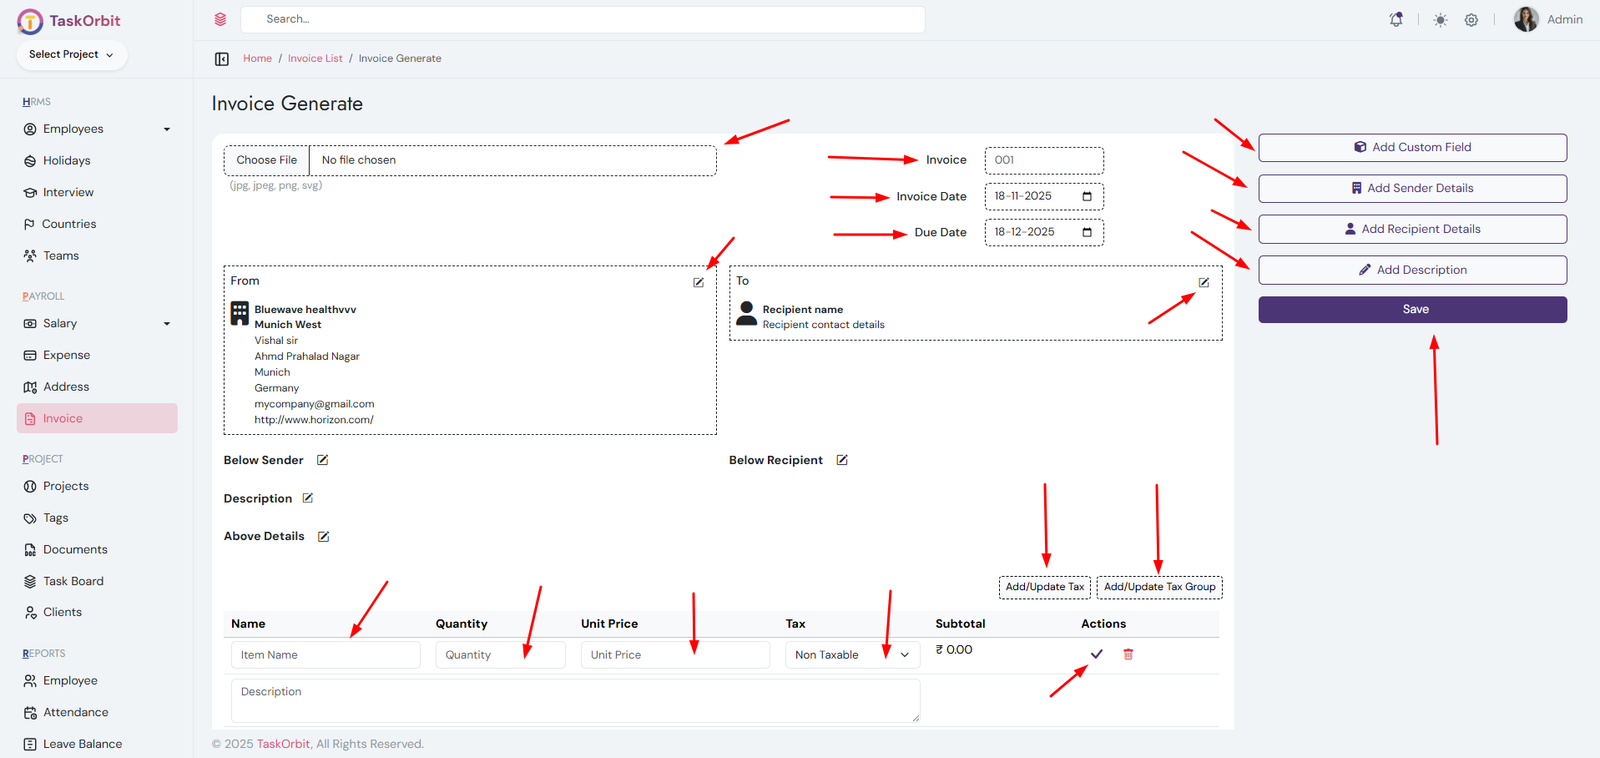
Invoice Management:
- You can manage invoice list here. You can add, edit, update and see the details too.
- You can change taxes for invoice.
-
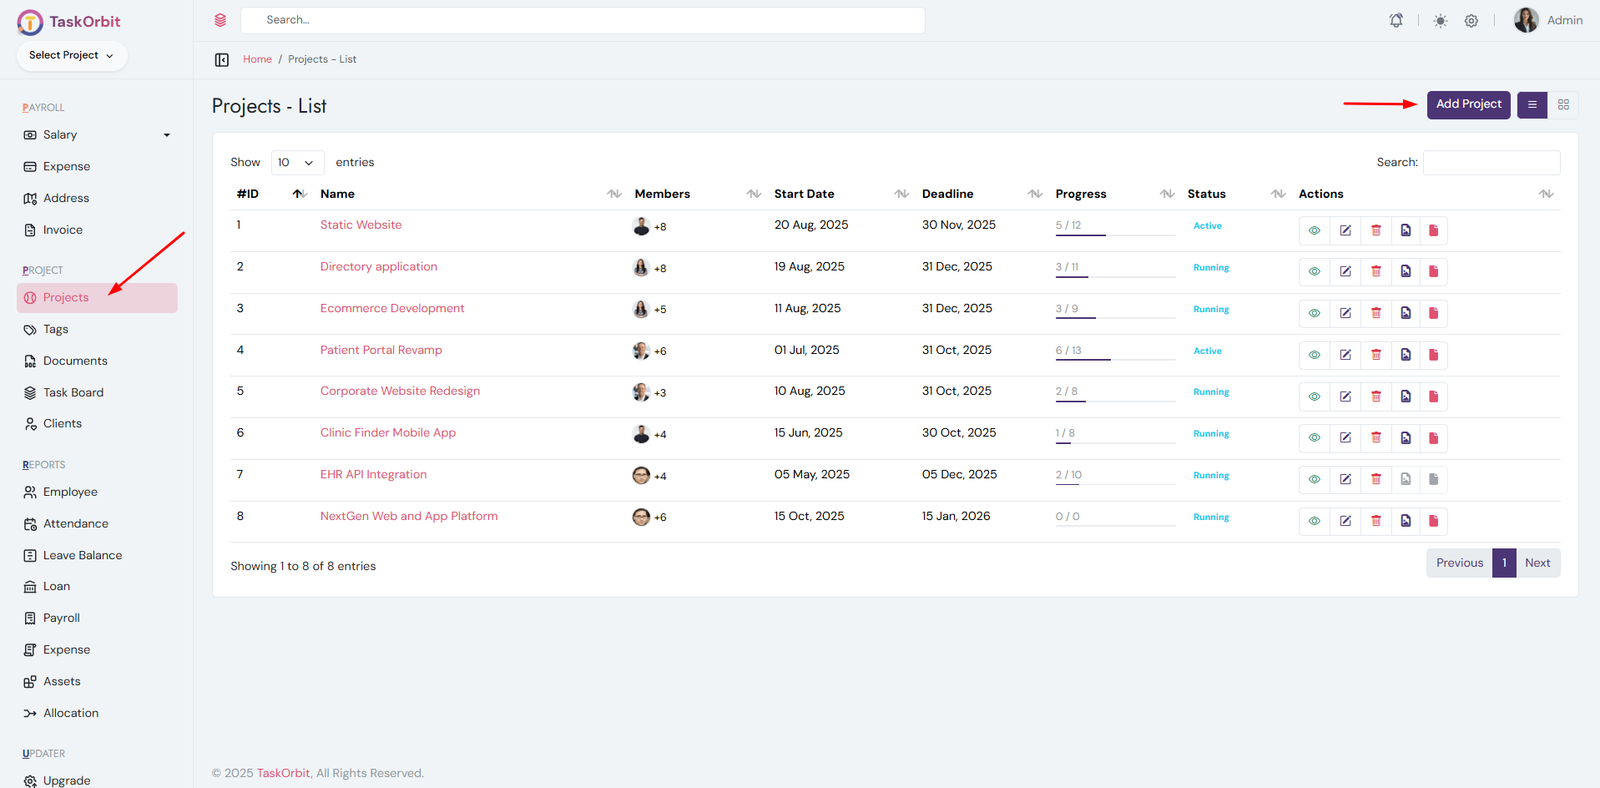
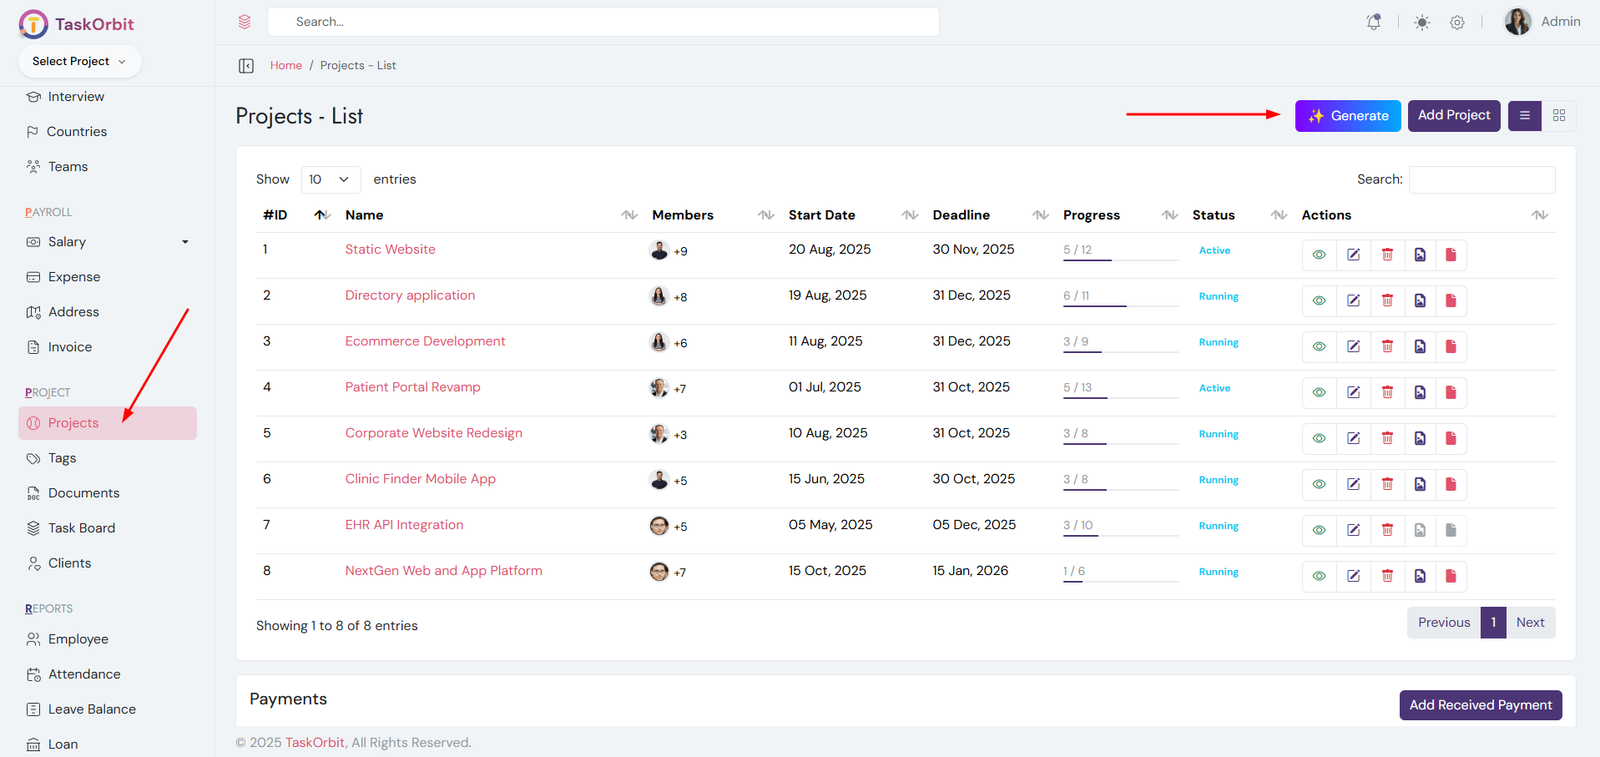
Project Management:
- Manage the list of all projects.
- Add, edit, update, and view project details.
- Change the project status as needed.
- Assign projects to employees who will work on them.
- Each project is assigned to a client.
-
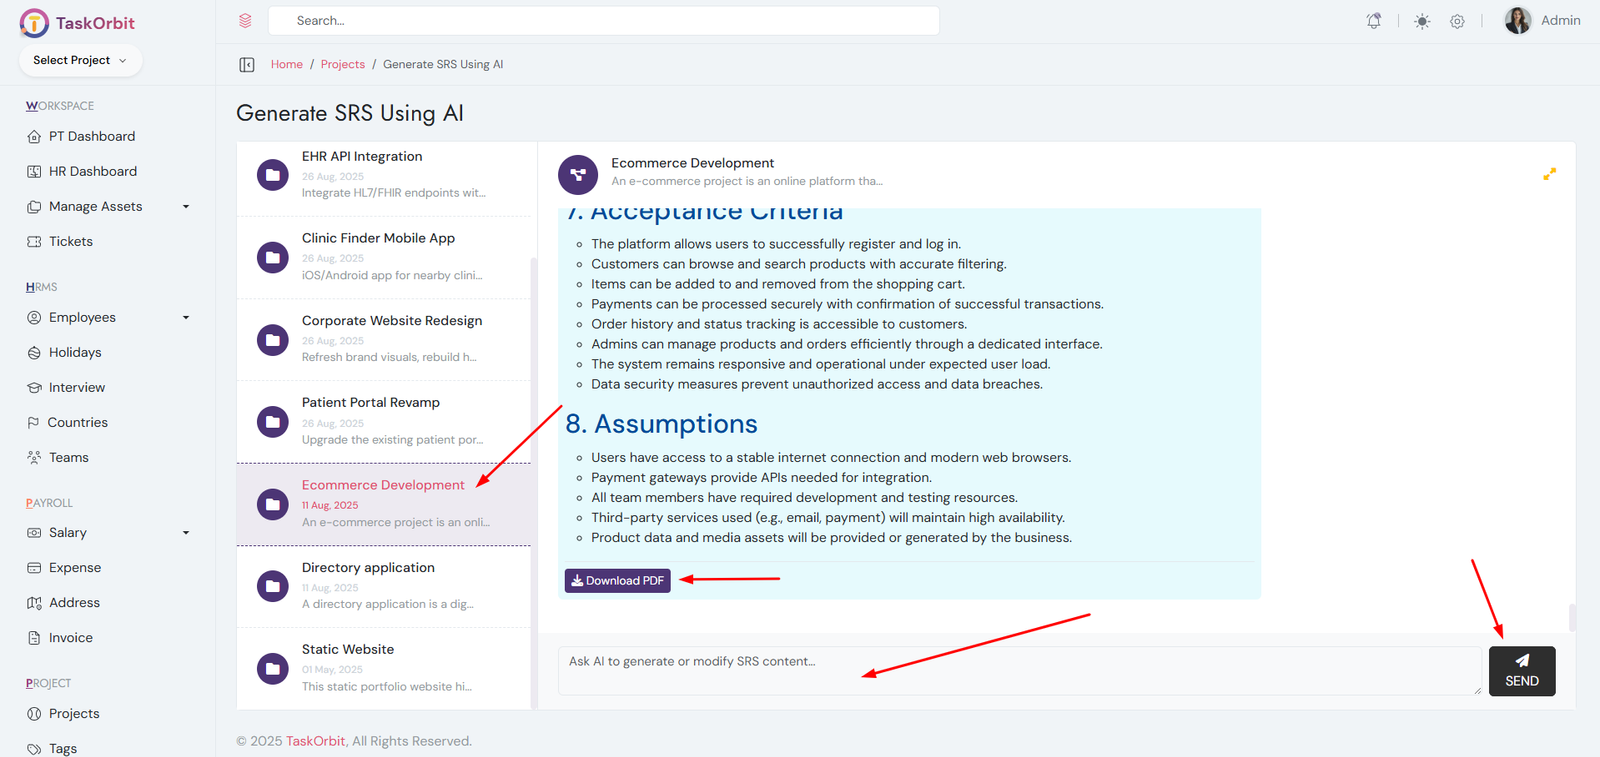
AI-Based SRS Generation
- Go to the list of all projects.
- Click the Generate button located at the top.
- Select the desired project.
- Ask AI to generate the SRS document.
- Download the generated SRS.
-
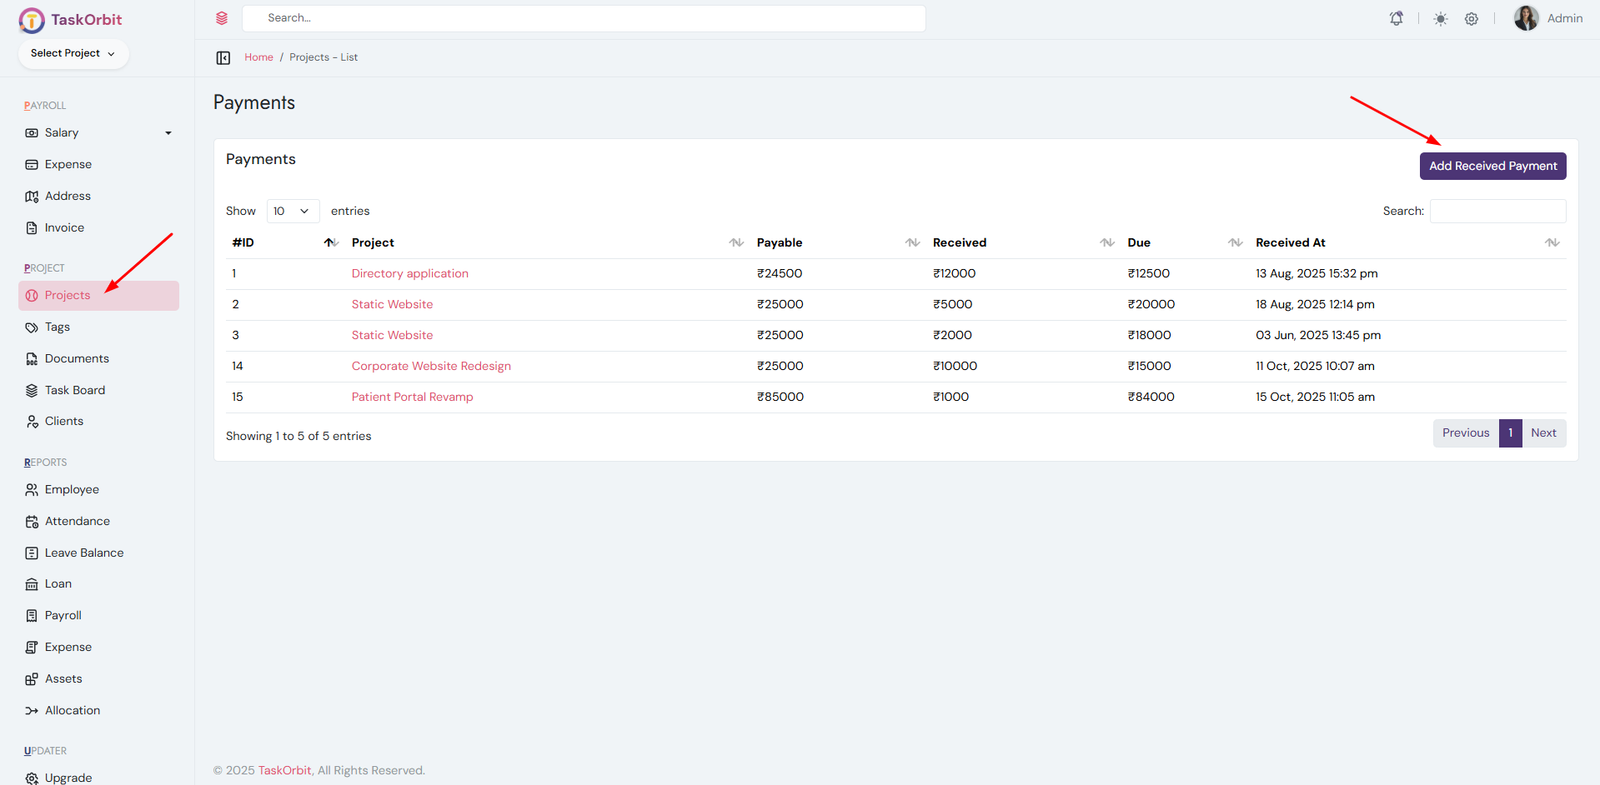
Payments management:
- Manage the list of all payments.
- Add and view payment details.
- Each payment is linked to a specific project.
-
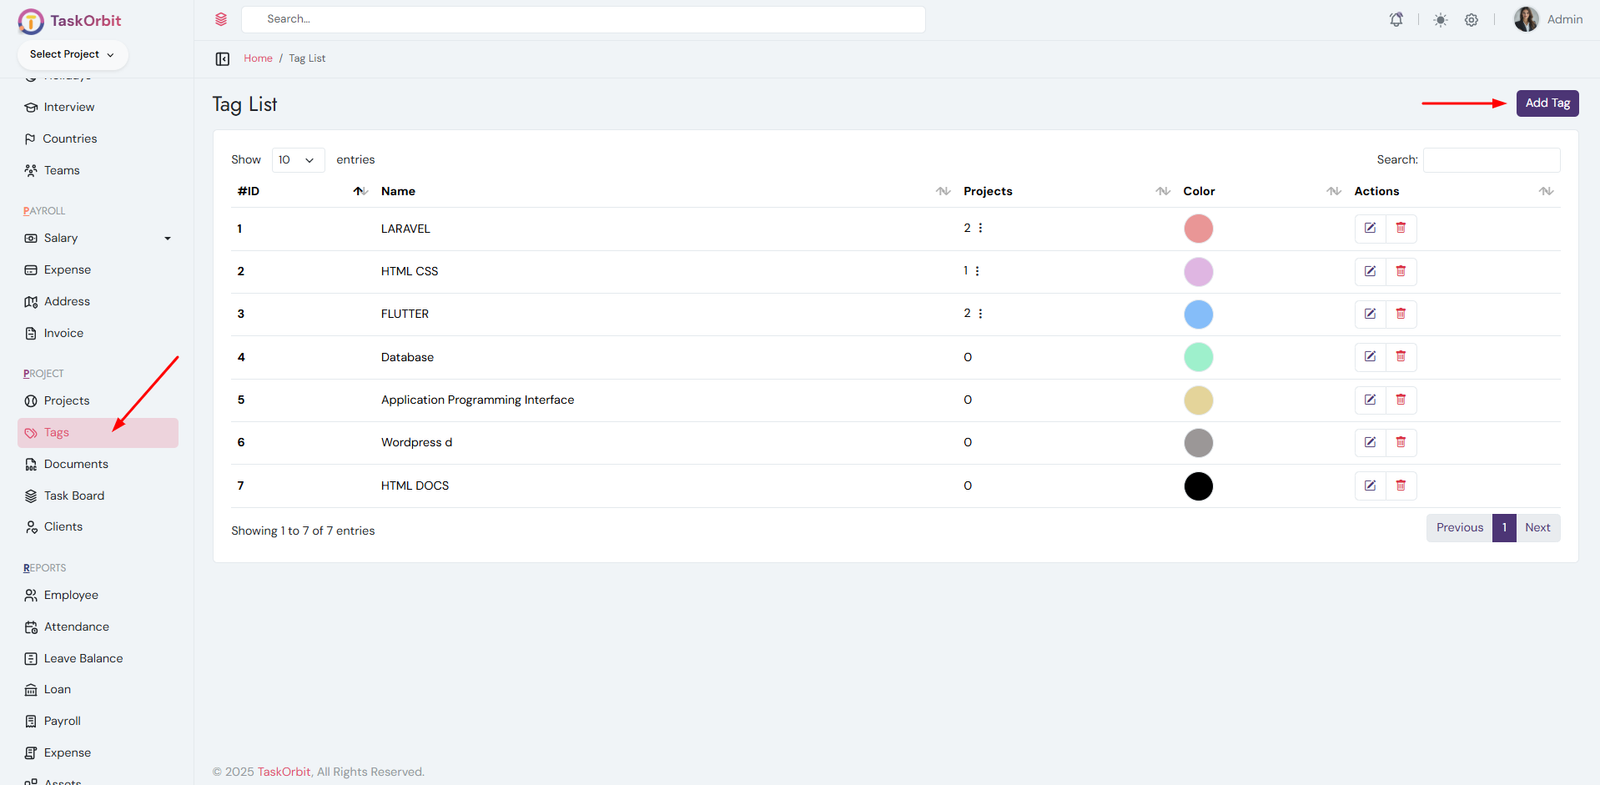
Tags management:
- Manage the list of all tags.
- Add, edit, update, delete and view tag details.
- Tags help categorize and organize projects.
-
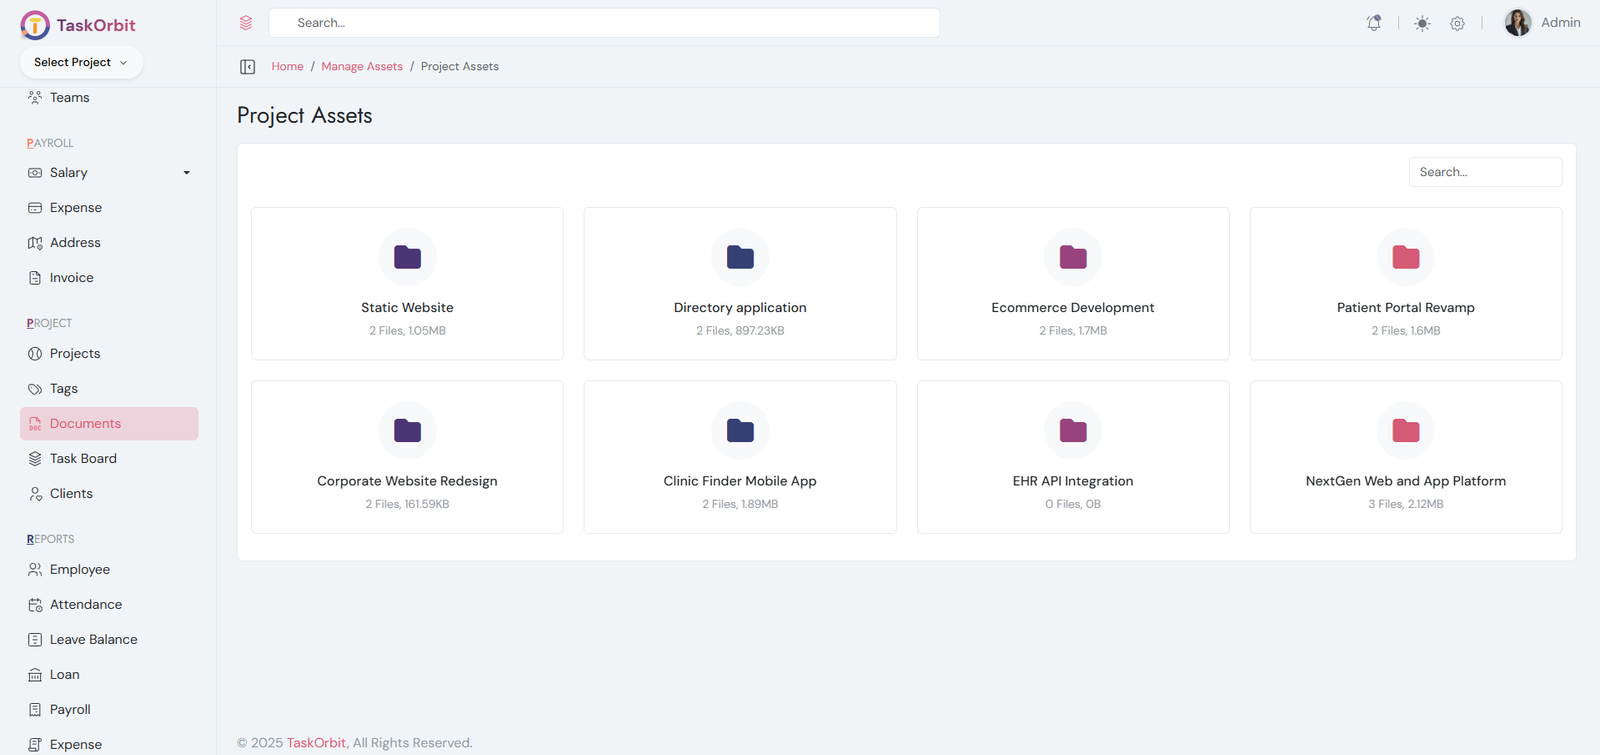
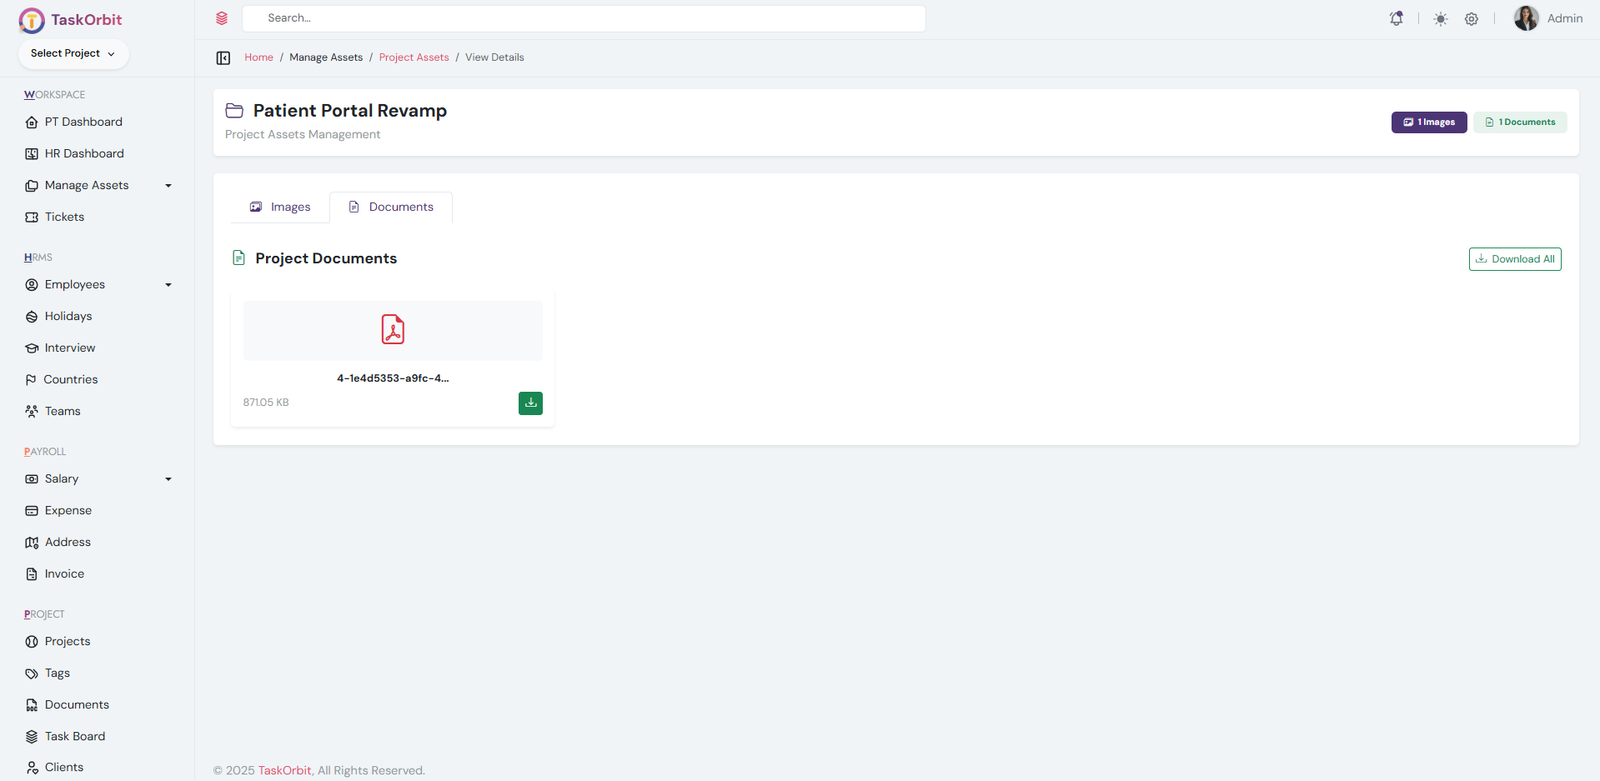
Project Assets:
- List of all project assets.
- Project assets are files or resources linked to specific projects.
- Each project can have multiple assets. you can download and view them.
-
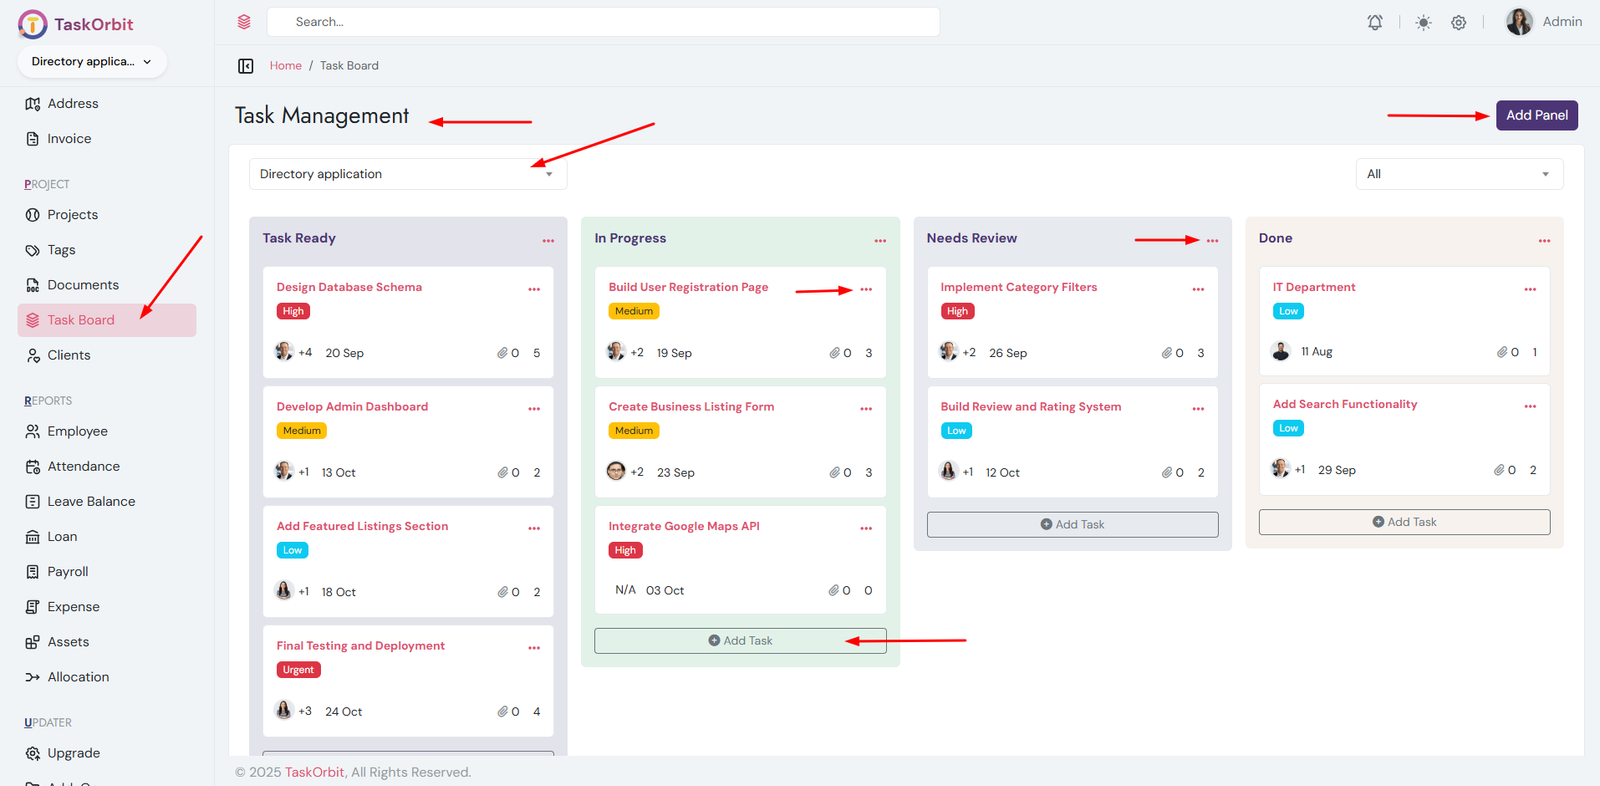
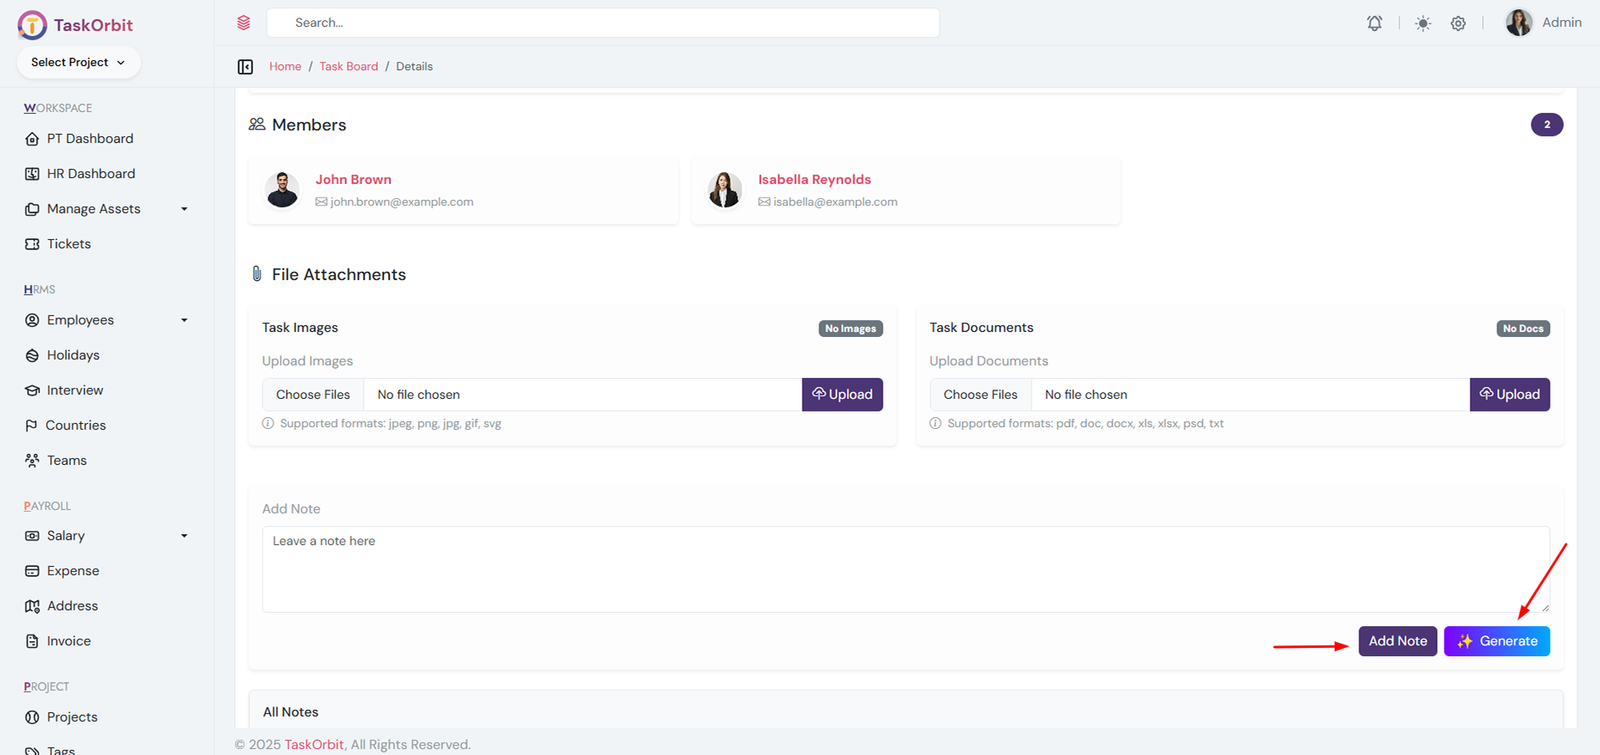
Task Management:
- Manage the list of all tasks.
- Add, edit, update, delete and view task details.
- Assign tasks to specific projects and employees.
- Create a dedicated panel for assigning tasks efficiently.
- AI Assistance: Click the Generate button in the task conversation area to receive AI-powered smart answers, suggestions, or auto-generated responses.
-
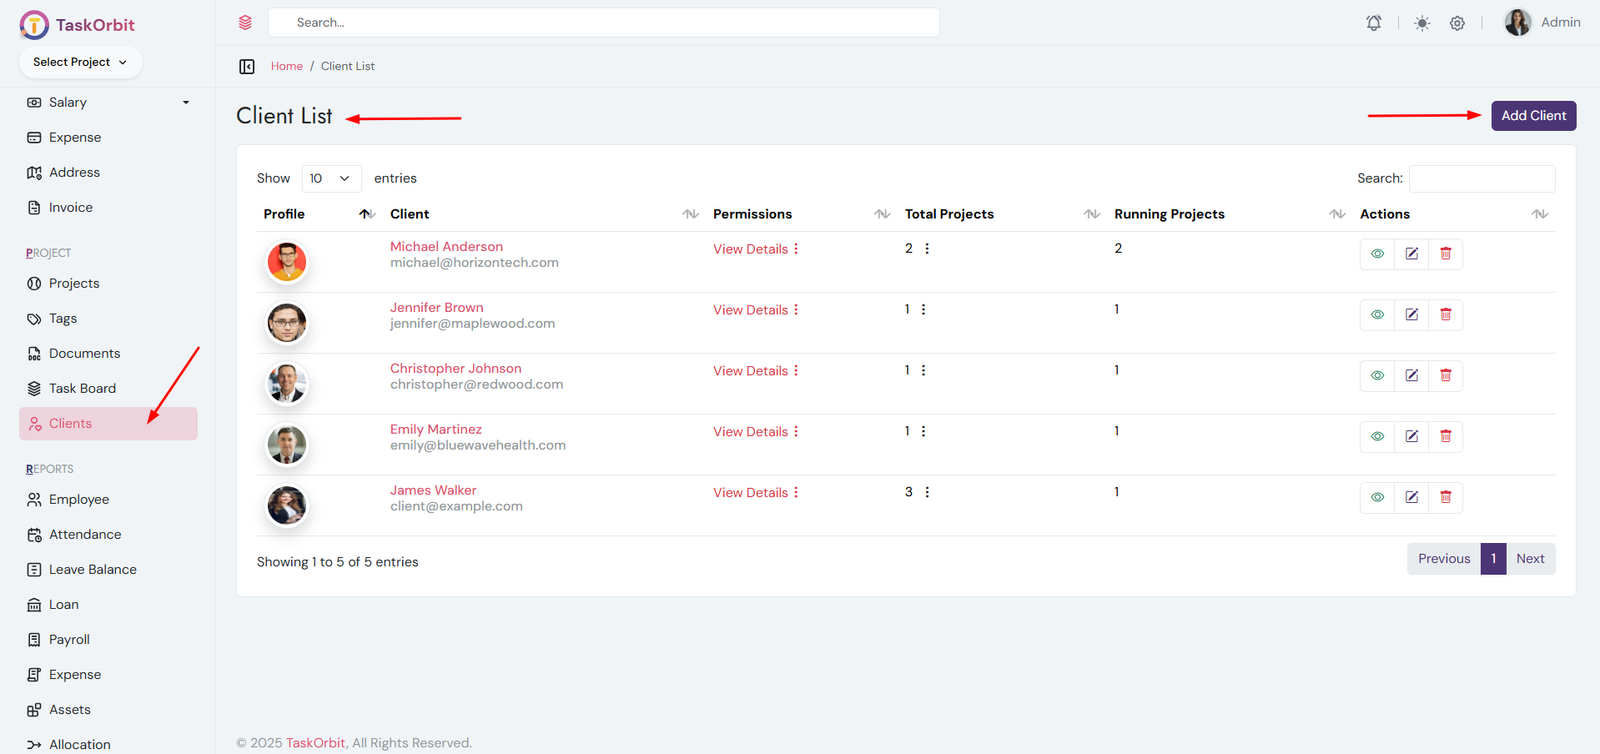
Client Management:
- Manage the list of all clients.
- Add, edit, update, delete and view client details.
-
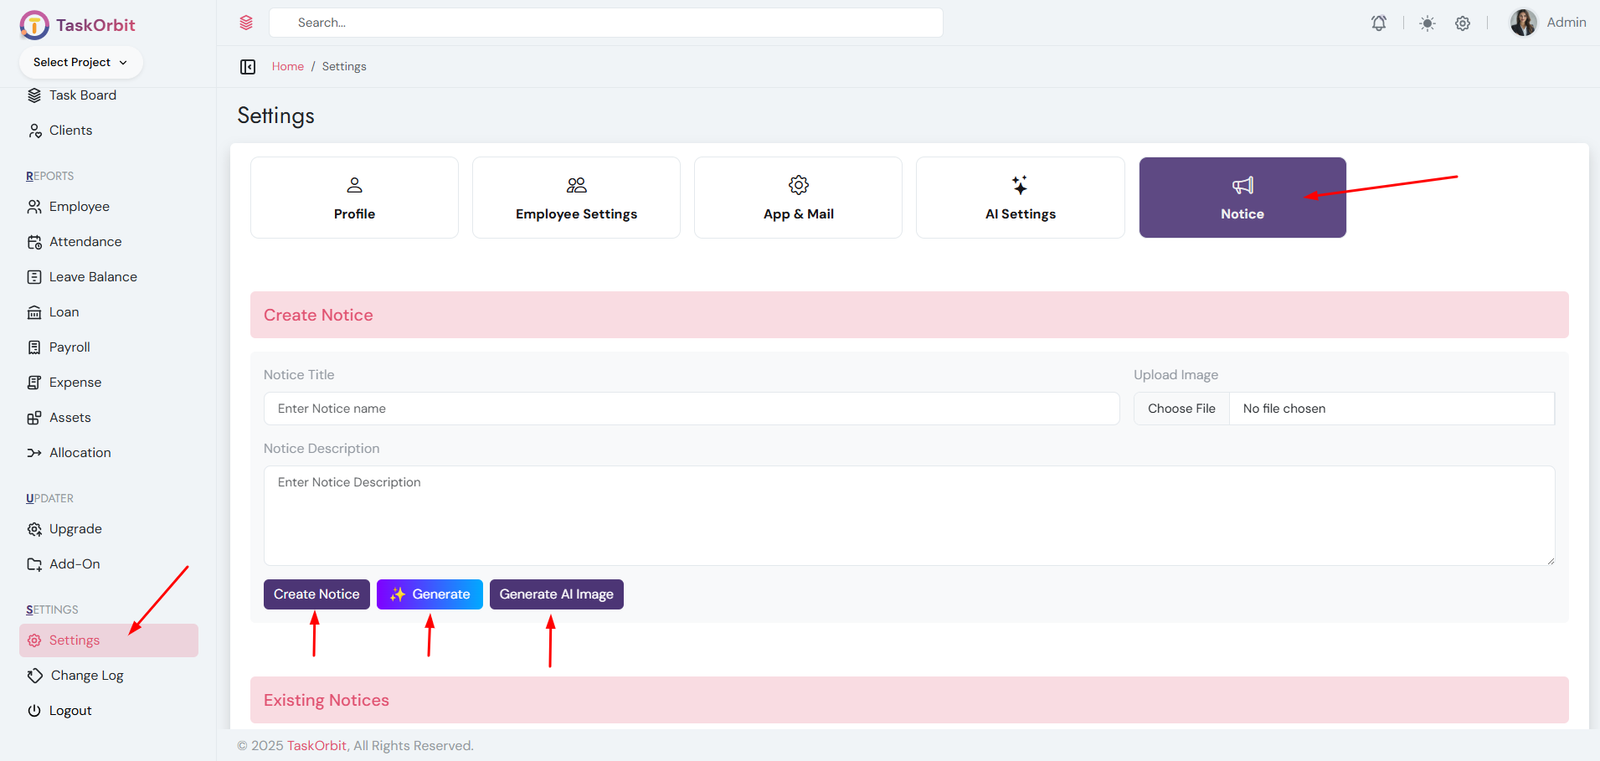
Notice Management:
- Manage the complete list of notices.
- Add, delete, and view notice details.
- AI Text Generation: Click the Generate button to let AI create a professional notice message for you.
- AI Image Generation: Use the Generate AI Image button to automatically create a relevant image for the notice.
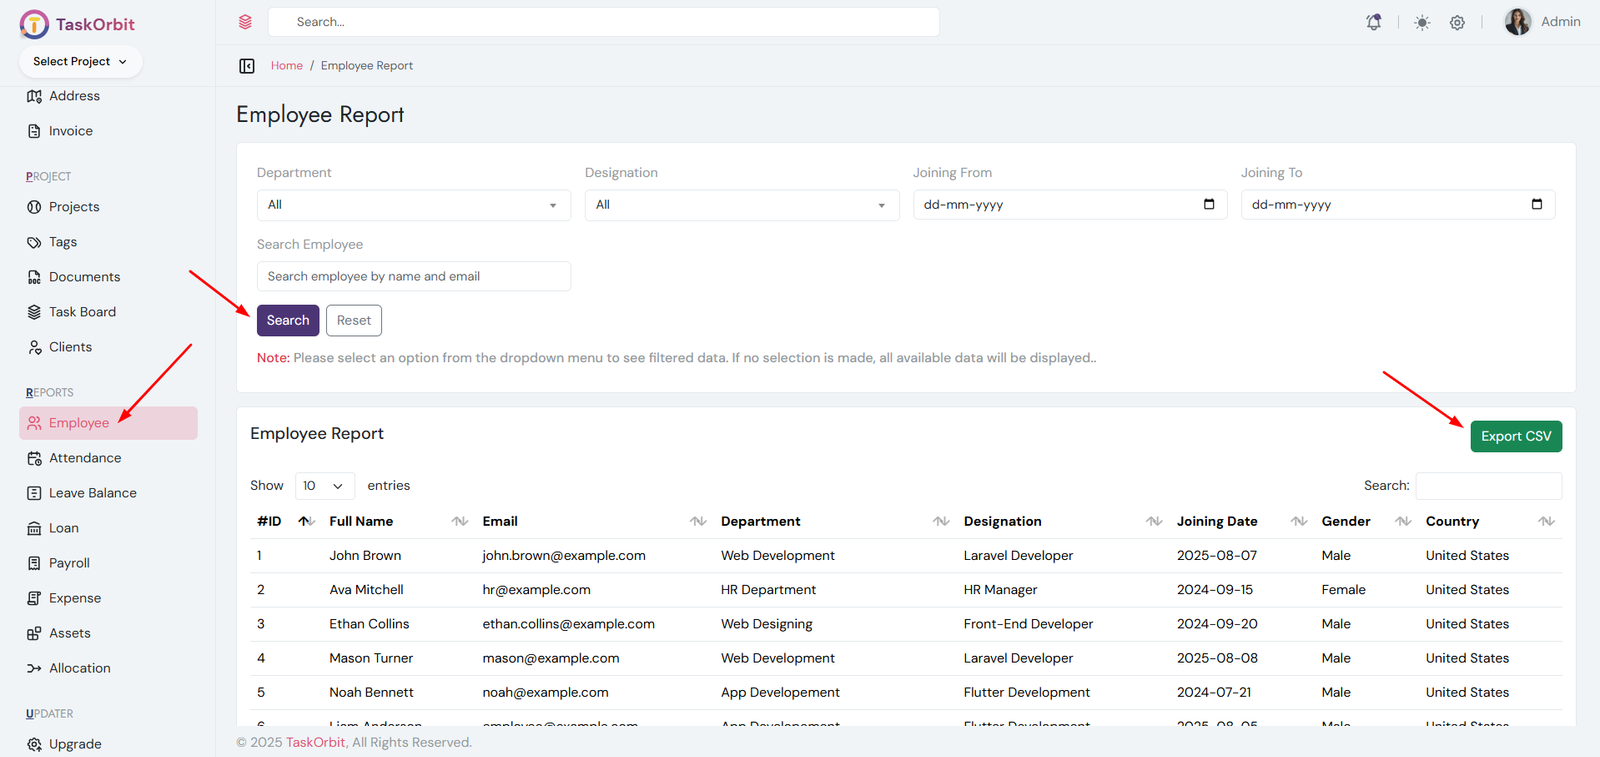
Report Generate:
- Generate reports based on specific criteria.
- Generate reports like employees, attendances, leave balances, loan, payroll, expenses, assets and allocation
- View and download reports in CSV formats.
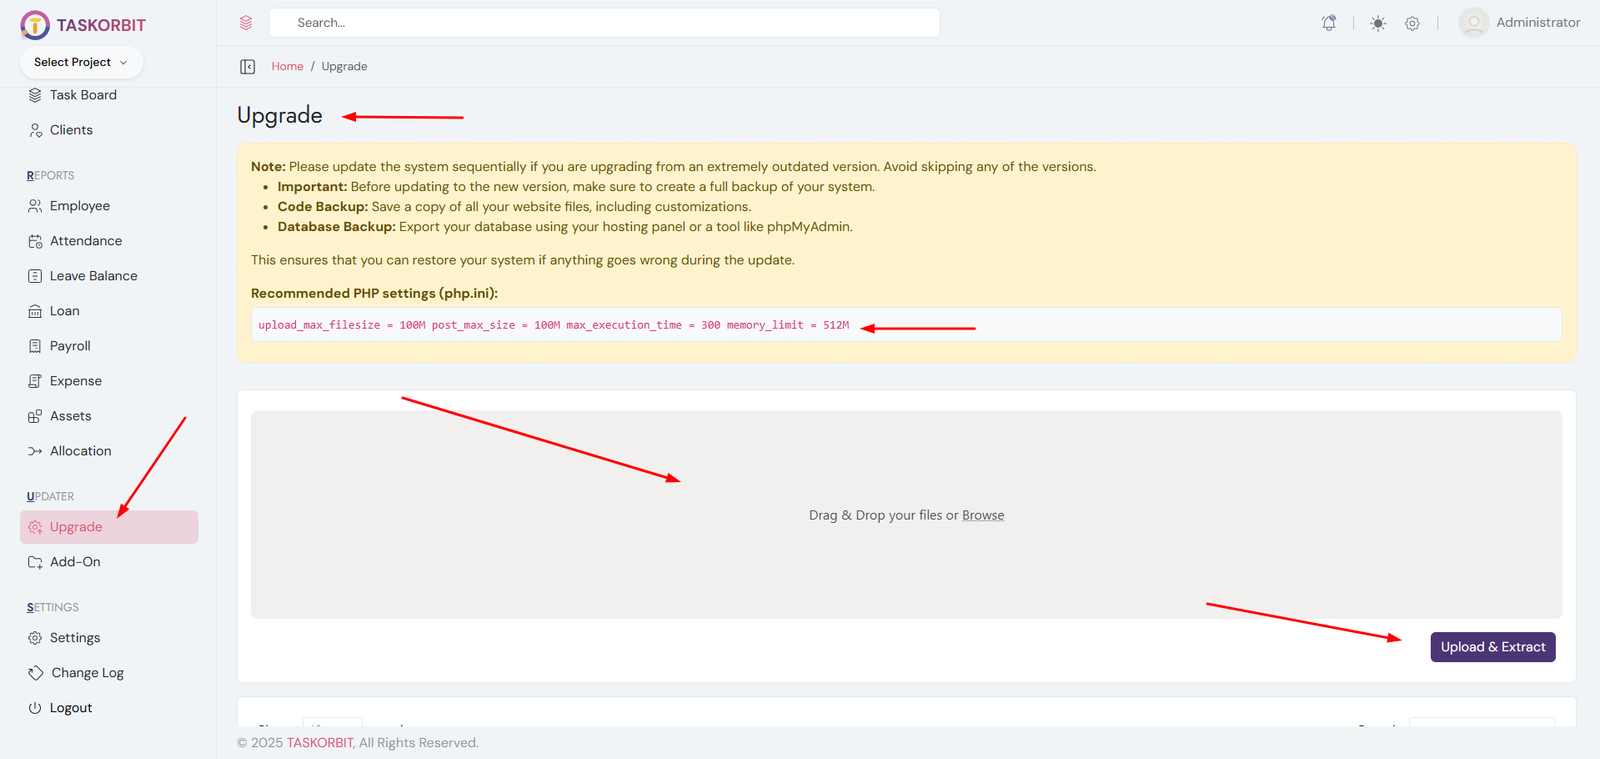
How can I update my web version or admin panel to the most recent version?
Note: Please update the system sequentially if you are upgrading from an extremely outdated version. Avoid skipping any of the versions.
- Important: Before updating to the new version, make sure to create a full backup of your system.
- Code Backup: Save a copy of all your website files, including customizations.
- Database Backup: Export your database using your hosting panel or a tool like phpMyAdmin.
- From the downloaded PHP source code, locate the upgrade from vX.X to vX.X.X.zip file.
- Open http://yourdomain.com/add-on-plugin in your browser.
- Display the most recent version, basic instructions, and an Upload & Extract button.
- Upload the file update.zip.
- Press the Upload & Extract button.
- A popup will appear asking for your Codecanyon purchase code. Please enter a valid purchase code to proceed.
- Once the upload and extraction are complete, click the Import button to finalize the update.
- Congratulations! your software has been successfully upgraded.
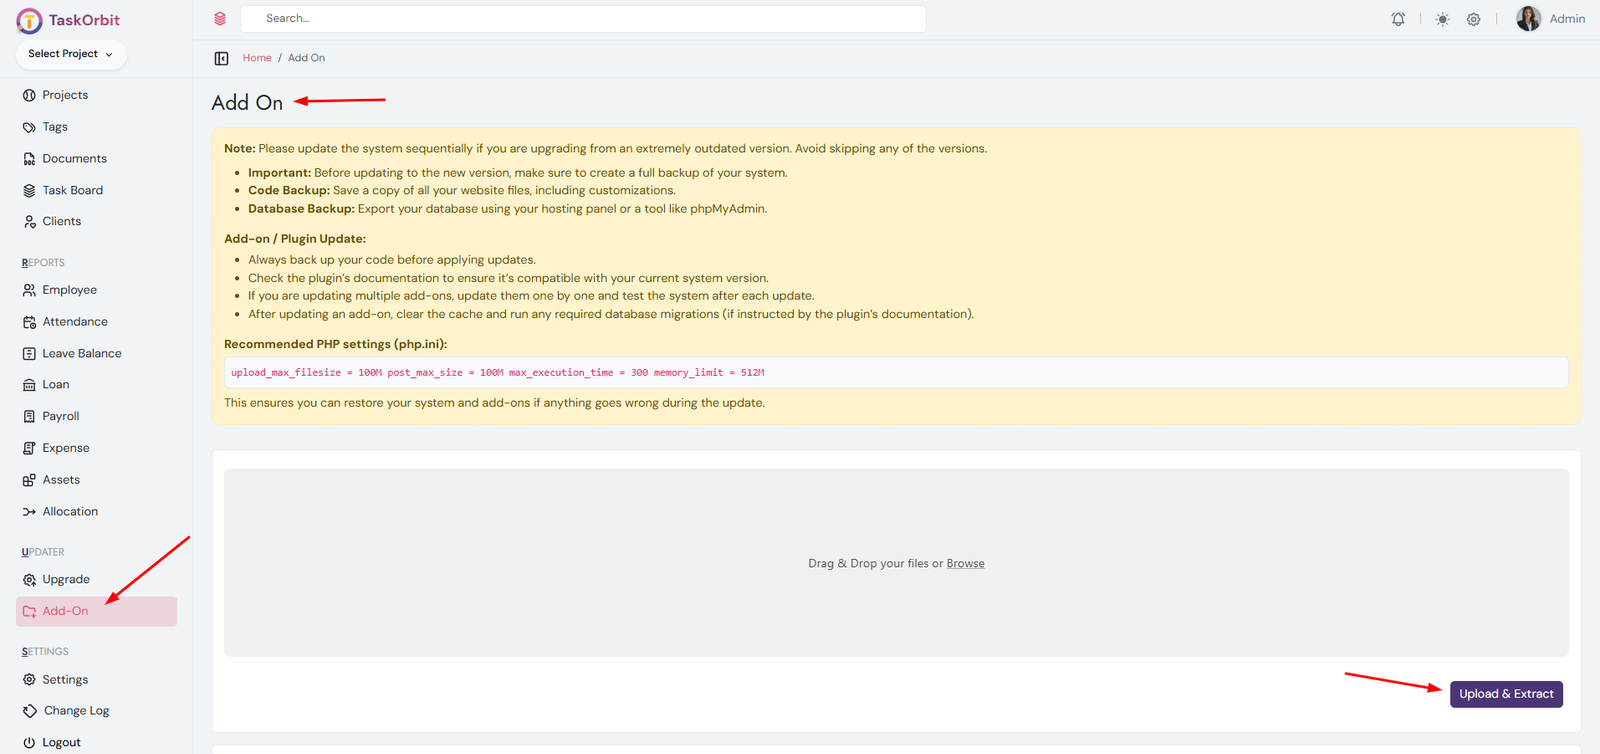
How can I add plugins to my web version or admin panel?
Note: Please update the system sequentially if you are upgrading from an extremely outdated version. Avoid skipping any of the versions.
- Important: Before updating to the new version, make sure to create a full backup of your system.
- Code Backup: Save a copy of all your website files, including customizations.
- Database Backup: Export your database using your hosting panel or a tool like phpMyAdmin.
Add-on / Plugin Update:
- Always back up your code before applying updates.
- Check the plugin’s documentation to ensure it’s compatible with your current system version.
- If you are updating multiple add-ons, update them one by one and test the system after each update.
- After updating an add-on, clear the cache and run any required database migrations (if instructed by the plugin’s documentation).
Recommended PHP settings (php.ini):
    upload_max_filesize = 100M
                                        post_max_size = 100M
                                        max_execution_time = 300
                                        memory_limit = 512M
This ensures you can restore your system and add-ons if anything goes wrong during the update.
- Download the plugin source code from your account or marketplace.
- Open http://yourdomain.com/add-on-plugin in your browser.
- Upload the file plugin.zip.
- Press the Upload & Extract button.
- A popup will appear asking for your Codecanyon purchase code. Please enter a valid purchase code to proceed.
- Once the upload and extraction are complete, click the Import button to finalize the update.
- Congratulations! The plugin has been successfully installed and added to your system.
v1.0.0
20 November 2025Initial Release of TaskOrbit - Complete HRMS with Payroll & Project Management Suite in Laravel
- Comprehensive HR Suite – Covers employee, department, attendance, leave, and payroll management.
- Project & Task Management – Boosts productivity with integrated project, task, and team tracking tools.
- Recruitment & Appraisal Tools – Streamlines hiring, interviews, and performance evaluations.
- Role-Based Access Control – Ensures secure and customized access for admins, managers, and employees.
- Shift & Holiday Scheduling – Simplifies workforce planning with flexible shift and holiday management.
- Loan & Payroll Automation – Automates salary calculations, deductions, and loan tracking.
- Client & Ticket Management – Improves client communication and internal support efficiency.
- Interactive Reports & Analytics – Generates detailed reports with CSV export for decision-making.
- Modern & Responsive UI – Clean, user-friendly interface that adapts to all devices.
- Version & Update Management – Keeps your HRMS secure and up to date with structured version control.
- AI-Powered Automation – Includes AI-based project SRS creation, employee CV generation, job descriptions, automated ticket replies, and notice drafting.
This application is built using open-source technologies. Full credit goes to the respective authors and open-source communities.
- Laravel Framework – https://laravel.com
- Bootstrap – https://getbootstrap.com
- jQuery – https://jquery.com
- DataTables – https://datatables.net
- Font Awesome Icons – https://fontawesome.com
- Google Fonts – https://fonts.google.com
All third-party libraries listed above are used under their respective open-source licenses. No paid or copyrighted assets are distributed with this product.
We are here to help!
Email: support@pixelwibes.com
Expected response time: 24–48 hours
Customizations are not included.
Support does not include custom development, server configuration, or third-party service issues.